Improve Your Technique With This Epic Sweeping Arpeggios Exercise from Guitar Control instructor Darrin Goodman. Be sure to click on the link for the tabs so you can easily follow along.
Introduction
Hey everybody how’s it going? This is Darrin with GuitarControl.com bringing you this video lesson. Today I want to show you a little sweeping arpeggios exercise that you can use it to follow over the top of a chord progression. So I’m doing this in E minor but this is a movable shape so you can just move it around to whatever key that you want to play it in. So be sure to click on the link in the description for the tabs and let’s get close up and take a look.
Sweeping Arpeggios
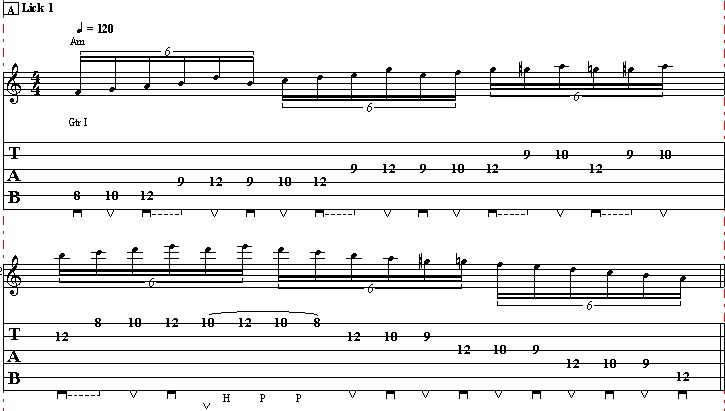
All right so we’re starting off the chord progression would be you’d have two measures of E minor, one measure C major, one measure of D major, and then back to E minor again.
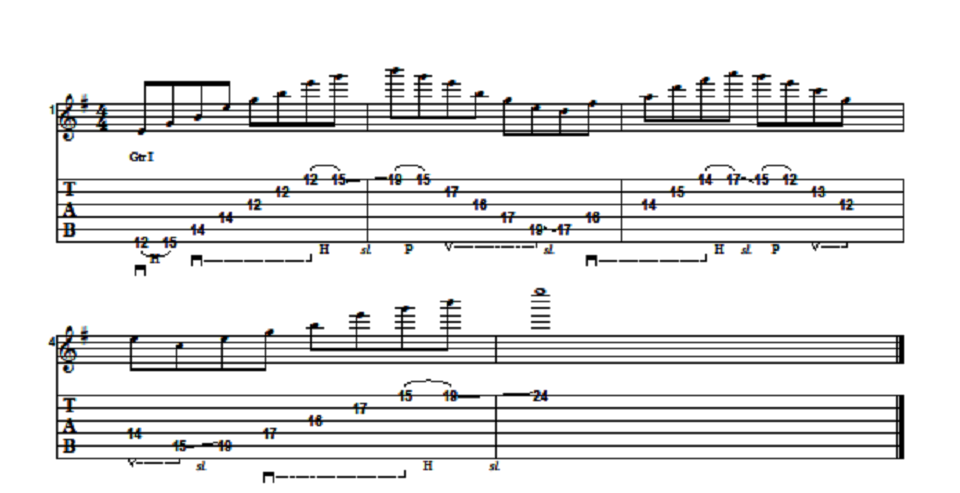
So we start off, we’ve got this first arpeggio shape here that uses all six strings. So I’m starting off here, I’ve got my first finger on the 12th fret because that’s the low E, we’re starting on E minor. So I’m going to pick that and then I do a hammer-on to the 15th fret with my fourth finger and then from there I go to the 14th fret of the A string with my third finger and then roll that up to the 14th fret of the D string. Then I go from there to the 12th fret of the G string with my first finger and roll up to the 12th fret of the B string and then roll up to the 12th fret of the high E and then a hammer-on to the 15th fret of the high E with my fourth finger. And then from there, we slide up to the 19th fret, so that was the first measure of E minor. So now we’re sliding up here and your fourth finger will end up on the 19th fret and your first finger you want it to land simultaneously at the 15th fret because now we’re going to do a five-string E minor arpeggio. So after we slide up we do a pull-off to that 15, then we go to the B string 17th fret with your middle finger to the 16th fret of the G string with your first finger back to the 17th fret on the D string and then finally to the 19th fret on the A string, which is another E. Then from there we slide down a whole step to the 17th fret and now we’re gonna D major.
So this is another five-string arpeggio, so we’re 17 on the A string to 16 on the D string to 14 on the G string, 15 on the B string, 14 on the high E, and then 17, so when you get up to there, that’s going to be a hammer-on and now we just take this shape and we slide it down a whole step so now our fourth finger is on the 15th fret and our first finger is on the 12th fret and it’s that same arpeggio shape and now we’re just going to do a descending. So we pull off 15 to 12 to 13 on the B string to 12 on the G string to 14 on the D string to 15 on the A string and then we slide that up to the 19th fret and now we’re going to take that E minor shape that we did there before and we’re going to ascend it. So 19 on the A string, 17 on the D string 16 on the G string 17, on the B string, 15 on the high E, and hammer to the 19th fret and then slide up to the 22nd fret, I just do that to make it resolve, so if your guitar does not have 24 frets, another way that you could do that is just going to the 22nd fret and bend it up a whole step.
So I did a lesson just recently that went over these five-string arpeggios and even had some tapping and stuff in there, so you might want to check that out so that way you can learn these shapes better and you can add some more you to it by maybe combining the two licks together, so I’ll just leave a link for that video right here.
All right so that whole sequence again… just like that.
Picking Technique
All right so then for your right hand, for your picking hand and I go into a lot more detail on this on that lesson that I talked about just a second ago, so I really recommend that you check that out, but the idea here is that when you do an arpeggio like this you don’t want it to be a bunch of individual down strokes or individual up strokes, you want it to be a long continuous down stroke and then a long continuous upstroke. So see how I pick the sixth string here and then I just let the pick come to a rest on the next string instead of having a bunch of separate little pick strokes like that. So the same thing with the other shapes, you just want it to be one long continuous pick stroke like that.
Conclusion
Alright, so I hope you enjoyed that and got something out of it. If you like the video give me a thumbs up. Leave a comment down below if there’s anything that you would like to see covered in a future lesson on the channel by either myself or one of the other instructors. Be sure to subscribe to the channel and click the notification bell so that way you get notified when we upload new content and you don’t miss out on anything. All right so that’s all I’ve got for you today, thanks for watching, and have a great day.