Guitar Control presents instructor Darrin Goodman with another, always free, lesson. Today Darrin teaches a continuation from the last lesson on the Pentatonic scale pattern. This time with an uncommon minor pentatonic scale pattern that will give you remarkable improvement. Be sure to click the link for the free tabs so you can easily follow along with this remarkable pentatonic scale lesson.
Overview
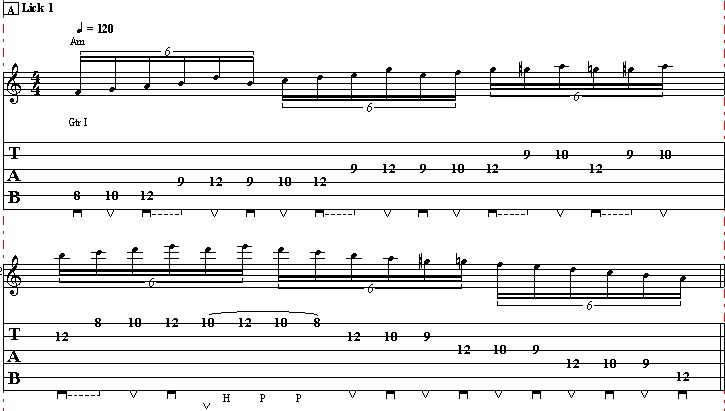
Hey everybody how’s it going? This is Darrin with GuitarControl.com bringing you this video lesson and today I want to do a slight continuation from my last lesson on the minor pentatonic scale. So what I want to show you how to get Remarkable Improvement From This Uncommon minor pentatonic Scale lesson. So you may have heard of the five positions of the pentatonic scale, this is not that per se. So what this is it’s a sequence that’s the same notes in the sequence that we did last time but they’re just arranged differently. So instead of being in a box pattern that’s going vertically across the fretboard, this is more stretched out to kind of go horizontally across the fretboard and you’re playing the same notes, but since they’re arranged differently it will cause you to play this uncommon pentatonic scale differently. I’ll use this uncommon pentatonic scale pattern if I’m doing things with slides and stuff like that because it’s not just two notes per string and some of the strings have three notes. So anyhow it’ll make a lot more sense when we go over it so be sure to click on the link down below to get the tabs and let’s get close up and take a look at this remarkable uncommon pentatonic scale pattern sequence.
Ascending Scale Pattern
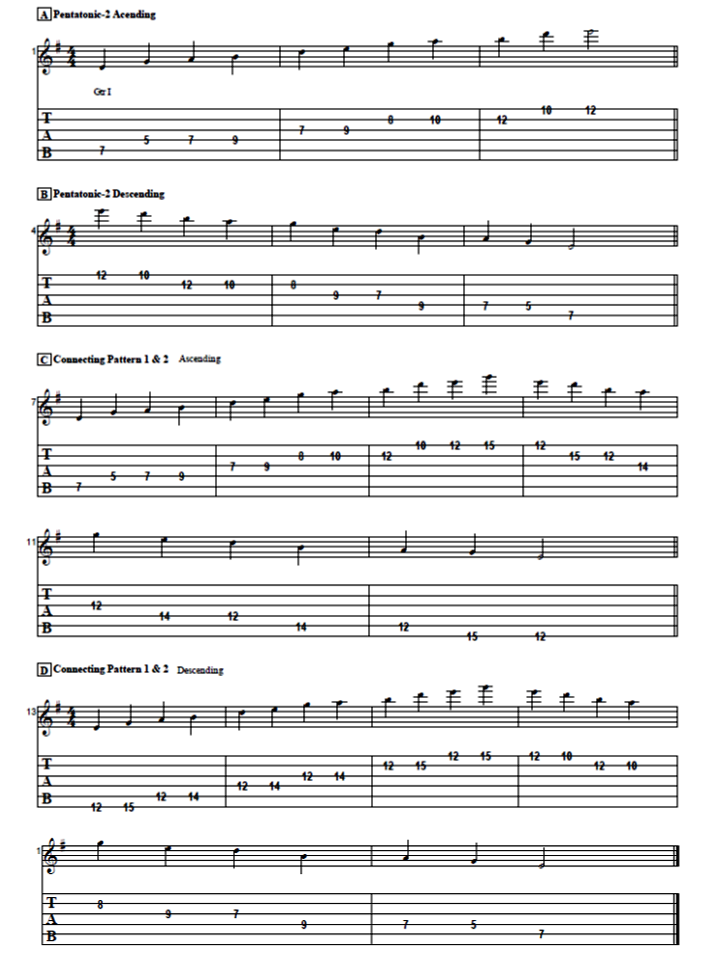
All right, so we’re going to do this in the key of E minor so that way it stays the same as what we were doing in the last lesson. So in the last lesson, we did minor pentatonic pattern number one so we started where an E is on the 12th fret; so now for this uncommon minor pentatonic scale pattern we’re going to start on E, but we’re going to start on E on the seventh fret of the A string. So the ascending scale pattern starts there with your third finger and then from there we go to the fifth fret of the fourth string with your first finger. Then the seventh fret of the fourth string with your third finger and then the ninth fret with your third finger. Now from there, we go to the G string seventh fret first finger to the ninth fret with your third finger. So far same notes as is over here but we’re arranging it differently.
All right, so once we get to the third-string or when we’re going to go, we’re going to transition from there to the B string we’re going you have to shift up a half step; so you always have to when you’re going from the G string to the B string since it’s tuned a half step lower, you have to compensate for that and go up a half step. So we ended on the G string on the seventh to the ninth fret, so then the first note that’s on the B string is on the eighth fret so you’re going to want to use your first finger and then from there we go to the 10th fret with your third finger and then the 12th fret with your third finger and then to the 10th fret of the high E with your first finger and then finally ending on the 12th fret of the high E. So you’re gonna do this entire sequence just with your first and third fingers, but there will be times that you do certain licks that you might use other fingers, but for just practicing the minor pentatonic scale ascending, this is the way I recommend to do it; so again starting here on the seventh fret of the A string.
Now a couple of things to kind of help you to remember this is that the root note is on the fifth string, the A string, we don’t play the low E at all, so there is just a single note and then the next string has three notes and the next string has two and the next one has three and the next has two. So if you just remember that it’s a pattern of three notes then two notes then three notes then two notes. Okay so these are the fingerings that I gave you for when we ascend it, so ascending starting here again on the seventh fret of the A string third finger going to the D string first third, third going to the G string, first third going to the B string first third, third going to the high E first third.
Descending Scale Pattern
Now when we descend this uncommon pattern, the fingering changes slightly, so now I’m starting at the 12th fret on the high E with my third finger to the 10th with my first. Now to the B string third finger twelfth fret, first finger tenth and now this is a string that has three notes, so now we’re going to move down to the eighth fret, we’re going to use our first finger, so ascending you use your third to go up, but descending you use your first to go down and that’s just so it puts your fingers in the more natural position to continue on with the scale. Then from there we go to the ninth fret of the G string, so again we’re having that half step compensation for the second string being tuned a half step lower, so that’s nine seven and we go to the D string, nine seven, three notes on this one so now our first finger is going to go back to the fifth fret and then finally ending on the seventh fret of the A string.
Connecting Both Patterns Together
All right, so one other thing I want to show you with is how you can hook this remarkable pattern to the pattern that we did last time. You can connect them together so you can cover a larger area of the fretboard. So how that works is we start with pattern number two here and we’re starting at the seventh fret on the A string because we’re in the key of E, but again this shape is movable so it doesn’t matter what key you’re in it’s always going to be the same sequence. So we play this scale and ascend it all the way to the top and end here on the 12th fret, so when you ascend scale pattern 2 the last note you get to is where your first finger will play for scale pattern number one.
So remember scale pattern number one your first finger plays all of the same fret, in this case when you get up here is just shift up to the second note on the high E in scale pattern number one, which in this case is the 15th fret and then that’ll leave your first finger here on 12 where we end in pattern two and then just descend scale pattern one. So the whole sequence is like this. So after you can do it that way then you want to practice it the opposite way, so start with minor pentatonic scale pattern two and ascend it, the note that your first finger is on is the last note of scale pattern two, so put your third finger there and descend scale pattern two so what you want to do is practice it ascending and descending. So what we’ve done there is we’re in the key of E and we’ve went from the fifth fret all the way to the 15th fret, so we’ve covered a pretty good chunk of the fretboard just by knowing two remarkable pentatonic scale patterns.
In a future lesson I will do some licks and stuff that are based off of both of these pentatonic patterns and how you can kind of hook them together and stuff.
Conclusion
All right so I hope that you found that informative and useful. If you liked the video Remarkable Improvement From This Uncommon Pentatonic Scale pattern, be sure to give me a thumbs up and leave a comment if there’s like something you’d like to see covered in a future lesson by myself or one of the other instructors at GuitarControl.com. Anyway thanks for watching and have a great day.