How to Play Paying the Cost to Be the Boss
In this Guitar Control video lesson instructor Jon McLennan, is going to show you how to play “Paying the Cost to Be the Boss” by B.B. King. This song is full of tons of classic B.B. King licks. Jon is going to breakdown the whole intro solo to this song and show you how to play the rhythm as well so that you can play through this entire song. The recording to reference for this video is, “The Best of B. B. King”

Step 1: The Intro Solo
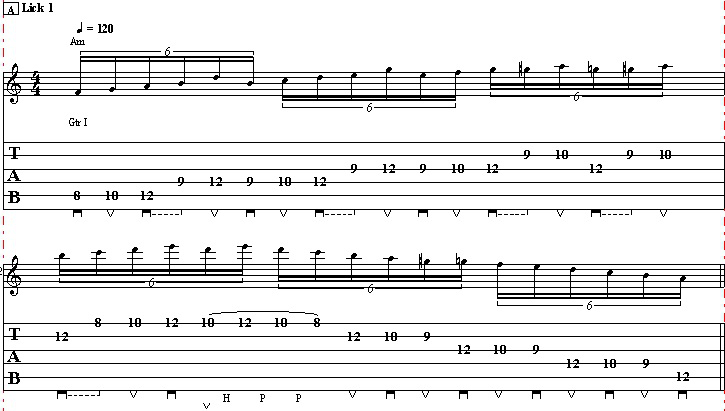
The first step in learning how to play “Paying the Cost to Be the Boss”, is figuring out this Intro solo! Start with your first finger on the 7th fret 2nd string. Then pick the 9th fret 2nd string holding it down with your ring finger, pick each of these notes once. Then go to the 7th fret 1st string with your first finger and pick this note once, straight into a full step bend on the 7th fret 1st string. And that is phrase one. The rhythm is all triplets starting on beat 4. The second phrase starts on the 9th fret 1st string with a full step bend. It is a bend release which means you go up and down. When you bring this bend down you are going to pull off to the 7th fret also on the 1st string. Then go to the 9th fret 2nd string and then back to the 7th fret 1st string, and then back to the 9th fret 1st string, playing that last note very light. Sometimes John is even just touching the note without picking it, kind of like a hammer-on.
He considers this note to be a ghost note, which means it’s just purely feel, not based on timing or anything. At about the 2:40 minute mark, B.B. does a very common B.B. lick! He is going to play the root on the 1st string and then he’ll play the root on the 2nd string. It’s the same note but the timbre does change. It gets a little fatter sounding because you are now on a thicker string even though it is the same note. He is obviously not only play roots but two similar licks using different options for the same note.
Freddie King did this a lot, too! So starting by picking the 7th fret 2nd string, to the 7th fret 1st string back to the 7th fret 2nd string, back to the 7th fret 1st string, which is a B and then jumping the the B on the 12th fret 2nd string and picking this B. So picking both of those B’s back to back but different voicing. Then to the 10th fret 1st string, back to the 12th fret 2nd string.
Now do a whole step bend on the 1st string 12th fret, a bend release, so up and down, straight into a pull off to the 10th fret 1st string, and ending with the 12th fret 2nd string with lots of vibrato. Follow along at the 3:45 minute mark with Jon through the first three measures and get some tips of getting that B. B. King hummingbird vibrato! That first line is just such a good blues phrase, you could build an entire solo around that! Then take your second finger and play the 13th fret 3rd string, then play the 13th fret to the 12th fret also on the 2nd string. Then place your middle finger on the 13th fret 3rd string and pick once, to the 2nd fret 2nd string, to a bend on the 15th fret 2nd string. Just a subtle half step bend, a micro tonal blues bend. Tons of classic B.B. isms right here.
Jon refers to the licks in this part as being played out of the B. B. box. At 5:22 see Jon play out of the B. B. box. The B. B. box is just basically where your first finger is on the 2nd string 12th fret, holding down that root. Then do a little blues trill on the 1st string 12th fret hammer onto 13th back to 12th, right back into another small bend on the 15th fret 2nd string. After holding down the 2nd string 12th fret there is another hard to hear ghost note on the 2nd string 15th fret with a bend. So he’s hammering on that note, bending it up and kind of cutting it off.
Then another classic B. B. lick, start with another bend on the 2nd string 15th fret, a bend release, then pick the 12th fret 2nd string, then the 13th fret 3rd string, back to the 12th fret 2nd string and then bend the 14th fret 2nd string again, this bend just like a slight lift, again kind of ghosting.
Then he repeats this phrase again which is nice, giving a theme and he continues it. See the video at 8:22. This is motif one 8:32. Bending the 14th fret up, pulling off to 12th. Then play the 13th fret 3rd string, then 12th fret to 14th, back to 12th all of the 2nd string, and then back to the 13th fret 3rd string, ending on the 2nd string 12th fret.
Adding vibrato of course, and in this style, Jon is actually not using the pressure of his thumb on the neck to help that he usually would. He calls this “floating vibrato”, the only contact he has with the string is with his pointer finger, giving a cool “floating” sound. Then on the 3rd string, slide from the 9th fret to the 11th, back to 9th, then to the 7th, then 8th, then 7th and end with a classic blues 5 chord. This is just a blues in the key of B, ending with the 5 chord, an F#7 and leading you back to the one, B. See 10:16 to play along with John while he plays the whole solo.
Step 2: The Rhythm
For the rhythm Jon is going to show you some classic B. B. King style 9th chords. It is well known that B. B. King was much more of a lead player and didn’t play a lot of chords, but he would use this one. Jon suspects he may have gotten it from T. Bone Walker. If you’re enjoying this song but want more blues rhythm tips check out our other lesson on how to play Stormy Monday by T. Bone Walker.
To play this chord put your first finger on the 6th fret of the 5th string and barring it down through the 2nd string, then place your third finger on the 4th string 7th fret, the 3rd string is held down by your pointer barring, and your middle finger is on the 7th fret on the 2nd string. That is a B9 chord. Then he is going to go to an E9 chord. Middle finger on the 7th fret 5th string, pointer on the 4th string 6th fret, and ring finger barring from the 3rd string all the way down through the 1st on the 7th fret. Play along with Jon while he counts at 12:48. Playing along in just a basic 12 bar structure.Then he adds in an F#9, it’s the same shape as the E9 just moved up two frets. So now middle finger on the 9th fret 5th string, pointer on the 8th fret 4th string, and ring finger barring from the 3rd string down on the 9th fret, right back down two frets to E9, then back to the same F#9 and resolve back to the 1. Follow along at 13:36 with John and an added bass line. Jon also gives some tips about other cool things you can do with the chord shapes.
First one being just taking the top three notes of these chord shapes and move them into a sliding figure, see 14:08. So just playing the top three notes of these chords, the 3rd, 2nd, and 1st strings. Jon demonstrates at 14:52 what he is talking about by sliding these higher voicing chord shapes. He does this idea all around the same chords sliding a whole step away and back all around the same 12 bar blues structure. This is the kind of thing Jon would just feel out and respond to the music and whatever the rhythm section is doing and create rhythm patterns out of those chord shapes.
Recep: How to Play Paying the Cost to Be the Boss
I hope you enjoyed learning how to play “Paying the Cost to Be the Boss”! This is such a fun song with so many cool classic B. B. King licks and ideas that really show so much emotion. This is a great lesson for learning licks, learning how to create themes in a solo, learning how to write a solo, and learning how to really add feel to your playing.
All of these licks have awesome characteristics and vibrato and bends that really make the guitar have a voice of its own. Practice not only the notes he plays but the way he plays them and how he tell his story.
GET Jon Maclennan’s courses by clicking in the links below – GO!!! ➜


