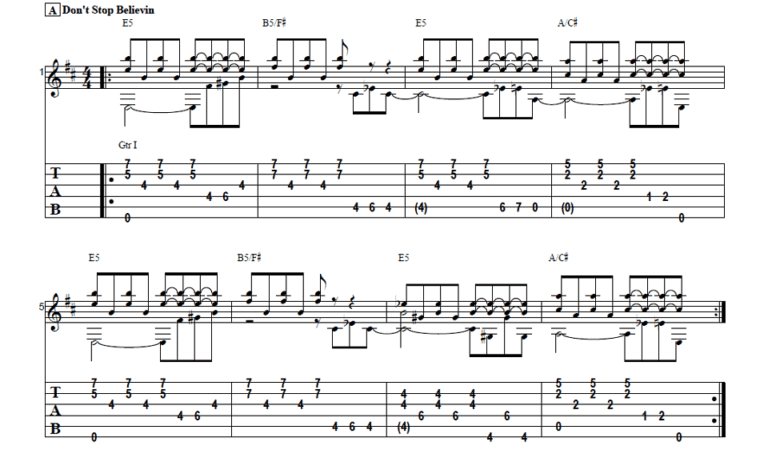
Challenge your skills with this riff from Don’t Stop Believin by Journey. This riff is originally for piano and bass guitar, but Uncle D has transposed it to fingerstyle guitar. Be sure to get the free tabs to go along with the video instruction.
Introduction
How’s it going everybody? This is Darrin with GuitarControl.com bringing you this video lesson and today I want to teach you how to play uh like the main piano riff and bass line for Don’t Stop Believin by Journey.
Right now there’s a link down in the description where you can download a free chord chart from GuitarControl.com. This chord chart is in PDF format so you can print it out it has every chord that you could ever need at a glance; very convenient really useful tool and it’s free, just click the link down in the description.
So be sure to click on the link in the description for the tabs and let’s get close up and take a look at this.
Don’t Stop Believin Riff By Journey
All right so like I said this riff is mainly piano and bass guitar for this first part of the song. This is kind of challenging, this isn’t like a beginner kind of a riff really at all. All right so starting off here we’ve got this E5 chord; so first finger on the fourth fret of the G string, second finger on the fifth fret of the B string and fourth finger on the seventh fret of the high E string. So we’re going to start off by playing the B and high E string and the low E string simultaneously and that’s on the downbeat of one. And then on the and of one we’re going to bring our thumb up and we’re going to hit the G string and then pluck the B and high E strings together; so it’s like one and two and three. And then on the and of three we’re gonna move our first finger here to the fourth fret of the D string and we’re gonna play that to the sixth fret with our third finger and to the fourth fret of the G string with our first finger. Now as soon as we hit that then we’re going to take our pinky and we’re going to lay it down so it’s barring the seventh fret of the high E and the B string and now we go back to that same one and two plucking the B and the high E strings and then the thumb playing the G string and then on the and of three we’re gonna go to the fourth fret of the A string to the sixth fret with our third finger and then back to the fourth fret and then keep that finger there. And then we have to drop back down with our middle finger onto the fifth fret of the B string and our fourth finger onto the seventh fret of the high E string so now we’re going to have one and, two and, three… And then go to the A string sixth fret with your third finger and to the seventh fret with your fourth finger and then the A string open… and then come up here and we’ve got that that E5 chord… All right so that’s our first three measures. Now after we do that then we’re gonna have to shift position so now we’re gonna come down and we’re gonna put our second finger or excuse me our first finger onto the second fret of the G string and our second and also barre. Now we’re picking up the second fret of the B string as well and then our pinky is gonna go to the fifth fret of the high E and we’re gonna do that same one and two and three and then on the and of three first fret of the D string… to the second fret and then open low E; so that’s the first four measures and is half of the riff. Now the second half of the riff the first two measures are the same and then it has a change after that. So this first half that we’ve got so far… All right so as soon as we hit that open low E string again then we’re back to our original E5, so back to that same shape again that we started with. So the fifth measure and the first measure are the same… Now the sixth measure is the same as the second, but now we have a little bit of a difference here. So here on this seventh measure so as we do that four, six, four on the A string we’re going to take that finger and right now it’s really a good idea just to barre across all six strings of the fourth fret and then take your third finger and put it on the sixth fret of the D string and now we’re going to do that same timing of eighth notes, but now we’re going to be plucking the G and the B string with our first finger and the bass note now is on the D string; so one and two and three and then on the and of three we hit that low E string which we’re on the fourth fret and then the sixth fret of the D string which our third finger is there and then back to that sixth string again… And then we’re going to go to the last measure, which is the same as the fourth, so we come back down to the shape again and then the whole thing would just start over again… So like I said this isn’t a isn’t for a beginner, it’s pretty challenging to play, this is something that I’ve wanted to try to do for a long time and I’m not really great at it yet; I still need to practice it myself to really be able to nail it. But you know pretty cool riff and kind of neat to take something that’s originally for the piano and transpose it to guitar, it’s just overall kind of a really good workout for both of your hands and you know multitasking a little bit.
Conclusion
All right so there you have it, the piano and bass line for Don’t Stop Believin by Journey. So if you like this lesson be sure to give me a thumbs up and leave a comment down below if you have any questions about this or other guitar related topics. If you’ve not already done so please subscribe to the channel and hit that notification bell so you don’t miss any of the content that we upload throughout the week. Well that is all I have for you today. Thanks for watching and have a great day.