Learn how to play the classic Beatles tune Hard Days Night with Guitar Control instructor Darrin Goodman, aka Uncle D. In this video lesson Uncle D breaks down this classic and gives alternative ways to play it no matter your skill level. Darrin also goes over how to play the guitar solo. So be sure to get the free tabs to go along with the video instruction and you will be rockin’ this classic tune tonight!
Introduction
How’s it going everybody? This is Darrin with GuitarControl.com bringing this video lesson and today I want to show you how to play Hard Days Night by The Beatles.
So right now Guitar Control is giving away this really cool free chord chart, there’s a link down in the description where you can get yours. It has every chord you could ever need all neatly compiled on one sheet. It’s in PDF format so you can download it, you can print it off, you can put a copy in your gig bag, put a copy where you practice; so just whatever situation you could have any chord you needed to glance and it’s a free download.
So be sure to click on the link in the description to the tabs and let’s get close up and take a look at this.
Hard Days Night – The Beatles
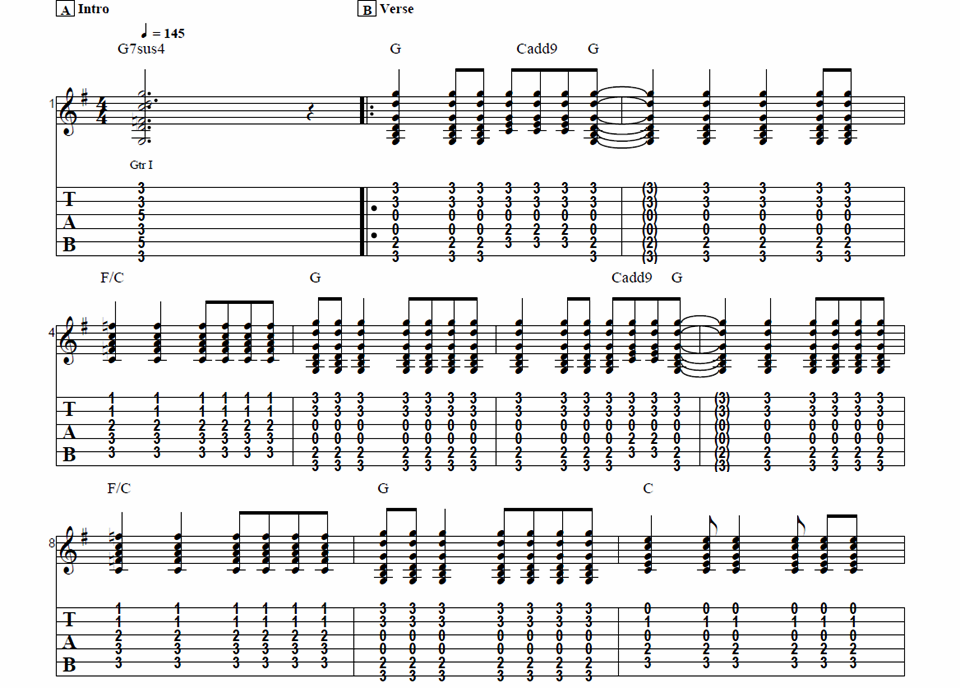
All right, so first off there’s multiple things that are kind of going on in this song. This starts off we’ve got this first chord here, this is a really interesting sounding chord, it’s a G7 suspended four (Gsus4). So it’s a barre chord unfortunately, so if you’re a beginner this may be the hardest part of the song, but you could really omit this and it isn’t going to make that big of a difference. So I’m going to start off, we’re just going to barre all the way across the third fret across all of the strings. Then we’re going to take our third finger we’re going to put it here on the fifth fret of the A string. So right now it looks like we’re playing a G minor seven, but then we’re going to take our pinky and we’re going to put it down on the fifth fret of the G string. So now it’s three, five, three, five, three, three…
So we hit that one, two, three, and then we rest on four and then it just starts on G. So if you are a beginner and this is really tough to do that and like I said you could totally start off with… you don’t have to do that at the beginning of it. Okay so then from there it’s pretty simple for the most part. The song also has a really easy solo that we’re going to go over as well.
Okay, so for this first part here we’ve got the chords G and then C add nine (Cadd9). So if you just take your regular old G chord here and you move your first and your second finger up a string each so now my first finger is on the second fret of the D string and my second fingers on the third fret of the A string and we don’t play the low E string, that’s Cadd9. And then we’ve got an F over C (F/C) and this is just my kind of a preference. So you could play A full on F barre chord like this if that if that’s comfortable for you, or you can do the really basic F chord shape that you probably already know. How I like to do it is like F/C, so it’s the regular F, but I just have the C in the bass here. So that’s third fret of the A string, third fret of the D string, third finger, fourth finger and then my second finger is on the second fret of the G string and first finger is barring the first and second string…
Then we also have a regular C major chord, a D major chord and that’s all the chords for this first part of the song. All right, so we start off with the G major on here it it’s broke down pretty simple for the most part. It’s quarter notes and eighth notes, so this is like one, two and, and then on the downbeat of three it goes to Cadd9, but you don’t need to really break it up you know… you can kind of just feel it. Once you get to where you can just kind of feel it and wing your own rhythms it’s so much easier to play and sounds lots better too. All right, so that’s on G, down, down, up and we switch to a Cadd9, down, up, down and then to a G down and up. If you wanted to do it that way it’d be like one, two and, three and, four and, so it’s kind of weird that G is coming in on the and of four and then it’s tied to one on the next measure. So you have that eighth note plus a quarter note for beat number one and then two, three, four and… Okay then we switch to the F, whatever version of it you’re gonna do, up… Then to a G and it’s one and, two, three and, four and, and then that also is carries over on to the next measure, one, two and. So it’s a lot easier if you just kind of feel this… now we’re back to Cadd9 again, back to F, G and the next change we go to a C.
So this is where the strumming kind of changes and this is kind of weird to count because it’s quarter note then an eight then a quarter then three eighths; one, two and, three and, four and… So how I think of it is like down, down, up, up, down, up, down, down, up, up, down, up… Then we when we go to this D it’s the same thing, the same strum, and then we go to a G
one, two and, three, to a Cadd9 and four and then on the and of four back to G.
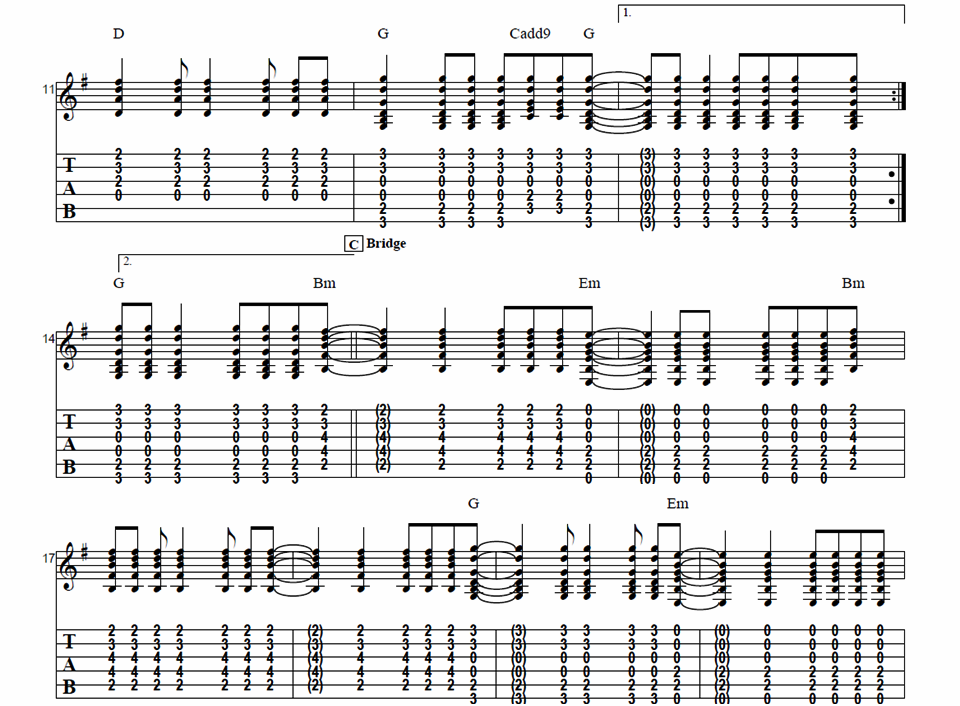
All right, so if you’re looking on your transcription we’re on the first staff of the second page. So if you look back at the very beginning starting on the second measure it has the beginning of the repeat, it’s the double barre with the colon. Now if we look here we’ve got the colon and a double barre so that’s the end of the repeat. So it means we’re going to go back to the second measure and play forward again, but the second time we do it where it has that bracket above that third measure with the number one. That means it’s the first ending. So the second time you play through it you’ll skip that measure and go right on to measure 14 because you can see above it has the bracket with the number two. The basic difference is when we get to this end… it goes right into another verse that second time around… it’s gonna be one and, two, three and, four. And then on the and of four we switch to a B minor (Bm) and this is what I’m going to call the bridge section.
This is the part that Paul McCartney sings and like a lot of Beatles fashion they completely change the feel of the song when he sings it versus when John Lennon sings. They’ll like switch your major chords to minor chords just to have that contrast which I think is really cool. So B minor barre chord unfortunately if you’re a beginner this might be kind of tough, but just do the best you can. So we’re gonna barre our first finger across the first five strings of the second fret and then my second finger is here on the third fret of the B string, my third finger is on the uh excuse me the fourth fret of the D string and my pinkies on the fourth fret of the G string. So we’re hitting that on the and of four and then it’s tied to all of beat one on that next measure; so it’s like and one, two, three and, four, and on the and of four we’re gonna switch to an E minor (Em)… So it goes into back into that same strum that we were doing uh on the C and D on the John Lennon part. So with the Bm to an Em and then on the and of four of that measure back to B minor again and now it’s going to go into that strum that we did on the D and C on the John Lennon part… so same strum still; down, up, up, down, up, to an Em. And then we’re gonna go to a C7; so if you just take your regular C major chord and you take your pinky and you put it down onto so it’s on the third fret of the G string that’s C7. So we got same strum to a D major one, two and, three and, four and, the whole bridge section… Then it just goes back into the same thing, it repeats those parts again. So it’s easy to put the song together when you have these two sections.
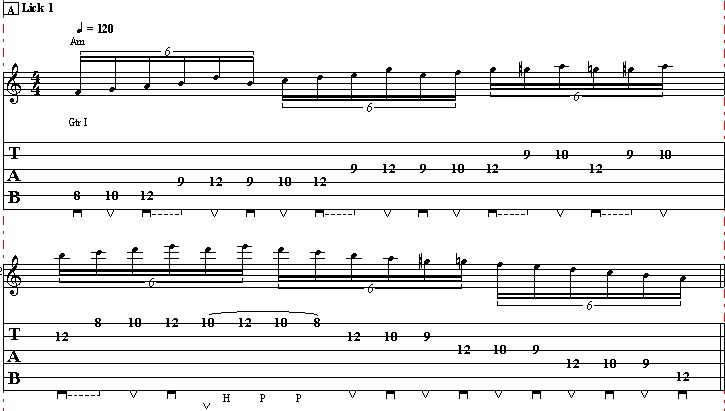
Solo Section
Alright, so now let’s take a look at the guitar solo. So this guitar solo is actually really easy. It’s just one little riff that’s repeated twice. So we’re going to start off here on the third fret of the low E string and you want to use your third finger. So we hit this, it’s a dotted quarter note so it means it’s going to get all of beat one plus the downbeat of two and then we hit it again on the and of two; so one, two and, and then on the downbeat of three we’re going to go to the first fret of the A string, three on the and of three to the third fret, down B to four back to the first fret and then on the four back to three and slide to the fifth fret… All right, so that’s the riff or lick or whatever you want to call it is two measures long and it’s repeated. So once we go through these two measures or excuse me these four measures here you just repeat the whole sequence. Now when we slide up to that five we’re doing it from the and of four and then it is tied to that whole measure. So it’s like one, two and, three and, four and, one, two, three, four… All right, so then the second half of this riff we’re going to keep our third finger here where we’ve got it on the fifth fret of the A string, We’re going to take our first finger we’re going to bring it back here and we’re going to barre so we’re picking up the third fret of the A string and the D string and then we’re going to pick the starting on the A string pick three and hammer to five and then we’re gonna follow that with the third fret on the D string. So how I’m doing this is I pick down pick and hammer and then an upstroke on the D string. So it just repeats you do that one, two, three, four, so you do it four times… Then you’re gonna with your third finger here on the fifth fret you’re gonna pick and slide to the third fret, but you’re going to want to do both of your fingers together. So your first finger is coming down here to the first fret and the reason is because we’re gonna pull that off so we’re gonna pick five, slide to three, pull to one and then end on the third fret of the low E string and that’s measure four and it’s a whole note…
Conclusion
Alright, so there you have it, not too difficult rendition of Hard Day’s Night by The Beatles. So if you like this lesson be sure to give me a thumbs up and leave a comment down below if you have any questions about this or other guitar related topics. If you’ve not already done so please subscribe to the channel and hit that notification bell so you don’t miss any of the content we upload throughout the week. Well that is all I have for you today. Thanks for watching and have a great day.