Learn to play the Judas Priest classic The Ripper with Guitar Control instructor Darrin Goodman. Be sure get the free tabs to go along with this killer Judas Priest lesson.

Introduction
Hey everybody how’s it going? This is Darrin with GuitarControl.com bringing you this video lesson. Today I want to show you how to play all the riffs and parts to The Ripper by Judas Priest. So this is a pretty cool song and it’s got a lot of different cool little note sequences in it and a lot of chromatic passing tones so it’s really weird. I mean technically a lot of it’s out of key, but it just sounds really cool; it’s a classic song. So be sure to click on the link in the description for the tabs and let’s get close up and take a look at this.
The Ripper Intro
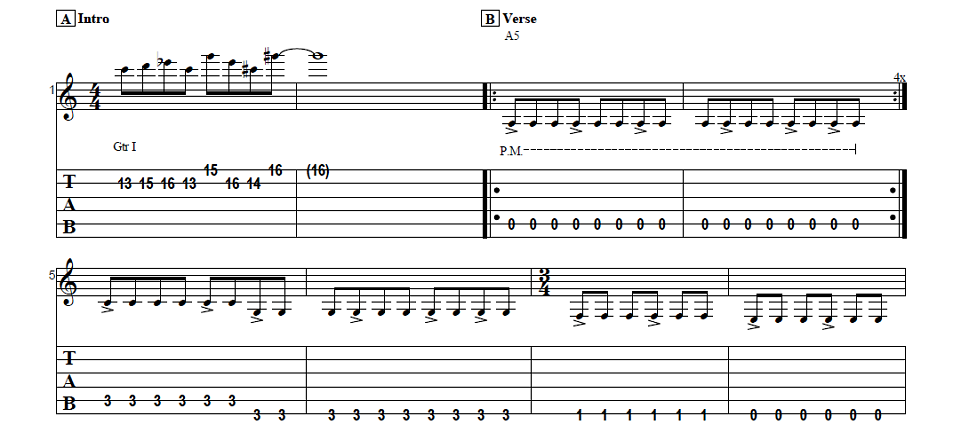
All right so starting off we’ve got this little intro riff here that’s actually played on two guitars and it’s harmonized, but we’re just going to be doing one part of it… So we start off here we’re on the 13th fret of the B string with my first finger and we’re going to go 13th fret to 15th fret to the 16th fret and then back to the 13th fret and then we’re gonna go to the 15th fret of the high E with your third finger. So when you’re doing this I’m using my first finger on the 13th fret and then my third finger on the 15th fret and my fourth finger on 16th fret here on the B string. You could use your first, second and third fingers, but I just like to do it this way because, well you’ll see why here in a second. So I go 13, 15, 16, and 13 and then to the 15th fret on the high E string and now to back to the 16th fret on the B string. Then we’re going to go to the 14th fret on the on the B string with my middle finger and then the last note is the 16th fret on the high E and I’m using my pinky. So the reason why I like to use these fingers is so I don’t have to shift my hand position… So that’s the intro and then from there it goes into the verse.
Verse
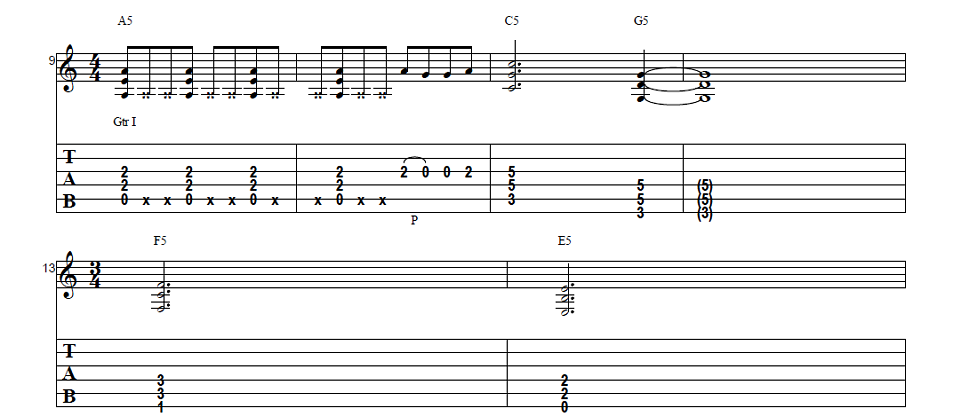
The verse is super simple, it’s actually just single notes and its all palm muted. So starting off with the A string open we want to put an accent on the downbeat of one and then on the end of two and then on the downbeat of four, so it’s like… So it kind of gives it almost like a triplet kind of feel, but all you’re doing is just accent and then you do two without; so it’s like one, two and one and we have two measures of that. Then we’re going to go to the third fret of the A string and you can just use your third finger or you could use your first finger because from there it’s going to go to the third fret of the low E string and then to the first fret of the low E string… So that’s like the first six measures of the verse so with that open A string, it stays on that longer, it’s two measures long, but it’s repeated four times, so if like you listen to the song you’ll be able to tell. Then to the third fret of the A string and then this here… it’s a whole measure, but on the downbeat of four we switch to the third fret of the low E and then follow that with an entire measure of that third fret of the low E string. Now we’re going to come down to the first fret and then the open low E string and then from there we go to just an A5 power chord here; so the A string is open and I’m using my first finger to bar the second fret of the D and the G strings and this is on the down beat of one and then on the end of one and the downbeat of two you’re just gonna mute to get dead notes. So what I’m doing there is I’m just taking my second finger and I’m just laying across to just to touch that A string so that way it’s just that like a percussive sound… So then we’ve got this little riff here; so I’m on the second fret of the G string and I’m gonna pick that and pull-off to the open string. So this is three and four and you pick, pull-off and then on the downbeat of four you play that open string again and then go back to the second fret. Then we go to a C5 up here on the third fret of the A string with my first finger and then the fifth fret of the D string with my third finger and you can also do the fifth fret of the G string with your fourth finger or just without it either way is fine. That’s a dotted half note so it’s like one, two, three and then for four we just move that shape straight down to the low E string so your first finger’s on the third fret of the low E. And again we can be on the fifth fret of the A string with your third finger and you can also add the fifth fret of the D string with your fourth finger if you like and that’s on the downbeat of four and then that’s tied to a whole note on the next measure; so it’s like one, two, three, four, one, two, three, four. Then we come down and move that shape down a whole step. So we’re F5 at the first fret so my first finger is on the first fret of the low E string, third finger’s on the third fret of the A string and then your fourth finger can be on the third fret of the D string. So another thing in this song is it switches time signature. So here we’re in three quarter time so this is a dotted half note, so it’s three beats, one, two, three and then on the next measure we go to E5. So now the low E string is open and I’m just using my first finger to pick up the second fret of the A string and the second fret of the D string and this is also three beats; one, two, three… and then that’s where it goes into this little riff.
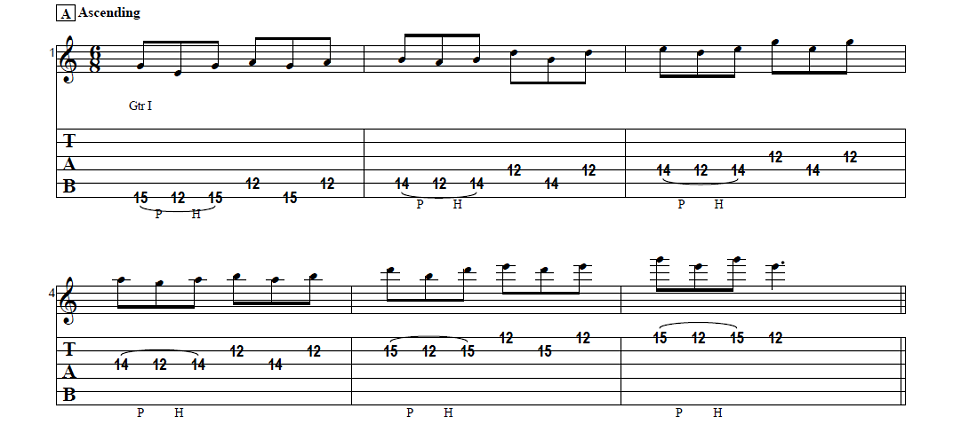
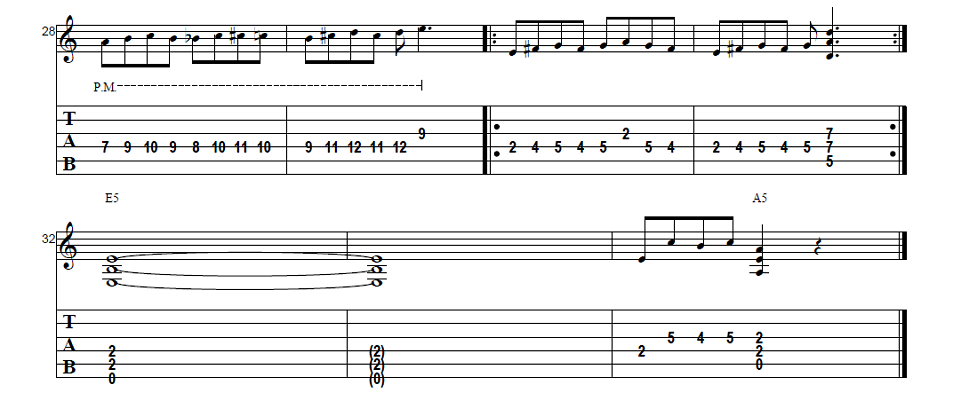
Now like I said this has a lot of passing tones and the way you have to do this with your fingers is kind of tricky but in a way this is like a really good kind of workout for your fretting hand. So I’m starting here on the seventh fret of the D string with my fourth finger and then I’m going to go to the fourth fret of the G string with my first finger to the fifth fret with my second finger and then back to the fourth fret… so that’s the that’s half of the first measure. Then we’re gonna go five to seven on the G string and then to five on the B string. Now another thing I forgot to mention too, like I said this is all eighth notes, so when I go to that note on the B string I’m gonna use my first finger instead of my second finger because of what’s coming next. Now we’re gonna go to the eighth fret of the B string and I’m gonna use my fourth finger and then I’m on the seventh fret of the B string with my third finger at the same time because we’re gonna pick that and do a pull-off and then we go to the seventh fret of the G string and I’m gonna use my third finger and then we go back to the B string sixth fret; so my second finger is gonna do that and my first finger is already here on the fifth fret because it’s six, five and then it’s going to go to the fifth fret of the third string and then to the fourth fret of the B string. So what I want to do here is use my second finger and this is kind of awkward… so that is the first two measures. All right and then starting on the third measure, this is measure 17 on your transcription, we do that same thing again as the first measure of it and it repeats… and then it has this ending. So after we go to that four now we shift down one fret so our first finger is on the third fret of the B string and we’re gonna go to the fourth fret of the G string and then back to that third fret of the B string and then the fifth fret of the G string and that’s where it leads us into the next section.
Breakdown
Okay so this next section begins on measure 20, this little breakdown part. So we start off we’re on the second fret of the D string with your first finger and then you’re gonna go to the fourth fret with your third finger and then the fifth fret with your fourth finger… so it’s two, four, five, four, five, two on the G string with your first finger and then we go back to the D string five, four, two, four, five, four, five and then back to two on the G string and this is all palm muted; so really slowly… All right so it does that twice and then what’s going to happen is we’re going to do the same thing, we’re just going to move it up a half step. So now we’re going three, five, six, five, six, three on the G string and then back to the D string six, five, three, five, six, five, six, three; so it’s the exact same thing just a half step higher. Then going on to measure 24 and you guessed it we just shift that up again; so now on the D string we’re playing the fourth, sixth and seventh frets and then the fourth fret on the on the G string… Then we move it up a half step again so now it’s five, seven and eight on the D string and then five on the G string and now this is where it starts to change a little bit. So we go five, seven, eight, seven, eight and five on the G string back to eight, seven and then we shift up again, so… So we do that same sequence we did there but we’re gonna move it up a half step; so now it’s six, eight, nine and now we shift it up again. We’re gonna go seven, nine, ten, nine, seven, nine, ten, nine, eight and then we move up a half step; so that whole thing slowly… All right and then from there we come back down to where we started and now we no longer palm mute, so we’re just at the second and fourth frets on the D string to the second fret on the G string. Now here we got something a little bit different, it’s the same as it was before and then we go to a D5 power chord; so fifth fret of the A string with your first finger and then the seventh fret of the D and G strings if you like with your third finger… Okay and then after you repeat that twice then you go to an E5 power chord and that rings out for two measures. Then we have this final thing to end the song.
Ending Riff
So we’re on the second fret of the D string with your first finger to the fifth fret of the G string with your fourth finger and back to the fourth fret with your third finger and back to the fifth fret and then end with an A5… So those are all the parts and you can easily identify them because the intro goes into a verse and then uh I think it’s another verse again and then it goes into that breakdown part and then where the guitar solo section is and then after the guitar solo section is where it goes into that whole part where it just moves up chromatically. Anyhow if you listen to the song you’ll be able to identify the parts and tell what they are all.
Conclusion
Alright so if you enjoyed that and you got something out of it be sure to give me a thumbs up. Leave a comment down below if you have a question about this or if you have any other guitar related questions or if there’s anything you’d like to see covered in a future lesson. If you have not already done so please subscribe to the channel and hit that notification bell so that way you don’t miss out any of the content that we upload throughout the week. Well that is all I have for you today. Thanks for watching and have a great day.