
What’s going on everybody Shawn Daniel here with Guitar Control, today we’re learning a criminally underrated song called “The Engine Driver” by The Decemberists, a super easy song to play, really relaxing, and a great one for a campfire song repertoire.
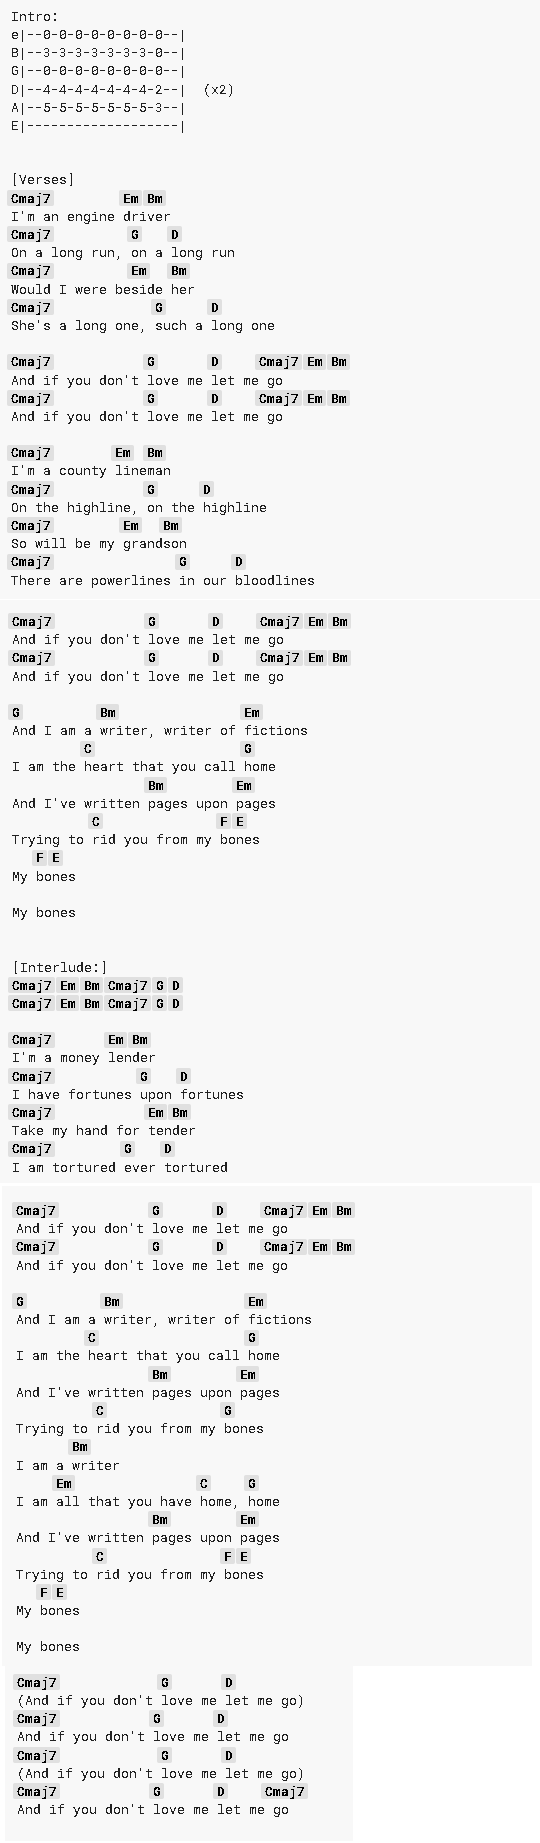
Check the image above to follow the chords and tabs.
We start with just an Intro, this is the first time I saw this school chord all in the c major chord. Take the c major right here, I prefer using the one where my ring fingers on the low e string and my pinky, on the third fret of the a string. If you just pop those two frets higher we get this chord, it’s really this nice chime e, d major ish-cor, so the intro is just this d chord to this sequel, and then you let that, down, up, down, up, and again.
Then we get right into the chord progression, I’m going to break the verse chord progression into two parts the first one being this, the best educational aspects of the song is it focuses on keeping a very steady strumming hand, you’re just going down, and up the whole time.
Right hand or strumming hand if you’re lucky you never stops, start with the c major seven chord it’s that same c chord we did, but with your pointer finger off, and then practicing going down, and up, nothing more relaxing than the sound of it. Just consistently strumming a major 7th chord with two, three, and four, and one, and two, and three, and four, next bar we have a full bar c major, now we’re going to from e minor, b minor. So e minor is a snow finger second fret ring finger, second fret of the d string, open everywhere else down, up, down, b minor, that might seems a really difficult switch at first, but it was a trick that we can do to make this a lot easier.
B minor, two on the a string ring finger, or d string, pinky for the g string middle finger three on the B string. We’re going to go from here to here, not the easiest transition in the world, but I promise you can get this down, down, down, up, and down. If you’ll notice when I left the e minor down, pop down. I went completely off the entire string set, to buy my hand a time to get that b minor, you can do this for every last beat of the chord for instance one, and two, and three, and four, and one, and two, and four.
Leaving that court a little bit early, as long as your strumming is in time, is really right way to do it. The way to buy your fretting hand more time to get to the next one place, that’s first series of chords, the second starts out just like the first c major seven to g, from c major seven, we’re going to a g, middle finger 3e pointer finger, 2a ring finger, 3b, and like this one, your pinky on top 3e, because it’s easy to keep your ring finger planned there, then you go to that d major.
When you abandon c to get from a to g, to a, to d, keep that ring locked in. Everything else, we alternate these back and forth which is really cool. One, and two, and three, and four, e minor, b minor, one and two, and more.
Now there’s one technically two more chord progressions that I want to talk about. It’s going to be the chorus, really easy conceptually, all we do is we swap the arrangement of those two. In fact, what we’ve done so far from part one is the c, e minor, b minor, and part two is c, g, b, the cool thing compositional, it sounds really different, for different type of song. All we did is we put part two with part one, we flipped them. Now in the chorus that’s just c, to g, to d, and then, we have seen g to d, and of the second part.
We’ll talk about that g major part next, what we’re going to do is the next part of the song; it’s going to sound like this. The chords are easy it’s g, b minor, e minor, c, and eventually we go to f, to e major, f, and e major. So same strumming pattern, you just keep it going, but now everything gets its own bar g major to b minor, now a handy transition here, same things before you can leave that cord one earlier, but keep your pointer finger where it is, because your pointer finger is going from g, to b minor which is already on the second fret of the g, to b minor one, and two, and three, and four, and b minor.
Now we’re going to e minor, and to c, we’re going to do that again, g, b minor, e minor, and c. I’m going to play an f chord, all we do for coming from this c core, the reason I love this low c chord with your ring finger down low, is you just keep your pointer finger where it is move, all your other fingers down to string, and then you end up with a half major chord.
Really easy way to play a major chord as an alternative to a bar for either one works, it’s fun and then go from here to an e, easy because you take this shape and move it one fret lower to get an open e major chord where it’s open e, 2a, 2d, and 1G, so these might not be the fingerings that you use for a traditional e major chord but I think it’s easier because we’re just going from f to e, to f to e, and let that e ring back to c.
Then try to chorus from here g, b minor, e minor, c, g, b minor, e minor, c to f, and je, there you have it as far as the structure overall arrangement make sure you click the image above to follow the chords and tabs. When you’re done with that, check out other videos on the Guitar Control YouTube Channel by myself and other great instructors, as always we’re looking forward to your feedback, let us know what you’d like to see more and thanks a lot for watching.