In this free lesson from Guitar Control, instructor Darrin Goodman demonstrates how to play the classic Beatles tune Come Together. Get the free tabs that go with this lesson and learn the whole song including the solo.


Introduction
Hey everybody how’s it going? This is Darrin with GuitarControl.com bringing you this video lesson. Today I want to show you how to play Come Together by The Beatles. Its a really simple song to play and it’s got a little part that’s like a blues shuffle that you’ve probably played before and it has a really easy guitar solo so we’ll go over the solo for it as well. So be sure to click on the link in the description for the tabs and let’s get close up and take a look.
Come Together Main Riff
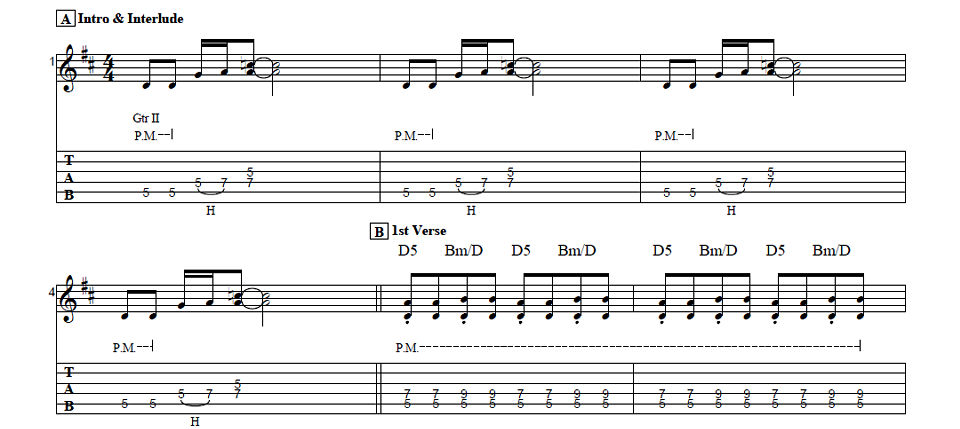
All right so start off we have this little intro that’s kind of like one of the main riffs of the song. So we’ll start off here, we’re going to play on the fifth fret of the A string with my first finger and we’re going to play that and we’re going to palm mute it and it’s eighth notes; so this is like one and. And then we go to the D string fifth fret and we pick and do a hammer-on onto the seventh fret and these are sixteenth notes, so they’re going to be twice as fast, so it’s like… and then we follow that, you’ve hammered down so your third finger is here on the seventh fret of the D string and you just drop your first finger to the fifth fret of the G string so we’ve got this little A minor dyad… It does that four times at the beginning and then it goes into the verse.
Verse
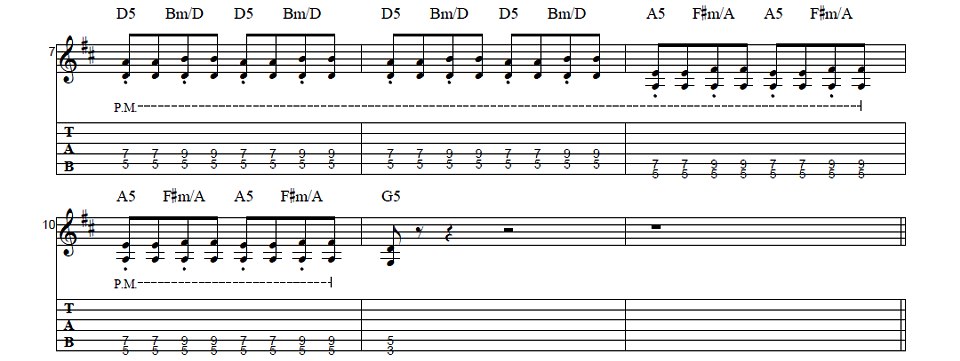
So the verse is where we’ve got what I was saying before, it’s like the shuffle. So we start off we just got this D5 power chord; so I’m on the fifth fret of the A string with my first finger and you can either do this with your third or second finger. This next part which would be the seventh fret of the D string and then it’s going to alternate from that to the ninth fret. So if you have your third finger here, then your fourth finger; for me it’s easier to go my first, second and fourth. So coming out of that first part it’s like one and two and and it’s palm muted. So being at the fifth fret and the seventh fret that’s one and, and then you put your pinky down, so now it’s like you’re at the fifth fret of the A string on the ninth fret of the D string, but you just keep your whatever finger you’re using, whether it be your second or third that you’re fretting the seventh fret of the D string, you just want to keep that there. So you get this one and two and three and four and, and it’s four measures of that, one two and three… Then we’re going to go to our next chord and it’s the same thing, we’re simply just going to move it down, so now my first finger is on the fifth fret of the low E and in my case my second finger is on the seventh fret of the A string and then going to the ninth fret of the A string with my fourth finger we have two measures of this; one and two and. Then we move down here and do a G5 power chord and that’s on the downbeat of one and then it rests the entire rest of the measure; so that whole part… All right, so that’s the intro and the first verse and then we go to a chorus.
Chorus
So after you come down and you let that ring out, then we go to a B5 power chord; so my first finger is on the second fret of the A string and my third finger is on the fourth fret of the D string and again we’ve got this with eighth notes so it’s one and two and three and. Then we go to an A5; so the A string is open and now I’m playing the second fret of the D string with my first finger and you can also play the second fret of the G string so it comes in on the downbeat of four; so you’ve got one and two and three and four and, then we go back to the G5 power chord we did before and we have two beats of that. Then we move up to the A5 here at the fifth fret of the low E with my first finger and seventh fret of the A string with my third finger. So “it’s come together” and then it just goes back into that. All right so the song uses those parts throughout the song for different parts of it. So it’s the verse and then there’s a piano solo and the piano solo you’re just playing this behind it and it’s really easy to be able to tell that when you’re listening to it. Then that leads into the guitar solo.
Guitar Solo
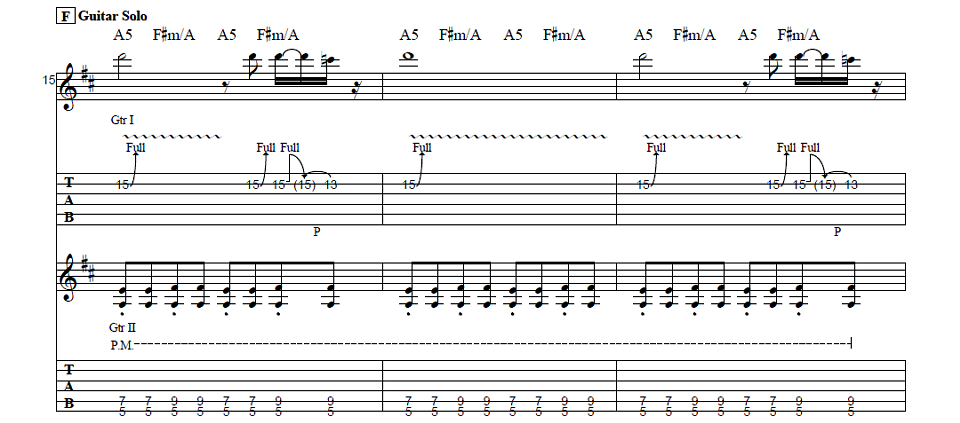
Okay so the first two measures of the solo… and then on the third measure it’s got a slight variation on it. So we start off with the 15th fret of the B string bend and then the two more and you release the bend this time and then you do a pull-off you do it to the 13th fret instead of the 12th fret. So the first time it’s… and the second time it’s… So those first three measures… and then we go to the twelfth fret on the third string and you’re going to watch your third finger because we’re going to do a pull-off to the 10th fret and then we go to back to the 13th fret on the B string and bend that up a whole step and that’s the whole solo… just like that.
Conclusion
All right so I hope you enjoyed that lesson and you got something out of it. If you like this lesson be sure to give it a thumbs up and leave me a comment down below if you have any questions about this song or any other guitar related questions. If you have not already done so please subscribe to the channel and hit that notification bell so you don’t miss any of the lessons and content that we upload throughout the week. Alright so that is all I’ve got for you today. Thanks for watching and have a great day.
For more great song lessons from the 1960s check out our 1960s Guitar Song Collection.