Hey, everybody Shawn Daniel with Guitar Control, today we’re here to learn an acoustic version of the U2 song “Every Breaking Wave”.
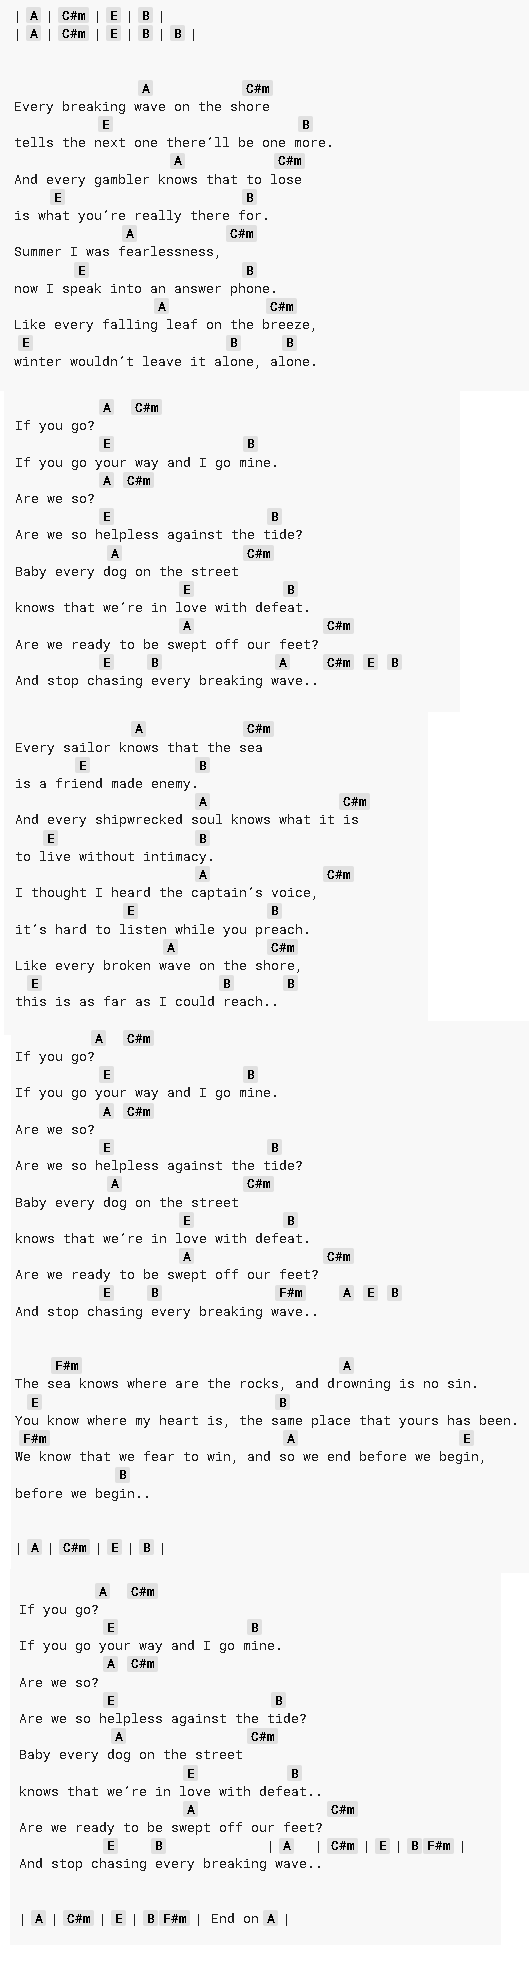
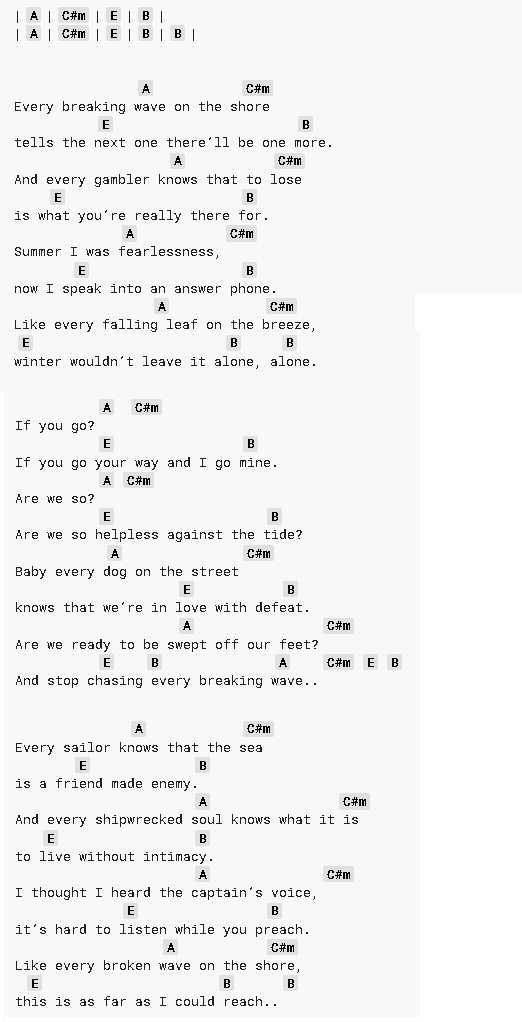
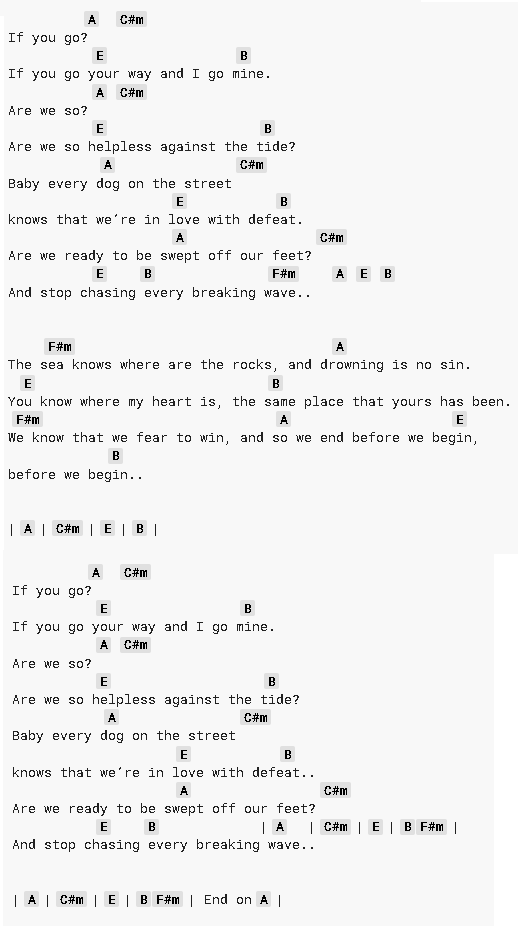
Check the image above to follow the chords and tabs.
It’s really an easy song to play, you can make it as simple or as difficult as you want. We’re going to do a couple different ways about the whole song. But most of it is going to sound like this.
And then there’s a couple of different ways about chord progression, a lot of it, is just the same four chords, with one little bit of a variation, we’re going to talk about. So what I want to do first is to outline the root notes of the chords that we’re going to use. You can play the whole song with just these root notes. If you want to do a super simple version, we’re going to start with the fifth fret on the low e string, then go to the fourth fret of the a string which is the c sharp, then go the seventh fret of that same string e, then up a string back to the low e string to get a b note.
I think with a lot of U2 songs, the rhythm is like the most important thing, it has this driving rhythm that you’ll find in a lot of their different songs.
First we’re going to outline how the verse is going to work with those notes, getting used to the pattern by just moving one finger around, then adding this to all of them. So if we’re counting out a bar, it’s going to be one, and two, and three, and four, and one, and two, and three, and four, and one, and two, and three, and four, and one, and two, and three, and four, and a, to c sharp, to e, and to b.
Second, turn all the single notes into power chords, all we have to do is have the root note and start on the a right fifth row on the e string, then we add the seventh fret on the a string. You can use your ring finger or your pinky. I like using my ring finger, I think it’s the most stable way to make that shape, where you get a little bit of a stretch in. If we add that same note two frets lower, two frets higher, and one string down we need a power chord.
Now, I’m playing this a little dynamically which gives it a little bit of that push forward, instead of going one, two, three, four, five, six, seven, eight, it’s one, and two, and three, and four, and basically we have the numbers one, two, three, four, and then we have the word one, and two, and three, and four, again a lot of that driving sound from this band is caused by dynamic. This is an acoustic representation of what the whole band is doing, but it really comes down to the rhythm section, and how it’s always like getting the full chord, or the full power chord both strings, and then the root note.
We have a, and e together or e, and a together, my pick is only hitting the lowest two strings and alternating with just the root note. The power chord, power group, power root, power root, and again that happens four times. I’m going to switch to the next one, you may notice that you can leave one kind of eighth note early to get to the next chord and it sounds fine. That’s a really great way to buy your hand extra pressure to get to the next spot. What I mean is like the end of four one, and two, and three, and four, and one, and two, and three, and four, and one.
See, I’m like jumping off on the end of four to get to the next one, and as long as you’re in time, it’s going to sound really good, you can play most of the song just like that. Now there are different ways we’re going to use that progression to flesh out an arrangement, that’s will going to work for the entire song but let’s just talk about the bridge real quick because it’s essentially the same thing, we just add one more chord and it’s going to be an f sharp second fret on the low e string making that a power chord, and then we’re going to have the same vibe back to the a and then the same thing e to b.
It’s really kind of the same thing, but it only happens again where you’ll find a traditional bridge, like the last third of the song. The only other thing arrangement-wise, which again make sure you click the link below because it charts out everything that you should remember.
When it goes into the chorus, which again are the same chords as the verse, just that a c-sharp e, b, we stay on that b an extra time a lot of times, what they’ll do is they’ll leave an extra bar of space there. To really kind of come home on that first chord, but again that’s the entire thing.
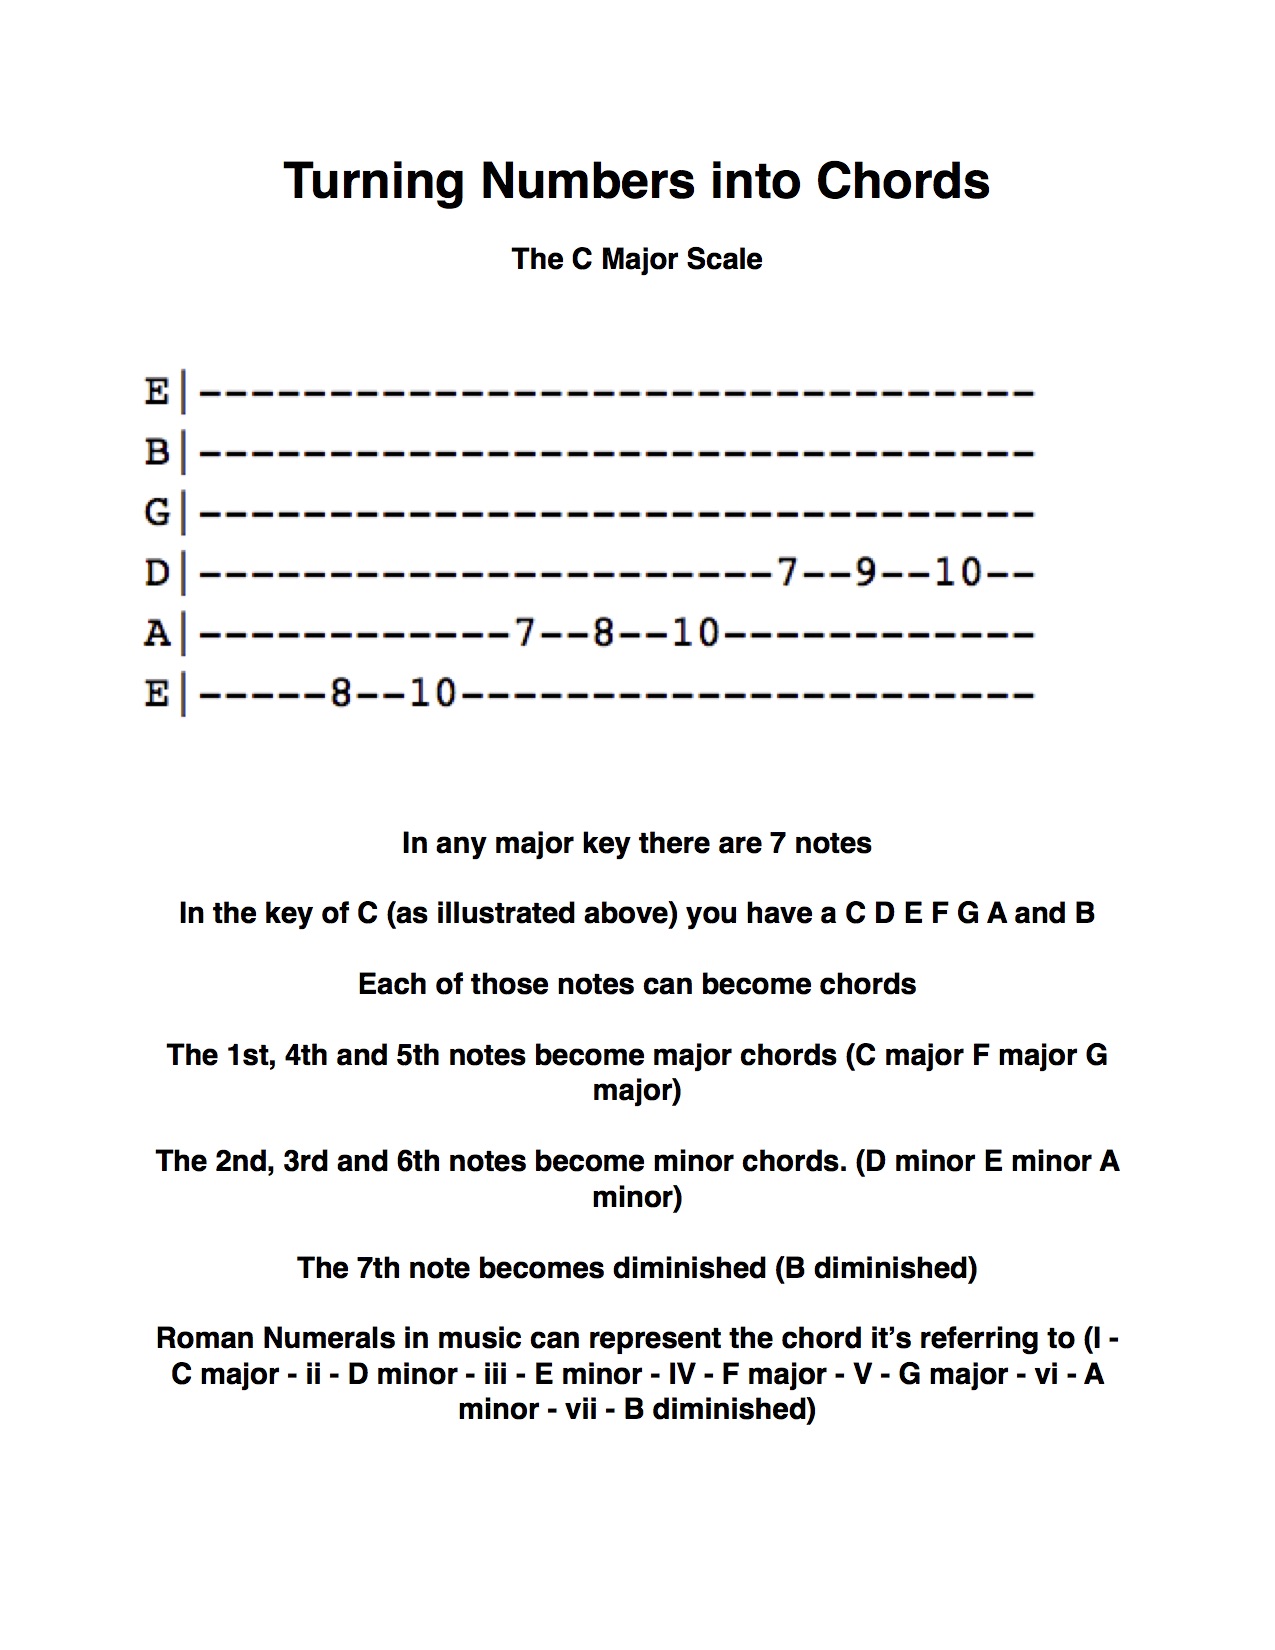
It’s important to talk about how we can make that simple chord progression sound a little fuller and sound more like a song. I think now, would be a good time to talk about what key is actually in the key of e major. We start on an a major chord, a lot of people think that the first chord that you start on, is always the key that you’re in. Actually this is going to be a 4, 6, 1, 5, progression. What that means is, if you take the notes into the e major scale one, two, three, four, five, six, seven, and one, all of those notes can become its own chord.
We start on the four chord in e, and we can kind of like count through like a, e, f sharp, g sharp a. There’s that four always going to be a major chord in a key with some exceptions, but if you stick within the key and don’t go do anything crazy outside of the key. That four chord is going to be major, so that a power chord is represented by an a major chord. So what you could do and what I will do, if I were to play the song live, is for the verses which have a little bit more low-key down tempo stuff or just chiller in general.
I’ll do the power chords one, and two, and three, and four, and then the next one c sharp is the sixth chord. It’s actually c sharp minor, e would be e major, and b would be b minor, which again when is just a power chord, it’s not major or minor which is nice because we can simplify everything and just turn it into a power chord, and not to worry about those root notes becoming major chords or minor chords, but then when we get into the chorus, we go to an a major to a c sharp minor, to e major, to b major and then back into the verse.
Now, we have a pretty big dynamic and I’m using my palm against the bridge to mute it, to kind of get these short bursts, instead of like a sustained chord. There are a lot of different things that you can do, but it’s worth talking how these chords are made. That first chord in the progression, the a major chord. You can play it as a bar chord, but not actually barring anything. The bar chord will be by the fifth fret ring finger and pinky on seven a, and b respectively, and then middle finger grabs the major third of the chord which is going to be the sixth fret on the g string. You can play all of these to get a major chord or instead of barring it, you can just get the fretted ones and leave the b, and e string, unplayed essentially.
Have your pointer finger mute and it does the trick. I like using the bar chord even though there are easier ways to play in a major chord, a lot of people just use the traditional open a major chord voicing which is the second fret on the d, g, and b string, and then open a, and open e. We can use open chords to do this, for sure you can do the same thing with the b major chord which we’re going to get later in the progression, by just moving this two frets down and again you can play a, b major. You don’t have to make it a bar chord or anything, you can just play that same chord even if you get the open strings.
It doesn’t sound awful, and it’s just an easy way to play a b major chord. E major is another chord in this progression which you already know as open e, 2a, 2d, pointer finger and the only thing you have to worry about is that c sharp minor, will do the same way in both versions, the open chord version and the barcode version. The way I play it, is having that e string rooted bar chord on the a and I just move that diagonally, and back to root on the fourth fret of the a string. When you use that shape on the a string it becomes minor, so now it’s a c sharp minor chord we can get that e major instead of a power chord just add another string. It’s seven a, nine, d, g, and d, b, and then get the b major by doing the a shape but just two frets higher. We’ll do both of them as an example a major c sharp minor, e major, or b, or we do the open versions a, c minor, and then bring it down again for the verses, and remember there’s just that one bridge which we’ll go after this one f sharp which should be a minor chord. If we were to play a full version of the a, e, b, or we could do open chords there too, f sharp minor, f of the f sharp, and then you can just ride that home the whole way.
So it’s really up to you on the arrangement that you want to, because you want to make whatever suitable for the context that you’re in. If you want to play a real low-key version of it, just use those power chords even just the root notes, if you want to practice singing along to you. It’s fun to play, easy one to conceptualize and there’s a lot that you can do with it. That’s why I really like YouTube as a band because they’re great as a band, also the songs can be distilled into an acoustic format. You still get a lot of cool songwriting stuff that they employ; it is kind of a different flavor while still keeping that driving force of the original.
This one chord progression like I said is a four, six, one, and five, in the key of e with that one little bridge. F sharp would be the two chords in the key v, a two, four, one, five, and then ride it out like every breaking wave. Let me know if you have any questions, comments, suggestion or stuff that you’d like to see in our future video. Write it in the comment section; also check out other videos on the Guitar Control YouTube Channel by myself and some of the other great instructors. Thank you so much for watching.