
In this Guitar Control lesson video instructor Sean Daniel, will show you how to play “Positions” by Ariana Grande.
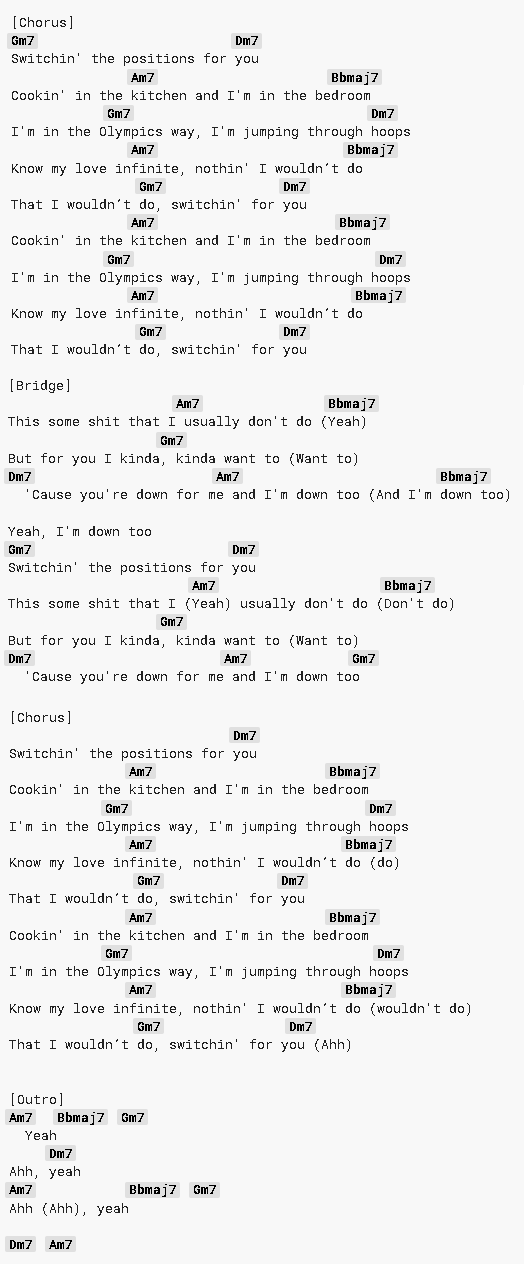
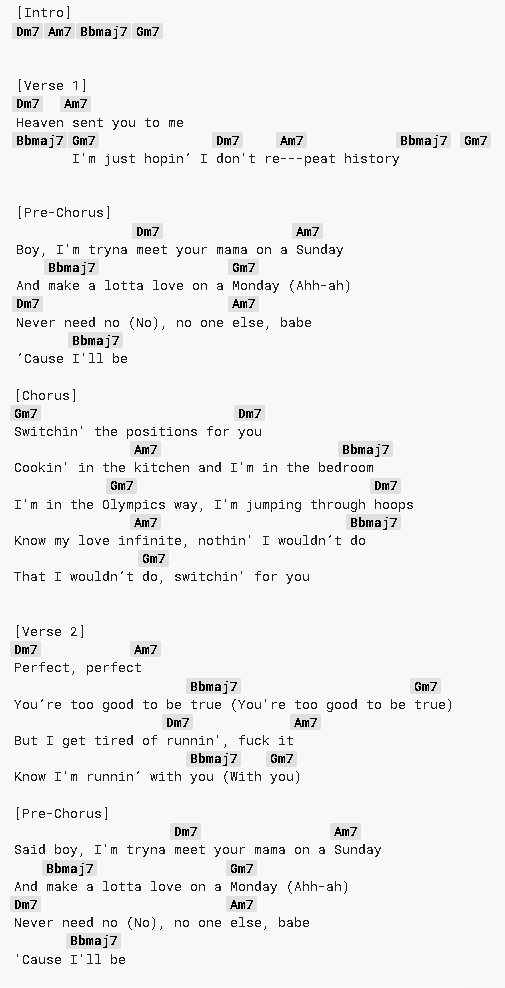
Check the image above to follow the chords and tabs.
This lesson has only four chords, and it’s really a great way to work on your picking, and work on how those chords sound. We start with the d minor chord going to play pointer finger first fret on the high e string using your pinky or your ring finger. Using your pinky on the third fret on the b string and middle finger second fret on the g string, then open d string is our root note. This will be trying to catch the vibes of the original song. While keeping it more of an acoustic rhythm guitar version of it, so the way we can do that is to pick through the chord alright.
Step 1: Taking the Four Notes
Start by just taking the four notes and playing them in order. Almost like an arpeggio right. An arpeggios is when you play the notes of a chord one note at a time instead of all together, we can work on doing them both ways because there are only four chords. This song is just repeated but played in different ways. I think a great way to start is to really pick d, g, b, e and then open the e string up to a. This will give us time to get to the next chord and also just kind of give the same vibe of the arpeggio in the song right so it’s one two three four five just like that now if we’re going to count it one, two, three, four and one and two and three and four and okay because we’re going to the next chord which is a minor next pointer finger first fret on the b string ring finger the second fret on the g string middle finger the second fret on the d string.
Step 2: Getting the b and g string together
Now, this is going to be a little bit different we’re still picking through the chord but it’s going to sound like this. All right, we’re getting a little longer on that open a string, now we’re getting the d, g and then I like to hit that b string with an upstroke and if I can get the b string and the g string together and then silence it, by just taking the pressure off of my fretting hand.
I think that’s really a good representation of the vibe of the song. So again you can just play like d minor, a minor, b flat major seven, g minor. But I think to get into the vibe of it is really a great way to do it, just like the first two chords. I think it’s good to think about this in pairs. So I’m just kind of working on getting that and again. You’ll see I’m kind of getting a mute, I’ll just bringing my picking hand just down to silence the strings instead of just letting it go with my fretting hand again, however if you want to do it, this is just one version you don’t have to play it just like that but I think it’s kind of like a cool way to kind of get the vibe of it d minor, a minor the next pair is going to be b flat major seven also known as a sharp major seven uh really it’s your pointer finger on the first fret of the a string ring finger third fret of the d string middle finger second fret on the g string, pinky third fret on the b string this can be kind of a big reach for a lot of people.
So we’re going to do an alternate version of this in a second but i want to do this one where we also get your pointer finger to bar the first fret on the high e string again we’re going to do a much easier version of this in a second but to kind of keep along with the vibe we’re just going to do that same picking pattern on this b flat major 7 chord where we’re going a d g going to the high e string and then the b string right just like that and then if you get more than the b string that’s fine too we’re just kind of getting that da, da, da sound going right and then from here.
Step 3: Doing Alternate Version
I like to take a g minor 7 chords, you’ll see chord charts call for a full g minor chord, but I actually think it sounds better as g minor seven plus is easier to play all right so again we’re going to do the alternate version of that b flat in a second. I just want to finish up the chord progression where the g minor is really easy to play, middle finger third frets on the low e string we’re going to skip a string and then try to either bar the third fret of the d, g, and b string with your ring finger or just play three-d and three g. As an alternate way to play a g minor seven chords where we’re just hitting the strings we’re holding down again in pairs, we have d minor. A minor b flat g would be okay if you do the easy version of this g minor seven chords. I’m just getting the root note of d, g, and then the chord. It seems much easier to do that than getting the whole chord in there, b, a minor b flat.
Step 4: Different Way to Play b Flat
Let’s talk about a different way to play this b flat, because again the frets are the farthest away from each other in the lower part closer to the nut of the guitar it gets a little bit easier to make these stretches as you go down the fretboard, just because you see b flat major seven or a sharp major seven doesn’t mean you have to play just one version of it.
I actually like this version of the b flat major 7, a little bit better because it’s easier and sounds really good to you right so we’re going to take this note, but playing it on the e string which you can always find another note on a string lower by just adding five frets one plus five to six and then going a string lower this and this six e and one are the same note. So we’re going to play a major seven chord voicing rooted on the sixth fret of the low e string we’ve got this and then we’ve got seven d and g with your ring finger and your pinky and then your middle finger on six b.
Step 5: Difference Same Picking
Here’s the difference same picking
e, d, g, b, g down down down up up
This is how I’ll generally play that direction from there and then, so from this to this I think it might be easier for some people to do this and honestly, it really doesn’t matter no one’s going to play the proper b flat major seven voicing of that chord. I think the easiest way to do this is having the b flat major seven D.
A little bit of run from playing this position all the way down is actually using a different d minor voicing right here and a different a minor voicing up here, then you can keep the whole thing in this one spot so when you play the song usually, playing like this would make it sound a little bit more different from the verse of the chorus because they are in the same chords so we’re just kind of mixing it up a little bit. I’m just using a different d minor chord voicing the fifth fret on the string 7 7 on d, n, g middle finger 6b, and then using the same voicing for the g minor. In fact, you can use this chord voicing minor seven chords for all the chords except for the b flat just by taking this d minor and playing it on the tenth fret.
Remember I’m rooting it on the fifth fret of a string, if you want to read this on the e string just add five, five plus five is ten go down to the e string. So it doesn’t have the same arpeggio picking as the other one but I think it’s actually a lot easier for your fretting hand because you’re doing pretty much the same shape with this variation for the b flat major to get back to the g minor. In this version, I’m just going to strum the whole progression and going to play it like this so 10 skips the string 10 and 10 down up, down up, and then mute. Then to the fifth fret, we’ve got this b flat major seven rooted on the sixth fret to the third fret so then, it becomes just kind of like a numbers game ten five-six three-d minor, a minor, b flat major seven g minor.
Recap: How to Play “Positions” by Ariana Grande on the Acoustic Guitar
So there’s a lot of different ways you can play one song and I think songs like this have a repetitive chord progression which allows you to practice different things you can do with both rhythm and chord voicing. It’s conceptually very easy to remember d minor, a minor, b flat major seven, g minor a lot of times. You know b flat major seven and g minor aren’t the most popular chords in a lot of pop music so that’s why it’s a really cool one to have it under your belt because it’ll make you a lot better of a player and you’ll be able to tackle any of these chord progressions in different songs so anyways thanks for watching if you have any questions or comments hit us up in the comment section let us know other things you might want to hear and then in the meantime check out other guitar control videos by myself and other great instructors on this channel and hopefully talking to you soon thanks a lot
