How to Play Green Onions by Booker T. Jones and the M.G.’s
In this Guitar Control video lesson instructor Jon McLennan, is going to show you how to play “Green Onions” by Booker T. Jones and The M.G.’S. Jon is going to breakdown the Organ Part and arrange it for the guitar. You can actually play that part through the entire song. He’s also going to show you how to play the melody in octaves in the style of Wes Montgomery.
Step 1: The Organ Part
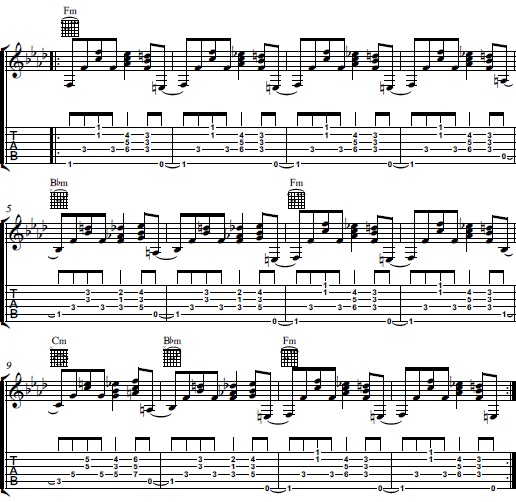
Step One is learning the rhythmic part. Breaking down this organ part and playing it on the guitar. This would be the rhythm part Jon would use to play behind a soloist or to just imitate that organ comping. It’s a really cool sound, so Jon decided to take it rearrange it for the guitar.
Start with an F minor chord. To play this F minor chord, Jon actually uses his thumb. He has his thumb wrapped around the neck and grabbing the 6th string 1st fret, you have probably done this many times to mute, but in this case you are doing to actually hold down and play that note. Then place your third finger on the 4th string 4th fret and then barre your pointer finger on the 1st fret pressing down on the 3rd, 2nd, and 1st strings. If this chord is uncomfortable for you, you can play the normal F major barre chord on the 1st fret.
Jon prefers the other voicing because he thinks it just sounds better for this song. Jon mixes up using his pick and his fingers for this song, too. He does this to grab some of the double stops you will hear and he feels like it better imitates the sound of an organ. Since this isn’t a part made for guitar, there is room for interpretation. The reason that doing this sounds more like an organ or piano style is because when playing those instruments the keys are pushed down and they all sound out at the same time, as opposed to guitar where even if you strum fast, in slow motion, you are hearing one note at a time. But by using your fingers in your strumming/picking hand to pick more than one string at the same time, you are getting the notes to sound out at the same time, making you sound much more like a keyboard player. So that is how John approaches this.
The first figure starts out by holding down that F chord and picking the 6th string, then the 4th string, then using your fingers to pluck both the 2nd and 1st strings at the same time. Then you are going to move up to an Ab triad. To play this chord place your ring finger on the 6th fret 4th string, your middle finger on the 5th fret 3rd string, and your pointer on the 4th fret 2nd string. And then you pinch those notes with your fingers in your picking hand, instead of strumming them.
Jon is actually using his pick on the 4th string and his fingers on the 3rd and 2nd strings, but he is pinch them all at the same time so that they ring out together at the same time. Then he goes to a Bb triad, which is just his first finger barring the 4th, 3rd, and 2nd strings all in the 3rd fret, use your fingers to make all of these notes sound out at the same time, and then play an open E note, the open 6th string, and then hammer back into the first chord, grabbing the 6th string 1st fret with your thumb. So that is the one chord. Again this is a 12 bar blues in the key of F minor. Repeat this for four bars and then move down to the four chord.
This is kind of an interesting treatment because one second its major, and then the next second you are playing is the minor 3rd. Again it’s sort of the ambiguity of the Blues. It’s like something are they chords major or are they minor. Jon would say they are neither, their blues. Back to that next chord, place your pointer on the BB note, on the 5th string 1st fret, then place your pinky on the 4th string 3rd fret, you can use your third finger instead of your pinky if you want to grab that note, it’s totally up to you, Jon is using his pinky, and you are actually going to bar with this finger, the 4th, 3rd, and 2nd strings. He plays this chord by picking the 5th string, then picking the 4th string, and then using his fingers to make sure he’s getting the 3rd and 2nd string to sound out at the same time. Then you’re going to go to a Db triad. To play this triad place your ring finger down on the 4th string 3rd fret, your middle finger down on the 2nd string 2nd fret, and your pointer on the 3rd string 1st fret.
Use your fingers to make all of these notes sound out at the same time, so only plucking the strings that have your fingers down. Do that once and then move the shape up a whole step to an Eb triad. Same fingers but now your ring finger is holding down the 6th string 3rd fret, your middle finger is on the 2nd string 4th fret, and your pointer is on the 3rd string 5th fret. Then pluck all these strings together with your fingers, once as well.
This is actually mimicking the actual guitar part in the song, which is just a bass line. So you can hear and see how the chord progression is mirroring that. Then for C, because we keep getting these little hammer ons, it’s just an embellishment, it’s basically the same thing we were doing before for the Bb but moved up two frets. So now sliding with your pointer finger from the 1st fret to the 3rd on the 5th string, leading you into the chord. Pointer on the 5th fret 3rd string and ring finger or pinky barring the 4th string, the 3rd string, and the 2nd second string all on the 5th fret. Then you do the same triad shape you did before for the Db and Eb triads, but now going Eb to F triads. So the same exact voicing and finger we did for that Eb, and then move up two frets to make it an F triad. So now your ring finger is holding down the 6th string 5th fret, your middle finger is on the 2nd string 6th fret, and your pointer is on the 3rd string 7th fret. Then go down a whole step back to the Bb minor, and then home to the F minor.
Follow along with Jon as he plays the last four bars at the 7:22 minute mark. If you are enjoying this blues lesson be sure to check out our other lesson how to play Chitlins Con Carne By Kenny Burrell, for another great and unique 12 bar blues.
Step 2: The Melody
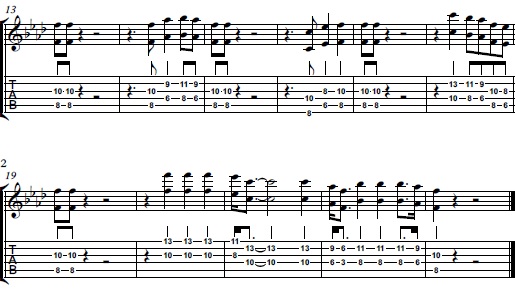
The next part that you are going to want to learn is called the head, or the melody. This is played by the Organ, but when Jon plays gigs he likes to play it in a Wes Montgomery octave style and uses his thumb. So for this part he actually hides his pick between his fingers and plays this part with just his thumb brushing on the strings, giving it this nice warm sound.
Starting out with your first finger on the 8th fret of the 5th string. Then use your pinky on the 10th fret 3rd string. This is how you make an octave, but the trick is to actually deaden all the strings around it so that you get a really clean sound with no open strings ringing.
You are going to play two eighth notes back to back on this octave shape and you are going to play that twice. Then you are going to move your shape to the 4th string 6th fret with your pointer finger and 2nd string 9th fret with your pinky finger, strum this octave once, then move it up a whole step, now having your pointer on the 4th string 8th fret and your pinky on the 2nd string 11th fret. Then move your shape back down a whole step to the 6th and 9th frets on the 4th and 2nds strings. Then back to the first shape on the 8th and 10th frets on the 5th and 3rd strings. And all that is is the Blues scale.
Try to play the melody along with Jon at the 10:41 minute mark. So that’s the first two phrases. Then we are leading into the four chord. You are going to repeat that same thing, but this time lead into it with an octave on the 6th string 8th fret with your pointer and the 4th string 10th fret with your pinky finger. Now playing C, Eb, F. So when you get to the Eb you play your octave on the 5th string 6th fret with your pointer finger and the 3rd string 8th fret with your pinky, then move this shape up a two frets, one whole step, now holding down the 5th string 8th fret with your pointer finger and the 3rd string 10th fret with your pinky.
This lead definitely has a very Miles Davis vibe to this riff, just that rhythm if the lead is very jazzy. Then you are going to slide into the note, C. place your finger on the 10th fret 4th string and your pinky on the 13th fret 2nd string, and then you just go down the scale. I’m just going to say the fret your pinky is on to make this easier to explain. So let your pinky guitar you for this part, as we are moving our shape to each fret I will say. So 13th fret, to the 11 fret, to the 9th fret, to the 10th fret, to the 8th fret, then ending on the 10th fret and this time play it twice, just that last octave, all the others were just played one time. A nice little phrase, walking back to our theme. Every phrase ending with those eighth note hits, one and.
Step 3: The Turnaround
For the turnaround there is a lot of sliding into the notes and embellishing them. So really you’re just thinking about that 13th fret. Letting our pinky finger note guitar us on the fret board for this part. Still holding those octave shapes. Again, this is pointer on the 3rd string 10th fret and pinky on the 1st string 13th fret sliding into the 13th fret from the 12th fret, over and over again. Then going up one string so now you are on the 2nd string and then make your octave with your pinky on the 11th fret, they also on the 2nd string now move your octave with your pinky on the 13th. So you really want to get comfortable with this octave shape and moving it around.
It definitely takes practice to be able to slide this octave shape around smoothly and confidently. Then end with the octave that has your pinky on the 13th fret 2nd string, then to the octave with your pinky on the 9th fret 2nd string, and ending with your octave with your pinky on the 10th fret 3rd string, then sliding into the octave with your pinky on the 11th fret 2nd string a bunch of times. And then ending with the octave with your pinky on the 9th fret 2nd string, ending with the octave with your pinky on the 3rd string 10th fret. Again, Jon is just trying imitate that Organ playing the melody.
Recap: how to play Green Onions by Booker T. Jones and the M.G.’s
I hope you enjoyed learning how to play “Green Onions” by Booker T. Jones and The M.G.’S. This is such a great and unique track. Remember to take this piece by piece and master each part before moving forwards. Also be sure to use this track as inspiration for your own writing, soloing, and playing. These legendary blues guitarist always play with tons of emotion and really tell a story with their playing and make their guitar sing. Try and find your inner blue guitarist and try to really make each note tell a story or add a different color or flavor to you musical sentences, and of course, as always, have fun!
