How to Play Chitlins Con Carne by Kenny Burrell
In this Guitar Control lesson instructor Jon McLennan, is going to show you how to play “Chitlins Con Carne” by Kenny Burrell. This is a great blues song in the key of C with a Latin flavor. Jon is going to break this song down for you in a couple of sections. His going to show you how to comp through the entire song and how to play the chords. Then he will also take you through the main melody and how to solo on this track in this style.
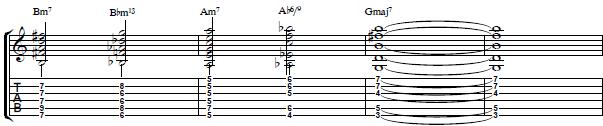
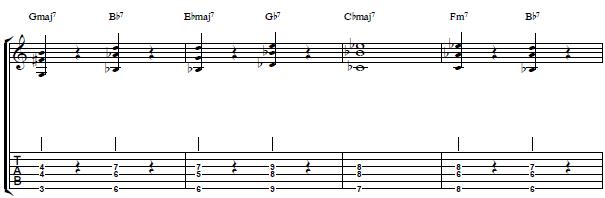
Check the image above to follow the chords and tabs.
Step 1: How to Comp
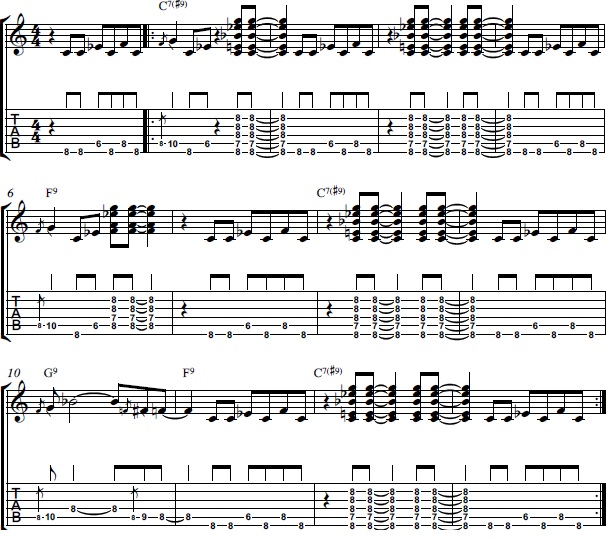
Step one in learning how to play “Chitlins Con Carne” by Kenny Burrell is learning how to comp. Jon is going to show you how to comp and show and explain the chord shapes that Kenny is using in this song. The first chord is a C7#9. The chord progression of this song follows a basic 12 bar blues, just using the 1, the 4, and the 5 chords. The 1 chord is a C7#9. Jon first learned this chord from Jimi Hendrix. Playing it with the root on the 5th string, 3rd fret with your middle finger, your pointer holding down the 4th string 2nd fret, your ring finger holding down the 3rd fret 3rd string, and your pinky on the 4th fret 2nd string. But when you move that chord down to the root being on the 6th string 8th fret, it sounds a lot more jazzier and just a lot fatter sounding, it sounds really good.
Jon does mention he sees a lot of players playing it in the Hendrix way, but he prefers it rooted on the 6th string 8th fret. To play it with the 6th string 8th fret root, use your middle finger to hold down that 6th string 8th fret, then use your pointer finger to hold down the 5th string 7th fret and your ring finger to barre the 98h fret on the 4th, 3rd, and 2nd strings.
This is cool because you are holding down the major 3rd on the low strings and then you have the sharp 9 on the higher strings. Jon is using this voicing to play the 1 chord, and we are going to play the 1 chord for four bars, nice and simple. Then you’re going to move this shape down a string. So basically moving that shape chord shape, same grip, just relocated down one string. Now your middle finger is on the 5th string 8th fret, your pointer on the 4th string 7th fret, and your ring finger barring the 3rd, 2nd, and 1st strings on the 8th fret. This an F9 chord. Play this F9 for two bars, then return back to the C7#9.
Then for the turnaround you’re going to use that same exact chord shape as the F9 but you’re going to bring it up two frets, playing an G9. So middle finger now on the 5th string 10th fret, pointer on the 4th string 9th fret, and ring finger barring the 3rd string down through the 1st on the 10th fret. Then move back down a whole step, returning to their F9 chord. Then back home to C7#9. Go to the 3:12 minute mark to see Jon play through this progression, playing the chords on down beats and playing very sparsely, really marking these chords through the 12 bar blues, feel free to try and play along.
That would be a cool way to practice getting used to playing these chords on those downbeats and getting used to these chord shapes and grips. Maybe these chord shapes are new for you and you just want to practice getting a clean sound and make sure you can hear all the notes in the chord, and that’s important. If you are enjoying learning this Kenny Burrell song be sure to also check out our other video on how to play Kenny Burrell jazz style guitar.
The other thing you may notice is that Jon is using his thumb to play. He decides to do that for this lesson and a few others that he feels do well with that warmer sound that he gets from using his fingers to pick and strum, rather than using a pick. Using his thumb totally changes the tone right away.
Step 2: The Rhythm
Now, lets add a little bit of rhythm to these chords. At the 5:06 minute mark see Jon add in some rhythm to this chord progression. So basically what Jon is doing is just adding a little bit of rhythm to these chords. He’s using eighth notes and adding them in on beat 2 and the and of 2, and also playing two more eighth notes on beat 4 and the and of 4. Just playing the chords twice, in a sequence of two. Then go through all of the chords, using this comping rhythm. Take it through the entire 12 bar blues applying how many times you play each chord to the structure it falls in in the 12 bar blues. That is how Jon would deal with the harmony. Jon would listen to the other musicians and try and find a rhythm that’s going to compliment what they’re doing, and also build and create motion.
Step 3: Learning The Melody
The next step is learning the melody. The melody of this song is totally a Classic and is the stand out riff in this track. Just like he did with the C7#9, Jon plays this melody on the lower strings. He does this because he wants to play this part with as fat of a tone as he can, and what better choice than the lowest string. You can play it on the 5th string 3rd fret, using that C note, but Jon prefers to play it on the fatter, lower string to get that fuller sound. Even though it’s just a one string difference, Jon feels that it’s a pretty big one.
Let’s go ahead and start with our third finger on the 8th fret 6th string. The melody comes in on beat 2 and you’re going to play two eighth notes in a row on the C on the low E string. So ring finger on the 6th string 8th fret and pick it on beat 2 and the and of 2. Then you are going to continue playing that strictly eighth note rhythm going to the 5th string 6th fret with your pointer finger and picking it once. Then go back to the 8th fret 6th string with your ring finger pick it once, then roll your ring finger down to the 5th string 8th fret, pick that note, and roll it back up picking the 6th string 8th fret one more time. Then slide your third finger from the 8th fret to the 10th fret on the 5th string. Then go back to the 6th string 8th fret with your ring finger and then play the 6th string 6th fret with your pointer finger.
Follow along with Jon at the 8:25 minute mark. That is the first part of the melody. Then go back to the 6th string 8th fret with your ring finger and pick it twice, then to the 6th fret 5th string then back to the 6th string 8th fret, back to rolling your ring finger down to get the 5th string 8th fret, and then bringing it back up to grab the 6th string 8th fret again then you rest.
Now, repeat the first part of the melody. We are at the point in the progression where we are at the 4 chord. This is where the melody changes. This is just following along your typical, lyrical blues format. A, A, B. So we would call that first part of the melody, A. Follow along with Jon at the 9:25 minute mark where he walks through everything we’ve done so far. And remember even though this is the same melody, it is over different chords which makes it sound different.
Now, we’re going to do what we call the B part, which is the turn around. It actually starts the same way, ring finger on the 8th fret 6th string, pick twice, then go to the 6th fret 5th string and pick it once, then right back to the 6th string 8th fret and pick it once. Then roll your ring finger down a string, picking the 8th fret 5th string once, and then back to the 6th string 8th fret once. Then take your 3rd finger and slide it up on the 5th string from the 8th fret to the 10th fret. Then drop your first finger to the 4th string 8th fret. Then side the 8th fret to the 9th fret on the 5th string as well. Back to the 8th fret 5th string. All of this is really coming out of the C Blues scale. Then return to the main theme. Then do it again.
It’s such a short melody and blues a lot of times you’ll play the melody twice. See what that sounds like over the blues changes at the 11:07 minute mark. You could probably tell that at this point, Jon is hinting what he is going to do last. He is going to combine both the parts we learned. Comping with that main melody. Follow along at 12:06. Whenever the melody takes a break, he is hitting some accents with the chords. What John do that in depth with the looper at the 12:40 minute mark.
Feel free to first work on the comping, then the melody, and then put them together like that. By playing both parts you could play that solo guitar and it would sound full, because you are bouncing back and forth, playing the melody that being the rhythm section, they respond to each other.
The last step would be getting into solos. Most of Kenny’s solo is the blues scale, even the melody is from the blues scale. Look at the melody and then look at the solos on it, that will teach you how to play the blues. If you know your C blues scale, the melody is telling you, it’s right there in the music. If you are not familiar with the blues scale, see the video at the 14:11 minute mark to see Jon play through it quickly. Then Jon demonstrates how he improvising over the Blues using the C Blues scale over the same 12 bar blues progression, now you do the same.
Recap: How to Play Chitlins Con Carne by Kenny Burrell
I hope you enjoyed learning how to play “Chitlins Con Carne” by Kenny Burrell. What a fun, cool song. Remember to take these unique elements you learned today and bring them into your own playing, creating your own unique style. Make sure you learn these chord shapes, changes, melodies and licks, slowly before speeding them up. And see how Kenny took a typical 12 bar blues and really spiced it up by adding a totally unique Latin feel to it. See what you can add to the 12 bar blues that would be unexpected and fun. You never know what you will stumble across, so let this open your mind to things you wouldn’t normally think to play or add in a 12 bar blues.
GET Jon Maclennan’s courses by clicking in the links below – GO!!! ➜