[contentwall]  [/contentwall][ninja-popup ID=715]
Killer Jazzy Neo Soul Chord Progression – Jazz Guitar Lesson w/ Matias Rengel with Guitar Control and today you’re going to be learning this really cool and challenging neo-soul jazzy progression. As usual there’s a link in the description, so make sure you click or tap on it to download the tab. Let’s get down to it. All right, so the first thing that I want to do, I want to play this at a slower speed because I was just playing it really kind of fast.
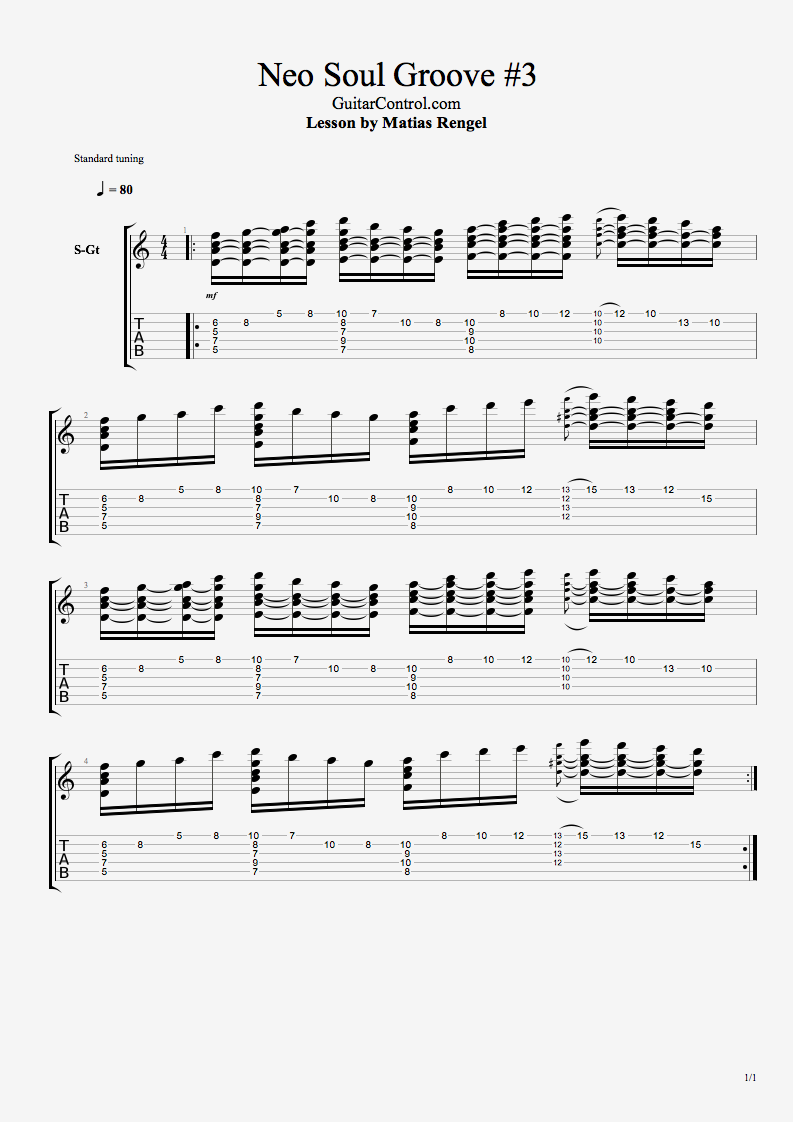
So I would like to, instead of showing you the actual riff that I’m doing, the actual progression, I would like to show the chords first and then we’re going to get into the specific of it because it’s much easier I think that way. So I’m playing a D minor seven. Then I’m playing the E Minor seven, F major seven. And then I’m just doing a version of it until I go into a E diminished.
But let me break it down for you. So for the first one, I got my index on the fifth fret of the fifth, fourth, third, second, and first string. Then I have my ring finger on the seventh fret of the fourth and middle finger on the sixth fret of the second. Then I move that same progression, that same chord, and move it into a seven fret, two frets up. And then from there, check this out, I move it one step up, but I bring my middle finger into the third string and I bring down the pinky into the 10th fret of the second string. Move it up and just…
Now for the inversion that I’m doing, we’ve seen it in other videos. I am placing my index finger on the 10th fret of the fourth, third, second and first string. And I’m bringing my, this is part of the actual licks that I’m playing a little bit, but I’m bringing my ring finger into the 12th fret of the first string. And that’s for that. For the E diminished one, I got my index finger on the 12th fret of the fourth, third, second and first. And I got the middle finger on the 13th fret of the third string and the ring finger on the 13 fret of the first string.
So you get the progression now. I would say practice the progression first. Just practice it like this. Like that. It’s going to help a lot because you need to know the chords first. So once you get that down, let me show you what I’m doing actually. I start here. I can strum it up to the second string. From the second string I go into the eighth fret. I always get the shape of the chord and I go… I bring down the pinky to the eighth fret of the second and then I play this first string. So for the first string I have it with the index finger on the fifth fret. And then I bring down the pinky to the eighth fret.
So we have that and I’m keeping the chord shape. The idea is to keep it sounded, unless you’re going for the muted sound, which also works. Perhaps, maybe it’s an even better idea to start with a muted sound so you don’t have to worry so much about keeping the chord sounding. What you want to do after this, you’re going to move the chord to this one with the pinky there and you’re going to go… You’re going to strum up to the first string and you’re going to remove the pinky and you’re going to have the seventh fret of the first that you’re playing it with index already. Then you put the pinky on the 10th fret of the second, remove it, see, and your middle finger’s already on the eighth fret of the second. So that’s why it’s important to keep the chord shapes and not move them. Because you’re moving around the chord shape. So from there you move it and you’re going to go up to the second string. And then you’re going to play the first one. You’re going to bring down the pinky into 10th fret.
I want to hear this. Okay? I’m going to hear the 10th fret of the second string, eighth fret of the first, 10th fret of the first then 12th fret of the first. So we’ve got…
And now from there we’re going to go into this chord. After you play the 12th fret of the first, you go into this chord and you do a hammer onto it, 12th fret like that. And then you played the 10th fret of the first, 13th fret of the second and 10th fret naturally, that is right there off the second string. Pretty cool right? Now, you got to repeat that. Up to this chord. Up to the 10th fret of the first string.
And once you get there, we’re going to do a hand move. You’re going to move the hand entirely with the index to the 12th fret of the fourth, third, second and first string. So basically the chord is going to be just a note. The chord is going to stop sounding for the moment. It’s going to be like… See there’s no chord there in that moment. Since you already have the index finger on the 12th fret, you’re going to bring down the middle finger to the 13th fret of the third and ring finger into the 13th fret of the first. And from there you’re going to do a hammer onto the 15th fret of the first string. Then you’re going to remove the ring finger. You’re going to be left with the 12th of the first string, and then bring the pinky on the 15th fret of the second and that’s it. It sounds like that.
So you got… Really, really cool. Now, some variations that you can add to this. You can do that right there in the second chord. So for that you will go… That will be seven, 10, hammer and pull off. 10 of the second, eight of the second, nine of the third, seven of the third and nine of the fourth. But you need to keep the chord. That’s a little bit harder.
Anyways, that’s all for today. I hope you’ve enjoyed this lesson. It’s a really cool progression and groove. It’s a little bit maybe on the complicated side, but you can totally do it. Especially if you click or tap on the link in the description and download the tab. Because this is, I’m going to say it, it’s not that easy, but if you have the tab, it’s going to be super easy. You’re going to be able to practice it every day. So that’s all for today.
Remember to subscribe to our YouTube channel for daily guitar lessons. One more thing. I would love to know what would you like me to teach you next? So leave a comment down below with your answer. Thank you so much for watching.
