Learn to play the iconic intro solo for the classic Pink Floyd Song Wish You Were Here from Guitar Control instructor Darrin Goodman. Be sure to get the free tabs to go along with the video instruction and you will be rockin’ this classic tonight.

Introduction
Hey everybody how’s it going? This is Darrin with GuitarControl.com bringing you this video lesson. Today I want to just show you how to play the little intro solo for Wish You Were Here by Pink Floyd. So this isn’t too terribly difficult to play and it’s a really nice melody. I’m not a really big Pink Floyd fan, but this is probably my favorite song by Pink Floyd. So be sure to click on the link in the description for the tab so let’s get close up and take a look.
Wish You Were Here Intro Solo
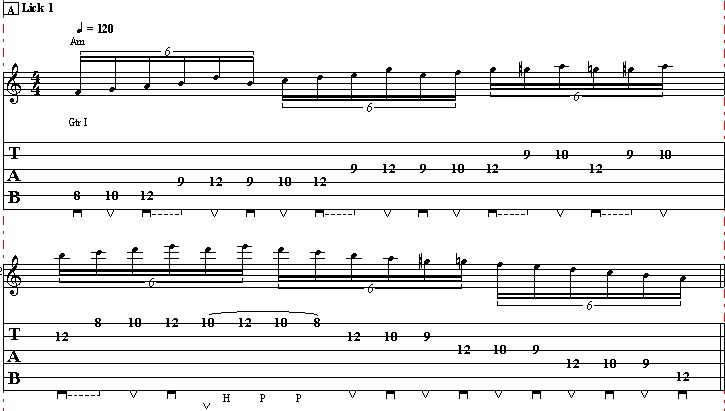
All right so we’re going to start off here on the second fret of the G string and we’re going to pick that and we’re going to slide to the fourth fret, but you kind of want it to be a little a little staggered so you hear when it goes across the third fret. Now I’m using my middle finger for this and the reason being is because after that the next note is on the third fret of the B string so that way my first finger is just ready to go for that. So we pick and slide… so when we do this is like kind of weird to count too; so we rest on the downbeat of one and then this starts on the and of one, but this is a 16th note and then the and then the third and fourth header the 32nd note, so I’m not even going to attempt to try to count this, you just really gotta feel it. Now when we come here this is a quarter note and this is the downbeat of two… now we’re going to go to the fifth fret of the B string so keep your first finger where it is here on the third fret and then we’re going to go to the fourth fret of the G string with your second finger and then back to this third fret of the B string and that’s why I want to keep your finger there… And then after that note there’s a very small rest and there’s little rests just kind of sprinkled throughout this that basically just gives you a second time to transition to the next part. Okay and then after that we’re going to move your hand down so now your first finger is on the second fret of the G string and your third finger is on the fourth fret and we’re going to pick four to the open string and then we follow that with the open D string… Then we’re going to do a slide from nowhere to the second fret of the A string and follow that with two more open D strings and that’s the first two measures… Alright so the third measure, this is probably the most difficult part of this at least this has been my experience with students in private lessons that I’ve done this with. So we’re gonna do is a bunch of little double stops so we’re going to take your third finger, this is how I feel is the easiest way to do it, and put it here, barre it at the third fret across the B and high E string and we’re going to pick that and we’re gonna slide to the fifth fret and we want it to be like a slide from nowhere, but we’re just starting at three… So we start at three slide to five and then we immediately come back down to the first fret and then do the same thing sliding to the third fret and that’s like the first part of it and then we’re gonna do the same thing on the G and the B string but now we have to be staggered a half step and I like to do this with my second and third finger because I’m on the third fret of the G string and the fourth fret of the B string and we’re gonna do that same thing; we’re gonna slide from here up a half step so it’ll be on the on the fourth fret of the G string and the fifth fret of the B string. So you could use you know your first and second finger, but the reason I like to use these is since my middle you know your middle finger is longer than your third and put your hand in this kind of a more natural position that just this works for me well. So we’re going to do that slide to from three and four to four and five and then we’re gonna come down and we’re going to do it so we’re on the second fret of the G string and on the third fret of the B string and then we have the open G string… and then we do that one again… follow with the open G string and then the open B string and that’s on the fourth measure and we just let that ring out for the for the whole measure and that’s the first half of the whole riff… Okay and then starting on the fifth measure it’s kind of like the first again; so we’re gonna start at the second fret of the G string using my middle finger and we’re gonna slide to the fourth fret and follow that with the third fret of the B string, back to the fourth fret of the G to the fifth fret of the B string and again that’s why I want to use my middle finger here… Now when we hit that five there we let that ring out with a little vibrato and then we’re going to we’re going to bend that and do a pull-off back to the third fret; so we have bend release pull back to the fourth fret of the G string and back to the third fret of the B string… And then starting on the next measure right onto the second fret of the G string… now we’re going to go to the fourth fret of the G string so if you keep your first finger here and then put your second finger on the third fret and then your third finger on the fourth fret because we’re going to do a bend and it just makes it easier if you have these two fingers behind you. Then we’re gonna shift up three to five on the B string, back down to the to the same second through fourth fret on the G string and bend and end on the second fret… All right and then moving on to the next measure it’s kind of like the beginning again so we’re gonna do that’s two slide through three and four on the G string to the third fret of the B string back to the fourth fret of the G string to the fifth fret of the B string… Now we’re going to bend that fifth fret of the B string and release and pull back to the fifth fret and then to the second fret of the G string and then finally the fourth fret of the G string and bend and release and end on that second fret of the G string… So the whole thing slowly… All right so as far as the timing with this to make it line up with the rhythm part of it… A good way to practice this is when you put on the original track it goes through that whole chord progression once and then it goes through it again and on the second time is when this lead comes in. So you can practice playing with in unison with the lead to kind of help you to get the overall timing and then you can practice playing it from the beginning of the song where it just has the rhythm without the solo so where you come in with this is you have like… so when you hear that those are like your pickup notes to start playing the lead… and then you hear it again… and then it just goes right into the G and then goes into where the verse of the song starts.
Conclusion
All right so there you have it, a little intro solo for Wish You Were Here by Pink Floyd. I said not too terribly tough to play with lots of good techniques to practice in there uh definitely easier to play it on an electric guitar than an acoustic guitar, but they did it on the acoustic guitar so that’s the way I wanted to do it. So if you don’t have an acoustic guitar or if you’re fairly new or you have a piece of crap acoustic guitar that’s really difficult to play or something you can play this on your electric and that sounds just fine. So if you like this lesson be sure to give me a thumbs up and leave a comment down below if you have any questions about this or other guitar related topics. If you’ve not already done so please subscribe to the channel and hit that notification bell so you don’t miss any of the content that we upload throughout the week. Well that is all I have for you today. Thanks for watching and have a great day.