Check out this second installment or amendment to a previous pentatonic sequence licks lesson from Guitar Control instructor Darrin Goodman, aka Uncle D. In this lesson Darrin revisits a pentatonic sequence idea that he already covered and makes to amendments to it by removing the passing tones and replacing them with the pentatonic scale notes. Being able to play both variations will give you a lot of ideas for licks of your own and with the step by step video instruction and free tabs you will be rockin’ these lick ideas tonight.


Introduction
How’s it going everybody this is Darrin with GuitarControl.com bringing this video lesson and today I’ve got kind of a part two or an update to one that I did a couple of weeks back. So if some of this seems familiar to you that is why and I’ll explain my reasoning.
So right now, Guitar Control is giving away this really awesome daily practice routine to improve your lead guitar chops. This was put together by our very own Silvio Gazquez, a two-time Guitar Idle finalist. This routine covers the four main concepts that are necessary for lead guitar; alternate picking, legato, sweep picking and tapping. All the tabs and exercises are all included in this free ebook and there’s a link in the description where you can get yours.
So be sure to click on the link in the description for the tabs and let’s get close up and take a look at these.
Previous Pentatonic Sequence
All right, so if you remember we’ve been doing these lessons on pentatonic sequences and I did this one that climbed up through the pentatonic positions and I had some feedback on it. People were saying that some of the notes I was playing was actually outside of the pentatonic scale, which is actually true. All right, so I’m going to show you this version of it that the notes I’ll be playing will actually be the correct ones from the scale and I’ll show you where the ones I changed to get my reasoning why. And then the other thing for this was is that some people wanted some more ideas of how to combine these two concepts together.
All right so the basic concept and like I said this is what we did in the other one is that we have this sequence that starts on the B string… and then there’s another version of it that starts on the high E string… So if you put those two together… it sounds pretty cool and that’s the thing we went over in the last one and then we worked our way up. So I have two versions of this on here. I’ve got it going through all the positions with the one that starts on the B string and then I have it again where it starts on the E string and I’m going to show you how you can take the two ideas and like mix them together. It’ll make more sense when we actually look at it.
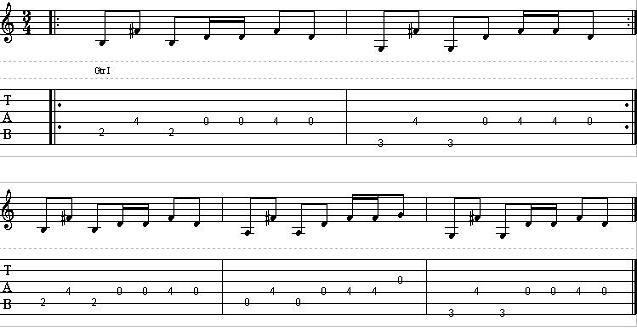
Pentatonic Sequence-1
So starting here on the eighth fret of the B string with my fourth finger and sometimes I’ll use my third finger; whatever’s more comfortable for you. And then on the fifth fret of the B string with my first finger so we’re going to pick that eight, pull the five and hammer to eight and this is all triplets. And then we go to the fifth fret of the of the high E string back to the eight on the B string and back to the five on the high E, so trip-le-let, trip-le-lit and that’s the first two beats. Now we’re gonna go to the eighth fret on the high E string and we’re gonna pick that and pull to eight, excuse me we’re going to pick eight and pull to five and then go to back to the eighth fret on the B string and that’s beat three… And then for beat four we go back to five on the high E string and then we go to the B and pull eight to five… So we’re doing the riff starting on the B string so each measure it’s going to shift up position and that’s our first measure. Okay now we’re just going to shift up so our first note is going to be the note we left off on so we’re going to go eight and then ten and it’s going to be eight, ten on the B and the high E string, but we’re going to do that same pattern. So we’re going to go ten pull to eight, hammer to ten and then to eight on the high E back to ten on the B and back to that eight. Now we’re starting on B and we’re going to pick ten pull to eight on the high E string to the 10th fret of the B string and then back to the eighth fret of the high E and then ten pulled eight on the B string… Okay so now is where we’re going to shift up again and this is where the change is going to be from the previous pattern. So now our first note on the B string tenth fret, but we’re going to go a step and a half to the 13th fret. So same timing 13 pull to 10 Hammer to 13 and now we’re going to go to the 10th fret on the high E string and then back to the 13th fret of the B string and then back to 10 on the high E. Okay now when we do the descending part starting on beat three the first note on the high E is ten, but the next note is actually going to be 12, so it’s just a whole step. So we’re gonna go 12 pull to 10 to 13 on the B string, back to 10 on the high E and then back to 13 pull to 10 on the B string… All right so now we move up into the fourth measure we’re going to shift up and now our first note on the B string is 13 and the second note is 15. So 15 pull to 13 hammer to 15 and then we’re going to go now to the 12th fret on the high E and then back to 15 on the B back to 12 on the high E. Now 15 so starting on B pull to 12 on the high E to 15 on the B string back to 12 on the high E and then 15 pull to 13 on the B string and then back to 15 and bend or just slide up to the from 15 to 17… So this one’s a little bit more difficult because you can’t just keep your first finger planted, you have to move it back and forth this half step. So that is the reason that, well one of the reasons why I changed it from just being a step and a half, whole step, whole step, whole step, whole step, step and a half step and a half… So by doing that what happens is we put a B in there which is not part of A minor pentatonic because B is the second, but in this case it’s like we’re doing a A minor pentatonic with adding the nine in there because nine is the same as two, it’s just an octave higher. So we could call it that, it makes easier to play obviously because you’re not having to shift your finger back and forth, but the other thing is that I just personally really like the way that it sounds and I like having those extra notes, passing tones, just to make it sound more interesting, but that’s just me. So my recommendation would be to actually practice it both ways…
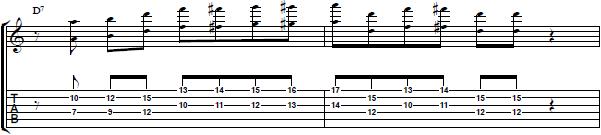
Variation
All right so the other thing I wanted to show you with this is it’s the same idea. All right, so we’re going to start with the descending part of it first. So we’re going to start first fingers on the fifth fret of the high E and the fourth finger is on the eighth fret of the high E string as well. Pick eight, pull to five and then go to the eighth fret on the B string. So again this is triplets, it’s the same timing we’re doing, and we’re just doing it backwards kinda… Now we’re going to go back to the fifth string or excuse me the fifth fret on the high E string and then eight pull to five on the B string. Now starting on beat three we’re gonna eight, pull the five, hammer back to eight on the B string. Now to the fifth fret of the high E, back to the eighth fret of the B and back to the fifth fret of the high E and that’s the pattern… So we’re gonna move the same way. We’re gonna move it up through the position. So now it’ll be eight and ten and then we’re gonna move it up again; so now it’s going to be a 10 and 13 on the B string and 10 and 12 on the high E… Now we’re going to move it up again so now on the high E string it’s going to be 15 and 12 and then it’s going to be 15 and 13 on the B string. So this one is the hardest position to do that in my opinion… it’s much easier, even though we’re adding in that note that’s not part of the scale, it’s still in the key of A minor, so it still sounds good.
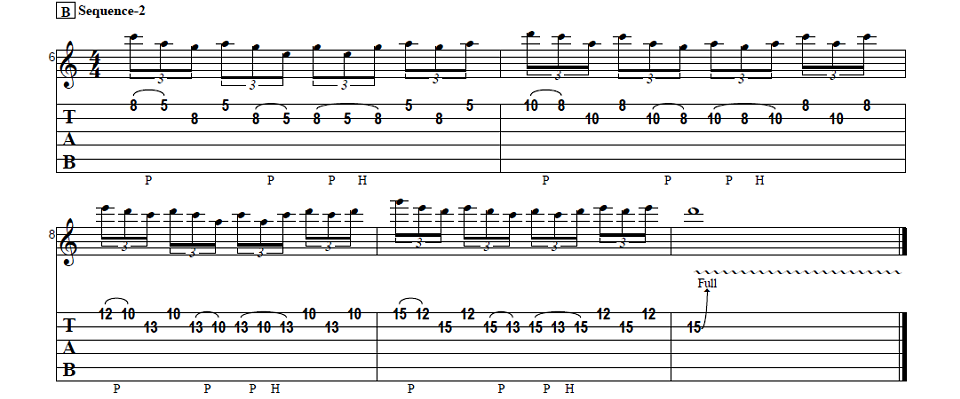
Pentatonic Sequence-2
Okay and then the last idea with this was is that as we move up in the positions a cool thing you can do is change how you’re playing it. So if we started with the descending one in the first position… Now we move to the next position and we start on the ascending… Now we’re going to shift up again and now we’ll start with the descending and then we’ll shift up to the last position we’ll start with the ascending… Now you could also do it the other way around. We could start with the ascending and then go to the descending on the second position and now the ascending part again… and then finally the descending… any kind of combination like that. So we have the first one… we’re going to skip the second position and go to the third… then we could come back and go to the last one. Any combination like that you like could be cool. You could kind of do it to follow a chord progression; there’s are lots of neat things that you could do with this.
Conclusion
All right, so there you have it, kind of a continuation or an amendment of a previous lesson that I did on these repeating pentatonic sequences. So if you like this lesson be sure to give me a thumbs up and leave a comment down below if you have any questions about this or other guitar related topics. If you’ve not already done so please subscribe to the channel and hit that notification bell so you don’t miss any of the content that we upload throughout the week. Well that is all I have for you today thanks for watching and have a great day.