How to Play The Stumble On Guitar
In this Guitar Control video lesson instructor Jon McLennan, is going to show you how to play “The Stumble on Guitar” by Freddie King. The recording we’re going to be referring is one from “My Feeling for the Blues”. There are a number of recordings done for this track so just make sure that this is the one you’re referencing. Jon is going to take you through this entire tune, you’ll learn how to play the rhythm and the opening main melody, theme for this song that he was playing in the beginning of this video. So let’s get started and break down this super cool, classic blues song.
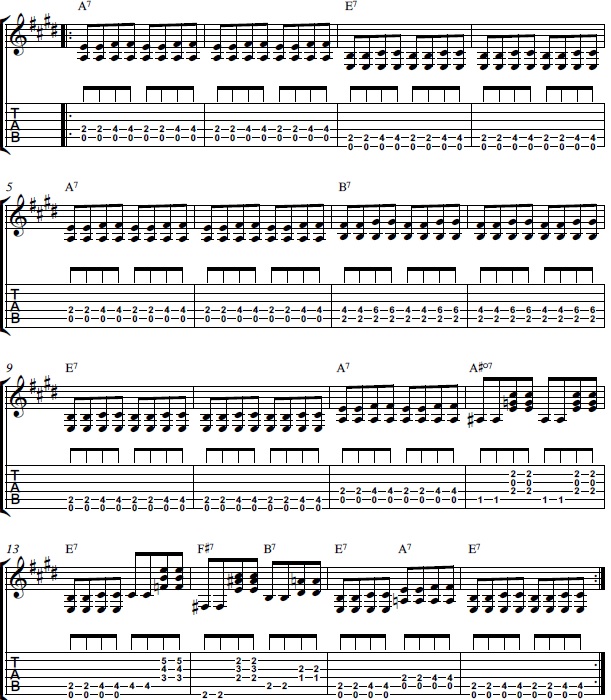
Step 1: The Rhythm
The first thing you’re going to do is learn the rhythm part of the song. Start with the open 5th string and then your first finger on the 2nd fret of the 4th string. You’re going to play these two notes together and play this chord twice.
Then your third finger is going to replace the 2nd fret 4th string and grab the 4th fret 4th string and you’re going to rock back and forth between these two voicing, creating a blues shuffle rhythm. A couple notes that Jon makes about the technique for this rhythm is one, he likes to palm mute this.
This is where his fretting hand comes down on the guitar where the string and the bridge come together creating a tight and muted sound. He does this using all down strokes with his fretting hand. The other thing you will notice in his fretting hand is that his thumb is coming over all the way over the top of the guitar and he is using his thumb to mute the 6th string. He is also using his first finger to mute all of the unwanted open strings below the note he is holding down with his 1st finger on the 4th string 2nd fret. So laying his pointer across the rest of the fret, muting the 3rd, 2nd, and 1st strings. By doing this he is guaranteeing that he will not get any unwanted ringing strings and your rhythm is sounding nice and clean. Then he is going to copy paste this same root 5th to root 6th blues figure and bring it up one string. Now he is going to get the open 6th string and the 5th string 2nd fret together, shuffling back and forth between that and the 6th string played with the 5th string 4th fret. So two bars of each chord shuffling between A and E. Again palm muting and making sure you are getting a good sound.
For the next four bars you are going to return to that A chord and then you’ll go to a B. This is going to become kind of the movable shape for this figure. Placing your pointer now on the 5th string 2nd fret, your ring finger down on the 4th string 4th fret and your pinky grabbing that shuffle note on the 4th string 6th fret. This is pretty interesting because it’s like a 16 bar blues which is a digression from your typical 12 bar blues which is a standard blues progression.
So after everything we have covered he is then going to go back to n E chord, than to an A but this time only for one measure, and then we are going to go to an A# diminished chord. See the video at about the 5 minute mark to see this unusual chord. For this chord he strums the lower bass strings first twice and then strums the higher strings of the chord all the way down twice. Then go back to the E chord. For this you are now just going to play half a measure. Then go to a C#7#9. This is basically your Jimi Hendrix chord right here. You have your middle finger on the 4th fret 5th string, You pointer finger on the 4th string 3rd fret, ring finger on the 4th fret 3rd string, and pinky on the 5th fret 2nd string. For another song heavily featuring that Hendrix chord be sure to check out our lesson on how to play Purple Haze by Jimi Hendrix. So half the measure on that E chord and then the other half on the C#7#9 chord.
He is doing kind of an interesting thing with this progression, he is going to a 1, 6, 2, 5, 1, 4, back to 1, and the way that John plays the 2 5 chord is basically an F# 7, grabbing the F# with his thumb on the 6th string 2nd fret, pick that bass note twice and then grab the rest of that chord, place your pointer on the 4th string 2nd fret, ring finger on the 3rd string 3rd fret and middle finger on the 2nd fret 2nd string. Then B7 is just a typical 3 note voicing, middle finger on the 5th string 2nd fret, pointer on the 4th string 1st fret, and ring finger on the 3rd string 2nd fret. You see these chords in blues all the time. Then he does half a measure of E, to half a measure of A. Back to a whole measure of E. Then back to the top! See a full play through at about 7:10. Then go back to the beginning and repeat, and this goes through the entire song.
Step 2: The Main Melody
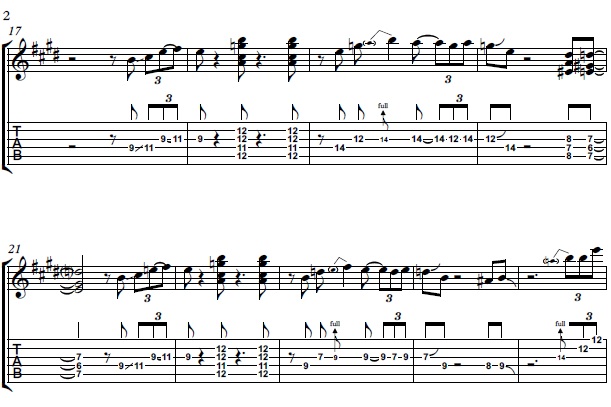
Now that you have that rhythm part down, let’s jump into that main melody. Start with your ring finger on the 9th fret 4th string and then slide it up one full step to the 11th fret 4th string. Then take your first finger and put it right underneath on the 9th fret 3rd string, play that note which is an E and then hammer on to the 11th fret which is an F# and then bring it back to the 9th fret all on the 3rd string. So a little back and forth between these two notes. This is the first motif.
Then we are basically going to play an A9 chord. Which would be your 2nd finger on the 12th fret 5th string, your pointer finger on the 11th fret 4th string, and then barre your ring finger across the 3rd and 2nd strings on the 12th fret. Strum it, then stop the guitar from ringing out, and then strum it again. Then you move up to the 14th fret here, or the 12th fret pentatonic box and play some really good, classic blues phrasing.
Whats going on there with the first lick is that your third finger plays the 4th string 14th fret. Then you move to the 12th fret 3rd string, to the 14th fret 3rd string and then give that note a little bend. Then back to the 14th fret 3rd string and just pick that note, then back to the 12th fret 3rd string, back to the 14th fret 3rd string, then back to the 12th fret with a little pull, adding just a slight bend. I can’t emphasize enough that you need to really be listening to the bends and the phrasing to make sure you give this lick the right blues sound. That is actually the hardest thing about this song, is just really trying to emulate the way he plays these notes, he is never really just sitting on a note without any vibrato, pulling it, or any special flare to it. It is always being bent, so you have to kind of get that way the language is said in the way he makes his guitar sing.
Then you’re going to play an F7 to an E7. F7 is middle finger on the 8th fret 5th string, pointer on the 4th string 7th fret, and ring finger on the 8th fret 3rd string. E7 is right next to it, just moving down one half step, so middle finger is now on the 7th fret 5th string, pointer on the 6th fret 4th string , and ring finger on the 7th fret 3rd string. He’s basically going a half step above the target chord.
The target chord is E7, you go above it and then you land on it, this is a really cool move. Then you are going to basically repeat the same phrase again, followed by an A9 chord, strum once, mute, then strum again both strums on an upbeat. Almost like horn stabs, imitate that characteristic with your guitar on the A9 chord. Then Jon takes the same phrase and relocated it around the 7th fret instead of the 12…moving from the E minor pentatonic box to the B. This is really cool because he is connecting the ideas and it doesn’t just sound like random licks. It really sounds like a composed melody. So be sure to change positions when you get to the B7 chord. He does a ton of these really cool fills where he just dips the note down a little bit or where he just goes back a half step.
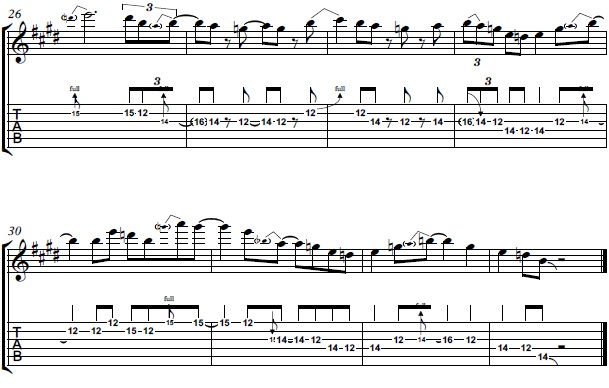
Freddie King does this all the time and it’s very cool and unexpected. So it just goes to show you, here he is breaking the rules. The chord is B7 and he is playing the major 7 against it. Which to Jon that would sound like an awful not to choose, theoretically as far as what is the textbook right note to play, but it sounds so good.
So it just goes to show you if you were only strictly playing by the rules, you would never go to that note but if you learn this note for note, you are going to learn to get this unique and unexpected sounds. Then he goes up to this sort of launching point, playing the most overplayed rock lick of all time, which is basically just bending the 14th fret 3rd string and then picking the 12th fret 2nd strings and then the 12th fret 1st string. Then bend the 15th fret 2nd string and hang that one out with some extra vibrato. The next phase he just picks the 15th fret 2nd string to the 12th fret 2nd string. Then bend the 14th fret 3rd string, and then pick the 3rd string 12th fret to 14th back to 12th fret and on the last hit on the 12th fret slightly pull the note giving it a lot of attitude.
Lots of pulling and pushing on those strings and of course, vibrato when you are sitting on a note. Then there’s this kind of interesting thing. Jon isn’t positive which finger Freddie uses to grab this note but he uses his first finger, bending the 12th fret up 2nd string, but not quite making it to the next note you’d think he would be trying to hit which is the C# which is what’s going on with the rhythm guitar while they’re playing an A7. So after your first finger bend, bend it up and let it back down, then pick the 2nd string 12th fret, to the 14th fret 3rd string, to the 12th fret 3rd string, to the 14th fret 3rd string, then pre-bend the 14th fret 3rd string, to the 4th string picking the 12th fret to 14th, back to 12th, and ending with a small pull on the 12th fret 3rd string.
A pre-bend means you basically just lift the note before you actually pick it so you only hear the second half, not the ascending part of the bend you still had to do to get to the second but you didn’t pick it so you don’t hear it. Then we’re going to hear that popular rock lick again, bending the 14th fret 3rd string, and picking the 2nd string 12th fret, and then the 1st string 12th fret. Then the 15th fret 2nd string, to the 12th fret 2nd string, and then bend the 15th fret 1st string up and down with lots of vibrato.
Then pick the 12th fret 1st string, then another subtle little prebend on the 14th fret 3rd string, then pick the 12th fret 3rd string, then 14th on the 4th, 12th on the 4th, back to the 14th fret. Then pick the 12th fret 3rd string, and then bend the 14th fret 4th string, pick the 12th fret 3rd string, and end with 14th fret 4th string, to the 12th fret 4th string, to the 14th fret 5th string and then slide your finger down the neck and off the fret board. Then start all over! At about 16:31 John will demonstrate this with the chords behind him.
Recap: How to Play The Stumble On Guitar
I hope you enjoyed Jon’s lesson on how to play “The Stumble on Guitar” by the great Freddie King. This lesson is full of great tips not only to master this song, but to add into your own vocabulary. Not only all the licks, but the style and feel that Freddie adds to his phrasing and taking notice of how he makes his guitar sing. So really use this lesson as not only a song lesson, but a style and feel of the lesson.