In this Guitar Control lesson video instructor Shawn Daniel, will show you how to play “Cry, Cry, Cry” by Coldplay. A typical type of waltz that is very emotional but so very easy to play.
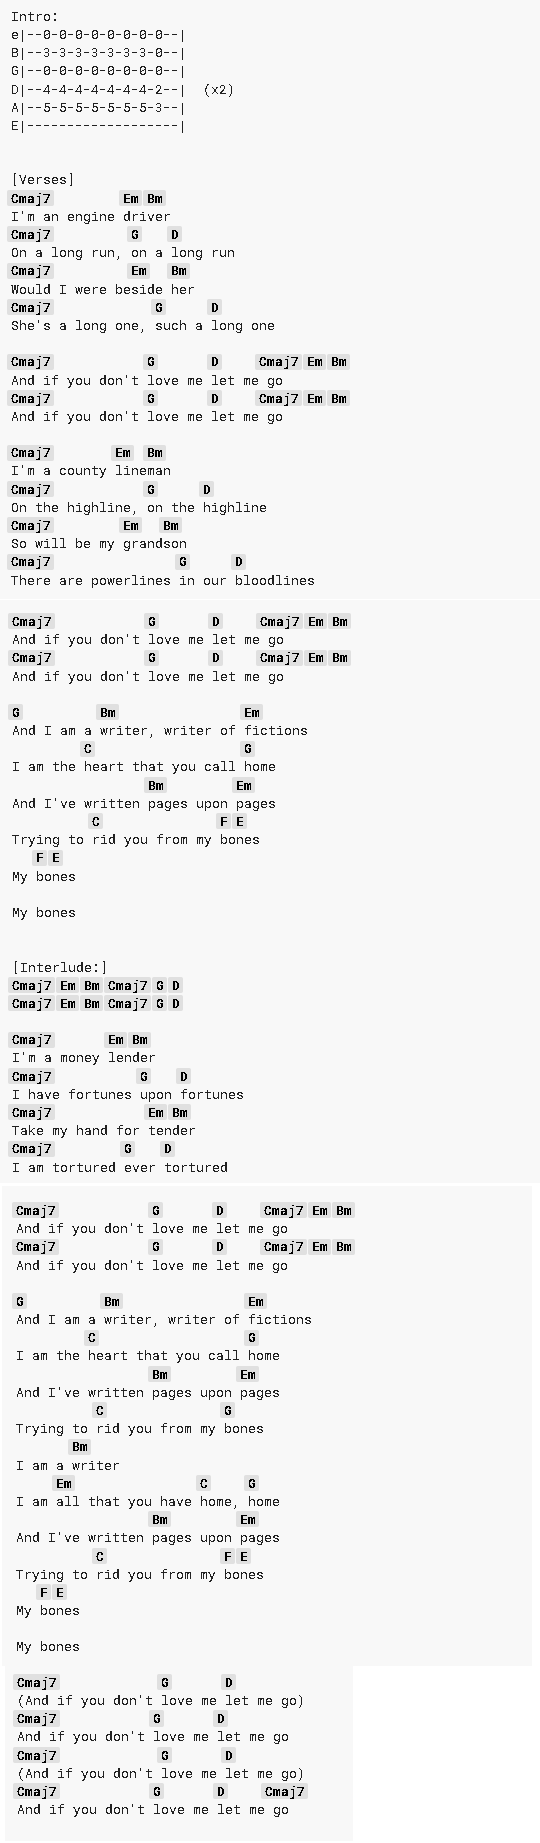
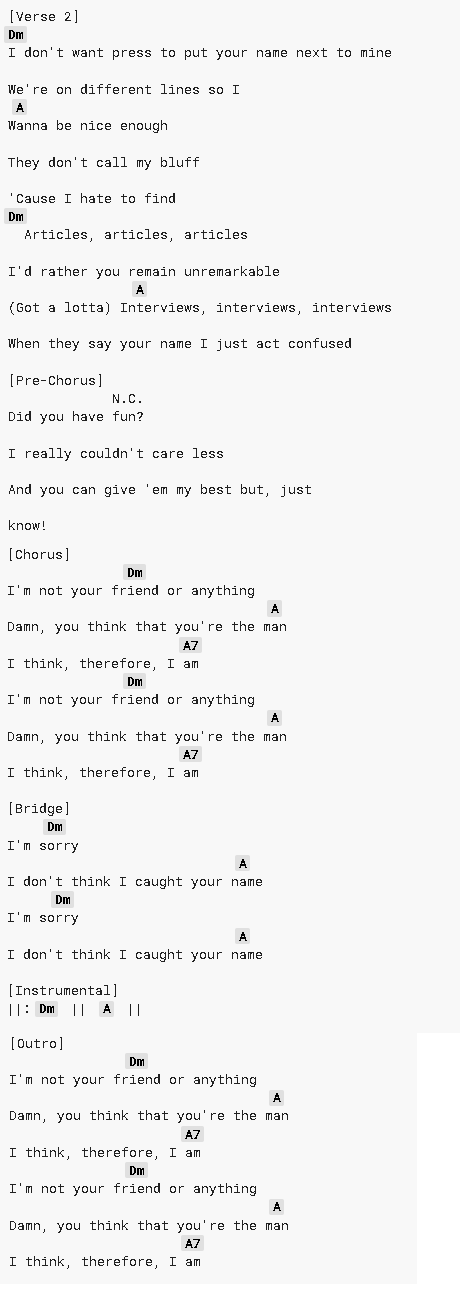
Be sure to check the image above to follow the chords and tabs.
This is an easy four main chords and a cool bridge, with some chords outside of the key. The main part of the song is going to sound like this and has a really cool vibe.
Step 1: Putting Capo
First a capo is put on the first fret of all the chords, we are going to be talking about are going to be relative to the capo, so we are going to start with the g major chord, we’re hearing a g sharp or a flat major but still going to call it a g chord because it is relative to the capo. The third fret relative to the capo on the low e string is our root note g point, your fingers are going to be the second fret on the a string, the ring finger is going to be the third fret on the b string. If you want to use another g major chord voicing that’s fine, we’re going to use one where the third fret on the b string, d note is on top.
Now the strumming pattern or the picking pattern, we will talk a little bit about finger style too if you want, it is pretty simple by thinking of counting to six or counting to three twice if that is easier kind of what gives us that swing that waltz time signature. This is a dynamic that kind of gets and built up through because this is an acoustic guitar arrangement for a piano song; the root note will be kind of isolated by itself on that one count and as you had noticed for the next five hits.
I am working my way through the string set instead of getting all of them. Starting low and then getting a little higher with each one, we will pick one, two, three, four, five, six, one, two, three, four, five, six, to an e minor. Let us use the voicing where your middle finger is on the second fret of the a string, your ring finger is on the second fret of the d string. Now for this same difference, we will get the root note, the open e, and work our way through the chord. Now you will notice, because when we do it this way because it is so constant that one, two, three, four, five, six, do not give your hand a lot of time to go from one, two, three, four, five, six, one, two, three, it is really fast so what we are going to do is we are going to abandon the previous chord on the sixth count.
The way I have done this one, two, three, four, five, six, one, leaving it because it is just one split second essentially between the next chords, buying our hand time to get to that e minor chord one, two, three, four, five, six, one, two, three, four, five, six, one, two, and three.
Moving on to the next chords, the reason I want you to use the e minor and not like the one where you are pulling your finger leads the way is because we are going to go down to an a7, next is a really, easy, smooth transition from e minor to a7. This a7 is open on the a string. Our root note now two on the d string middle finger open g two on the b string with your ring finger and then open on the high e string. It’s really like an e minor down a string and then have your ring finger go down another string.
Step 2: Applying Strumming
We are going to talk about strumming. The next chord is just down a string in your pointer finger. Jumps on the first fret of the b string, a d7 chord on the whole progression are g, e minor, a minor d7. When we apply the strumming, one thing that I like you to do is to palm the verses because this is one of the many songs where the verse and the chorus are in the same chord progression. But if you want to change the vibe up a little bit to have it sound different, we will do an acoustic version. I will take the side of my hand of chop near the bridge, and you can hear me working through the string set. If you really are focus on the length of my pick. Starting here and ending up down here, but never all the way down in one strum, I am starting low and exaggerating this, but you will get the idea anyway. When you get to the chorus, you can open it up, a couple of different ways to play the verse in the chorus.
Arrange it however you want to, especially if you are signing yourself or playing with another singer, use that palm to really create a lot of dynamic control, to maybe deaden or lower the volume of the verse parts, you never want to be playing up here because you got nowhere to go but down, that’s most of the song does. But we have a really cool bridge that sounds like this.
Step 3: Learning Traditional C Major Chord
Let us talk about a c major chord. First of all, traditional c major chord voicing will work just fine, ring finger third fret on the a string, middle finger second fret on the d string open g, pointer finger first fret on the b string we can strum it the same way one, two, three, four, five, six, if we are thinking of counting to six, if a bar is six we will do two bars each. In the first part, we will switch chords every six-count one, two, three, four, five, six, switch then switch. If a six-hole is a bar, we will switch every bar on the bridge. Two bars one, two, three, four, five, six, one, two, three, four, five, and six, again you can do it the same way throughout.
Let me go back to that d7 as we did before core charts have this sauce a d7 suspended. This means you take your ring finger away and make it open; in that case, have a c major. It might be true on the piano, but I think it sounds better in a guitar arrangement to get that f sharp on top to make it a real d7. Having c major to d7 to come up to a new chord b7, b dominant seven has the same shape of a d7 but bump it a string lower, and then another string lower. The root note is the second fret on the a string pointer fingers, first, fret on the d string ring finger, the second fret on the g string now optionally you can get your pinky on that high e string second fret to keep the vibe keeping that f sharp, this is an easier way to do b7 you can totally hit it with a high e string open.
I will play with my pinky on the high e, then after that, we will go to an e minor, but here is where we kind of start getting crazy, c sharp minor seven flat five, also known as c sharp diminished. The fourth fret on the a string, fifth fret on the d string, fourth fret on the g string, fifth fret one pointer ring middle. Four, five, four, five, would be another way to look at this.
This is a really cool chord. It will create a lot of tension. It will split the same time again, two bars each splitting with e minor, it will be one bar b minor, one bar of c sharp half-diminished, same thing as c sharp minor seven, five, five, two different names for the same form. We got c d7, d7 e minor, that is the only time it really splits the bar. After that we’re going back to the a7, middle finger second fret the d string, and your ring finger is the same thing, two bars to c, and then after two bars of c, we will start to do a run and thinking of root note c sharp d. But we are going to play it is as a c chord. That c sharp one back to d7 and then leave some space to get back to the g board.
Let us go through the entire bridge again, a c chord c major one two three four five six again to d7 five-six again d7 e minor splits with the c sharp to a7 to c now we’re going to start the run here c c sharp d seven one, two, three four, five, six, and back to the beginning. I really love and enjoy this song. It is simple, and you can finger pick it if you want. It is just as easy to do.
I think like waltz or anything in six, eight, three, four-time, is really fun, and finger pick. A good example of this is like a one, two, three, four, five, and six. Picking through the chord e, d, g, b, e, chord one, two, three, four, five, six, always striking the root note on the one. I’m going to thumb pointer my middle ring, thumb all of them together. A fun one to practice if you’re interested in finger-style guitar and if you’re interested in learning more guitar lessons. In general, check out some other videos on the Guitar Control YouTube Channel. Let us know, what else you want to see and what you think because we are always taking requests. Thank you for watching and see you to our next video.