Ultimate Pentatonic Roadmap Part 2
In part 2 of Guitar Control instructor, Robert Bakers, 3 part series, Ultimate Pentatonic Roadmap, where he will be focusing on showing you ways to now show you how to connect the pentatonic scale patterns. He will also go over good practice habits to put into play when you are running through this stuff. In this lesson he will be focusing on two different examples, connecting the scales in a way that isn’t just simply playing the scale up and down.
Step 1: Connecting Pentatonic Scale Patterns
If you missed part one, we learned all of our boxes and all of the shapes in E minor pentatonic. What we are going to go over now is a great way to practice these pentatonic scale patterns and get out of the mindset that you have to strictly stay in one box at a time. Robert starts off this example in box one and he is going to play this shape ascending. If you aren’t familiar with box one, or any of these boxes be sure to check out Ultimate Pentatonic Roadmap Part 1, which focuses on the pentatonic boxes.
So box one, open 6th string to the 6th string 3rd fret with your middle finger, then on strings 5, 4, and 3, pick the open strings to the 2nd fret using your pointer to hold down the 2nd fret and then on the 2nd and 1st strings go back to playing the open string to the 3rd fret, using your middle finger to hold down the 3rd fret. Remember if you are having trouble with this be sure to refer back to part 1 because Robert breaks down this pattern much slower, since it is the focus of that lesson. So normally when practicing a scale pattern, you would ascend it and descend it.
Meaning playing it up, and then play it down. Which he does want you to be able to do. So descending remember is the reversed, being able to play these scales forwards and backwards, up and down, knowing them inside out. Then practice playing pattern 2 both ascending and descending. Then box 3, box 4, and of course box 5 which brings you back to box 1.
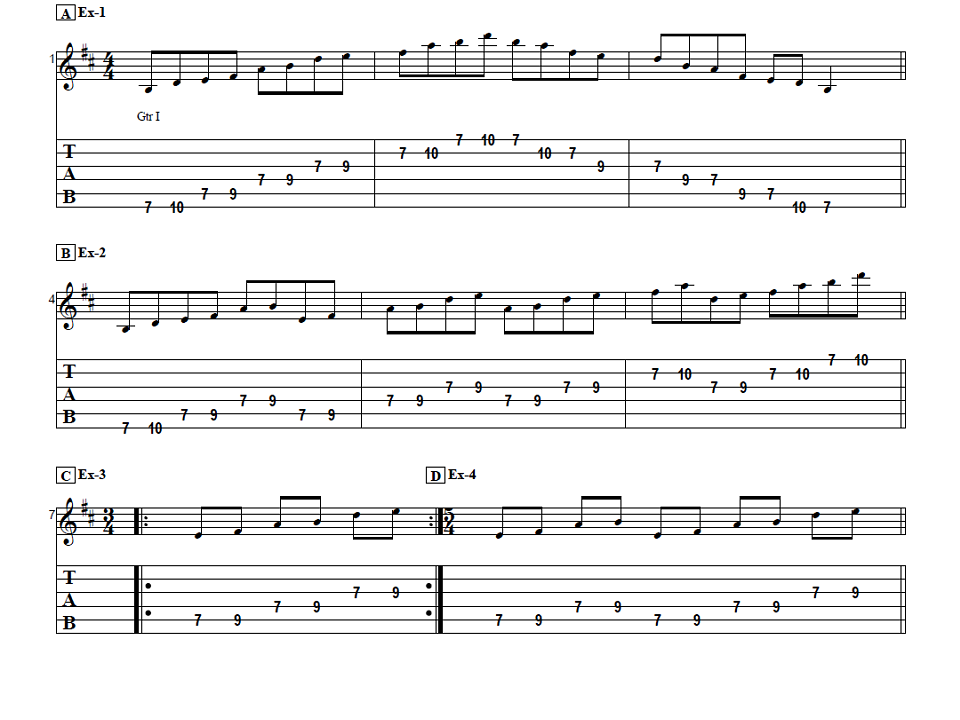
To spice this up a bit more, after you get to a place where you can comfortably ascend and descend each one of these scales and you’ve made sure they are real nice and controlled, as box 4 can be kind of tricky. So once you are familiar with these shapes and are feeling comfortable, Robert wants you to do is to mix the shapes together. He starts by ascending box 2, starting on the 6th string playing the 3rd and 5th frets holding them down with his middle finger to pinky, then on the 5th and 4th strings playing the 2nd fret to the 5th using his pointer to pinky, on the 3rd string he plays his 2nd fret to 4th fret with his pointer to ring, and on the 2nd and 1st strings he plays the 3rd to 5th frets with his pointer to ring finger.
Now instead of descending the same pattern, which would sound great too, we are actually going to descend the next box up. So that was box 2 and now we are going to move to box 3 and play it descending. So after you finished playing bix 2 ascending you are going to move up on the 1st string from the 5th fret to the 7th fret 1st string with your ring finger to the 5th fret 1st string with your pointer, to the 2nd string 8th fret with your pinky to the 5th fret 2nd string with your pointer, to the 7th fret 3rd string with your pinky to the 4th fret 3rd string with your pointer, to playing the 7th fret to the 5th fret with your ring finger to pointer on the 4th, 5th and 6th strings. Once you finish descending box 3 you are going to connect it to box 4 and play it ascending. On the 6th and 5th strings playing the 7th to 10th frets with your pointer to pinky, on the 4th and 3rd strings playing the 7th to 9th frets using your pointer to ring finger, on the 2nd string playing the 8th to 10th frets with your pointer to ring finger.
And on the first string playing the 7th to 10th frets with your pointer to ring finger, you can use your pinky instead of your ring finger if you find it more comfortable. And I’m sure you guessed it, we are now going to descend the next pattern, which is box number 5. Playing the 12th fret to the 10th on both the 1st and 2nd strings using your ring finger to your pointer, on the 3rd and 4th strings playing the 12th to 9th frets also with your ring finger to pointer, and then playing the 12th to 10th frets on both the 5th and 6th strings using your ring finger to your pointer finger. At the 3:45 minute mark, robert will play all of these patterns up the neck alternating between ascending and descending. So after box number 5, you just keep going, starting back over at box 1 now and octave higher and connecting it to box 5. So now playing box number one ascending on the 6th string pick the 12th to 15th frets with your pointer to pinky finger, on the 5th, 4th, and 3rd strings pick the 12th to 14th frets with your pointer to ring finger, and on the 2nd to 1st strings picking the 12th to 15th frets with your pointer to pinky fingers. Then ascending back down box 2 an octave higher, to ascending box 3 an octave higher to descending box 4 an octave higher.
This is where Robert stops because he has 22 frets, but if your guitar has 24 feel free to end with ascending box 5. This is just a really nice way to get you out of thinking that you have to stay in a box. Starting you off in a box you already know ascending and then connecting you to the next shape descending, automatically shifting you into a new shape each time. So that exercise was connecting your pentatonic scale patterns by ascending one shape and descending the next.
Step 2: The Pentatonic Scale on 2 Strings Only
So now for our next example we are going to take the pentatonic scale patterns and play them all on two strings only. Start by playing the 2nd string open to the 2nd string 3rd fret, and then playing the 1st string open to the 1st string 3rd fret, using your middle finger to play the 3rd fret on both strings. Then on the 2nd and 1st strings you are going to play the 3rd fret to the 5th on both, using your first to third fingers on both strings. The on the 2nd string you are going to play the 5th to 8th frets using your pointer to pinky, but on the 1st string you are going to play the 5th to 7th on the 1st string using your pointer to third fingers.
Then shifting up again you are now going to play the 6th fret to the 8th fret on the 2nd string using your pointer to ring fingers and then on the 1st string you are going to play the 7th fret to the 10th fret using your pointer to ring finger. At the 5:43 minute mark Robert will walk you through all of these back to back.
Then keep going, now playing the 10th to 12th frets on both the 2nd and 1st strings with your pointer to ring finger on both. Then keep on going to the 12th to 15th frets on the 2nd and 1st strings using your pointer to ring finger, and then the 15th to 17th frets on both the 2nd and 1st string with your pointer to ring finger for both strings.
At 6:08 Robert will demonstrate all of it including the newer higher parts in a play through. Then play the 17th to 20th fret on the 2nd string using your pointer to pinky, and then the 17th to 19th frets on the 1st string using your pointer to ring finger. The the last one, pick the 20th to the 22nd fret on the 2nd string with your pointer to ring finger and then on the 1st string pick your 19th fret to 22nd with your pointer to ring finger and bend the 22nd fret one full step with your ring finger supported by your middle and pointer from a D note to an E.
So that was the second example, ascending through the pentatonic scale, and once you are really really comfortable with this then try to tackle descending it. Which would start on the 1st string, playing the 22nd to 19th fret with your ring finger to pointer, to your 2nd string 22nd fret to the 20th using your ring finger to pointer, and so on and so on till you get all the way back to the start, playing the 1st string 3rd fret to open with your middle finger, and then the 2nd string 3rd fret to open, also with your middle finger.
Recap: Ultimate Pentatonic Roadmap Part 2
I hope you enjoyed part 2 of the Ultimate Pentatonic Roadmap. Focusing on two ways to connect the pentatonic scale patterns. Be sure to follow along careful, playing and mastering each example slowly before you speed it up. The key to playing fast is playing slow. If you don’t understand a lick or exercise at a slow tempo, then remember, you don’t truly know it even if it sounds like you do when you play it fast. So be sure to pay high attention to detail and use these great exercises to help you not only see scales up and down in one pattern, but to also see them connected pattern to pattern, as well as all on two strings. And of course, as always, have fun!


