Ultimate Pentatonic Roadmap Part 1
In part one of Guitar Control instructor Robert Baker’s three part series called, “Ultimate Pentatonic Road Map”, Robert has made three different elaborate videos about the pentatonic scale. Part 1 which we are going over in this article, focuses on the pentatonic boxes.
In this video Robert is actually going to cover all of the pentatonic boxes, and he doesn’t mean just five, he is going to start at the beginning in open E and end at the end of his fret board, showing you all of them! In part two he will go over how to apply them and how to get out of the boxes a little bit and using them with each other, and in part three he is going to give you all kinds of pentatonic licks to try out because you will already have that road map down!
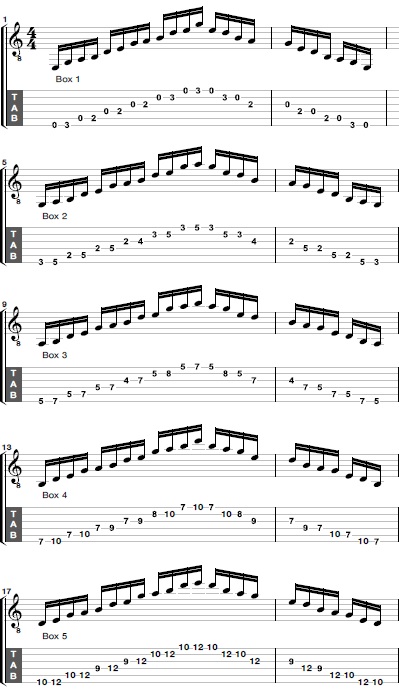
Step 1: Pentatonic Box 1
So started out with our pentatonic box 1, first focusing on E minor pentatonic scale in the open position using pentatonic box 1 and we are going to work out way up all the way to the 22nd fret. Pick the open 6th string and then the 6th string 3rd fret on the 5th, 4th, and 3rd, strings pick the open string to the 2nd fret, and on the 2nd and 1st strings pick the open string to the 3rd fret. This is pentatonic box number one, with all of the open strings in there. If you are enjoying learning these pentatonic scales be sure to check our Robert’s video on how to play like Jimmy Page, for 3 different Jimmy Page pentatonic licks.
Step 2: Pentatonic Box 2
Now we are going to work our way on to pentatonic box 2. For this one Robert leads with his middle finger to pinky on the 6th string picking frets 3 to 5. Then on the 5th and 4th string he picks the 2nd to 5th frets using his pointer to pinky, and now you can see why he start with his middle finger it gives him an advantage because when he got to the 5th string his hand was already lined up and ready and in position for the other notes. On the 3rd string he plays the 2nd to 4th frets using his pointer to ring finger, and you may have noticed he did shift his hand here, since before when he played the same frets on the 6th string he used his middle finger to pinky fingers.
Why he shifted here is because using his middle finger to pinky finger isn’t necessarily a common finger situation that he uses very often. So choosing to shift on the 3rd string, he feels, isn’t such a big deal, and same goes for if you want to stick to using your middle finger and pinky, it’s totally up to you and your personal preference, but he is using his pointer to ring finger. Then he shifts again on the 2nd and 1st strings using his pointer to ring finger again on both strings and playing the 3rd to 5th frets on both strings. And that is box number 2!
Step 3: Pentatonic Box 3
Moving on up to pentatonic box 3. This one is a great one, Robert refers to it as “the riff mecca center”. Starting this one off with his pointer finger on the 6th string 5th fret to the 6th string 7th fret with his ring finger, and he actually does the same frets and uses the same fingers on strings 5 and 4, too. On the 3rd string he uses his pointer finger to come out of the box and hold down the 3rd string 4th fret and uses his pinky to grab the 3rd string 7th fret. Then he goes to the 2nd string and picks the 5th fret holding it down with his pointer, so bringing his pointer back in the box, and grabbing the 8th fret with his pinky. On the 1st string he picks the 5th fret holding it down with his pointer finger and then grabbing the 7th fret with his ring finger. And this is box 3!
Step 4: Pentatonic Box 4
So pentatonic box 4. This one almost starts out the same as pentatonic box 1. You will see here what I’m talking about in a minute. On the 6th and 5th strings you are going to pick the 7th to 10th frets holding them down with your pointer to pinky finger, on the 4th and 3rd strings you are going to pick the 7th to 9th frets holding them down with you pointer to ring finger, on the 2nd string Robert shifts to use his pointer to ring but if you want to stay in position you can use your middle finger to pinky, either way picking frets 8 to 10, and then the 7th fret to 10th fret on the high E, the 1st string. Robert used his pointer to ring finger, you can do this, or to stay in position use your pointer to pinky finger. And that is box 4!
Step 5: Pentatonic Box 5
We have one more position before we start hitting our octave positions, which means the same boxes we played earlier in higher voicing. So starting with pentatonic box 5 by picking both the 6th and 5th strings on the 10th fret to the 12th fret using your pointer to ring finger, then on the 4th and 3rd strings you are going to pick the 9th to 12th frets using your pointer to pinky finger, and on the 2nd and 1st strings back to the 10th to 12th frets using your pointer to ring finger, and that is our final pentatonic shape! Box 5.
Step 6: Playing The Boxes in Octaves
So now we are playing the same 5 boxes but in octaves which means higher! We started with pentatonic box 1 in the open position in E, and now we are playing it an octave higher, starting on the 6th string 12 fret, which is also an E but an octave up. So now this box looks different because instead of playing all open strings we are going to play the 12th fret. On the 6th string playing the 12th fret to the 15th fret with your pointer to pinky, on the 5th, 4th and 3rd, playing the 12th to 14th frets with your pointer to ring finger, and on the 2nd and 1st string playing the 12th to 15th frets with your pointer to pinky. So same as box one where we started and played this E minor pentatonic scale in open E, we now played it an octave higher started on the E on the 6th string.
Now onto box 2 played an octave higher. This one will actually look exactly the same just played on different frets. The only reason box one looked different was because we changed out of the open positions. So now starting on the 6th string playing the 15th to 17th frets with your middle finger to pinky finger, then on the 5th and 4th strings playing the 14th to 17th frets with your pointer to pinky, making starting with our middle finger make sense since we were all lined up for the 5th and 4th strings. Then on the 3rd string play the 14th to 16th frets with your pointer to ring finger, and then one the 2nd and 1st strings bring your pointer finger in to play the 15th to 17th frets.
Now onto box number 3, working our way up the neck. We only have one more box left after this one since Robert’s guitar only has 22 frets. So box number 3 an octave up plays the same thing on the 6th, 5th, and 4th strings, same frets and same fingers. So on the 6th, 5th, and 4th strings play the 17th to 19th frets using your pointer to ring finger. Then on the 3rd string you are going to play the 16th to 19th frets, moving your pointer down to the 16th fret and grabbing the 19th fret with your ring finger. Then moving your pointer again on the 2nd string to grab the 17th fret to the 20th fret with your ring finger, and the 17th to 19th fret on the high E, the 1st string, using your pointer to middle finger.
The reason Robert changed the fingers this time is because as you go up the neck the frets become smaller so it is easier to use fingers that are closer together to get wider stretches than you would be able to get if you were playing this same scale further back on the fretboard. These shapes should be becoming familiar now since we are playing them for the second time.
And now for our final octave shape. Pattern 4. This is the last one we have left in today’s lesson unless you have more than 22 frets, which in that case you can play one more, you can play box 5 up an octave. So back to box 4. On the 6th and 5th strings pick the 19th fret to the 22nd using your pointer to ring finger.In the 4th and 3rd strings pick the 19th fret to the 21st fret with your pointer to ring as well, on teh 2nd string pick the 20th fret to the 22nd with your pointer to ring finger, and last pick your 1st string 19th fret to the 22nd with your pointer to ring finer. Robert bends this note one whole step taking it from a D note to an E.
Recap: Ultimate Pentatonic Road Map Part 1
I hope you enjoyed this lesson. That is all of the pentatonic boxes! First start by memorizing all of these and then in the next video Robert is going to show you how to practice these, ways to get out of ruts, and to get you right on track to moving around and improvising and soloing with the pentatonic scale. Make sure to check out both parts 2nd 3 to this series and as always, have fun! That’s what it’s all about.