In this Guitar Control video lesson instructor Jon McLennan, is going to show you how to play the main riff in “Pretty Woman” on the guitar by Roy Orbison. This riff is so cool and memorable. This classic song has so much personality and is extremely well written. John is going to breakdown and explain the main riff of this hit and get you playing it in minutes. Let’s get started!
[contentwall] [/contentwall]
Click on the Tabs button to follow chords and tabs.
Step 1: The Intro
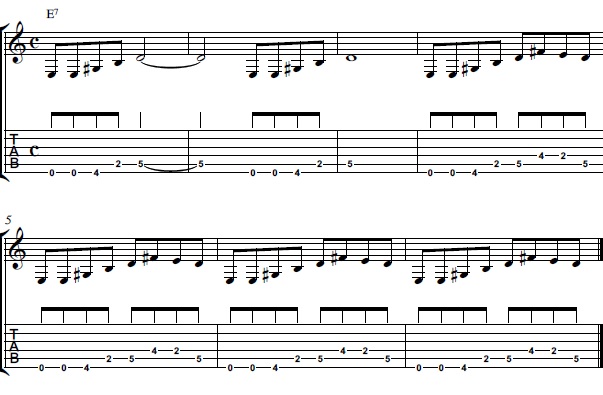
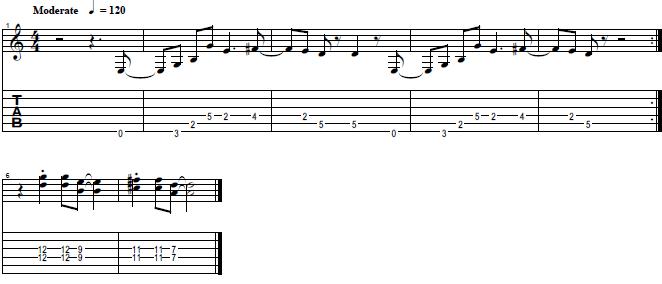
In this simple Roy Orbison guitar lesson you are going to start off this main riff by picking two open low E’s, the open 6th string. Then you are going to play the 4th fret on the same string, the 6th string, with your ring finger. Then you are going to go down to the 2nd fret on the 5th string with your pointer finger, and then go up to the 5th fret on the 5th string with your pinky finger.
Make sure to pay attention to the finger numbers Jon suggests and remember that to play as fast and clean as possible you also have to play intelligently and logically. Finger placement and pick direction are key in this. This song isn’t super fast so finger placement much more so than pick direction for this one. But you will notice when using this suggested fingerings you are often already hovering over the next note or are all lined up and can easily grab the fret you want to hear, with very little effort.
Then repeat this part, playing through the entire thing we have so far, twice. Go to the one minute mark to see Jon play through all of what you have so far. So the entire song starts out with four drum hits and the you go straight into this riff. Hold out the last note of the riff for 2 beats the first time and for an entire measure the second time you play it. If you are enjoying learning this simple but awesome riff, be sure to also check out our lesson video for how to play Living Loving Maid by Led Zeppelin for another one.
Step 2: The Full Riff
Now the full riff starts. Play the 6th string open twice again. Then you are going to play the 4th fret 6th string with your ring finger to the 2nd fret on the 5th string with your pointer finger, and then go up to the 5th fret on the 5th string with your pinky finger. Basically playing the same we did in the intro when we first played this main idea/theme, but this time we are going to continue it and take the idea further. So now going to the 4th string 4th fret with our ring finger, to our pointer finger holding down the 4th string 2nd fret, to the open 4th string. If you don’t want to use the open 4th string to play that last D note, you can also play a D by playing the 5th string 5th fret with your pinky finger. Jon actually shows it the first time with the open D, the open 4th string, but explains that he does really prefer to use his pinky on the 5th fret 5th string. So totally up to you.
That’s the cool thing about the guitar, there are so many different ways to play the same thing, and we are all different and different things come naturally to different players or are easier or harder so what is easy for Jon may be different than what comes naturally to you versus what comes naturally to me. So there are times when there is just no argument which way is cleaner or more efficient but there are also moments where it is totally fine to do what you think is easiest. So this is one of those moments.
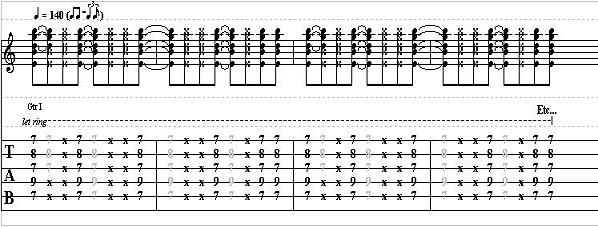
Totally up to you if you want to play that last D note as the open 4th string or as the 5th string 5th fret. Then repeat this continued theme twice and go straight into an A major chord. To play an open A major you are going to hold down the 4th, 3rd, and 2nd strings all inside the 2nd fret. Jon shows that he is holding his A major by using his middle finger on the 4th string, his pointer on the 3rd, and his ring finger on the 2nd string. I usually use my pointer on the 4th string, my middle on the 3rd, and my ring finger on the 2nd string, or I barre all 3 of those strings, the 4th, 3rd, and 2nd, with my pointer finger, so just using that one finger to hold them all down at once. In all of these versions you are going to strum from the 5th string down through the 1st. So again totally a personal preference moment.
So basically you have this riff that is using the notes of an E7 chord. It goes from the root, to the 3rd, to the 5th, to the 7th. So it is basically arpeggiating an E7 chord. It is exactly an E7 chord when we are playing the intro and when we go into the continued theme where you play the 4th fret 4th string to the 2nd fret 4th string, you now have an E9.
With his right hand, John is just strumming all down strokes. He refers to it as he is just kind of bashing on the notes in all down strokes, giving the riff this cool kind of hammered sound. See the video at 2:48 to watch John play through the entire riff so far!
Recap: Roy Orbison Pretty Woman Guitar Lesson
I hope you enjoyed this “Pretty Woman” guitar lesson! What a great, fun, catchy song! With cool ideas and a continued theme, showing you that things don’t always have to be over complicated to be good. He basically just outlined two extended chords but with different dynamics and rhythmic changes made a very cool but simple stand out riff that is probably stuck in your head right now! All basically based off an E7 arpeggio and amazing that it doesn’t sound like that because of the feel and attitude he puts in. So take all these lessons with you, not just the notes, and try adding all these dynamics and ideas into your own playing.
[ninja-popup ID=715]


