Check out this free lesson from Guitar Control instructor Darrin Goodman on how to play Famous Last words by My Chemical Romance. Click the link for the free tabs to go along with this lesson.


Introduction
Hey everybody how’s it going? This is Darrin with GuitarControl.com bringing this video lesson. Today I want to show you how to play some riffs from the My Chemical Romance song Famous Last Words. This has a lot of really big stretches and some really unusual dyad chord shapes. So not only is this a cool song to learn, but learning these riffs is a really good workout for your fretting hand. So be sure to click on the link in the description for the tabs and let’s get close up and take a look at this.
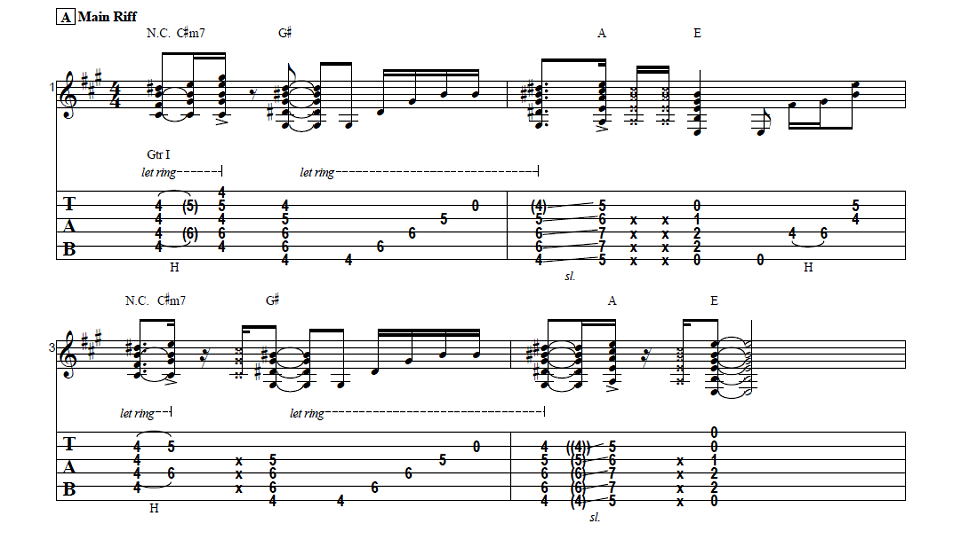
Famous Last Words Intro
So primarily this is just using a lot of power chords and a lot of them are unusual shapes. So I’m just going to show you the shapes rather than go through and try to name some of these unusual chords that wouldn’t really make a lot of sense, but this is pretty easy to follow along with. So the very first thing we got here is just a regular old power chord, D5; so I’m on the fifth fret of the A string with my first finger and I’m on the seventh fret of the D string and I’m using my fourth finger. Now usually I probably would use my first and third, but because of the big stretch I’m going to use my fourth finger. Now this song is actually two guitar parts played together so I’ve tried to combine them as best as I could so you could play it by yourself and still sound like the song. So it’s all eighth notes and so we’re going to accent one and then starting on the downbeat of two we palm mute it; so we’re like one and two and three and four and one and two and, and then on the second measure on the end of the downbeat of three, our fourth finger is going to stay where it is but we’re gonna move our first finger all the way down to the third fret. So I’m on the third fret of the A string with my first finger and on the seventh fret of the D string with my fourth finger; so that’s a pretty big stretch. So starting on that downbeat of three and four; so the first two measures… Now we’re going to go back to another just regular power chord shape all the way down here on the first fret of the A string with my first finger and then the third fret of the D string. You can use your third finger your fourth finger, whichever is comfortable, and this is the downbeat of measure three; so it’s one and two and three and four. All right so that third measure is all eighth notes and we’re going to accent one and again. Now the fourth measure one and two and, and then just remove your first finger so the A string is open, but we’re still on the third fret of the D string three and four; so that’s the first four measures… All right so this next part here is pretty challenging and I feel like I screw it up like just all the time when I play this. What we have is we’re on the third fret of the low E string with your first finger and the fifth fret of the G string with your fourth finger and the A string is muted and the D string is open…. I’m fretting that here, but I’m just letting my finger kind of just droop over so it mutes the A string; here in a second this note on the G string is gonna go from the fifth down to the third. So an easy way to do it is if you just have your second finger already on the third fret of the G string. So for this we’ve got one and two and three and four and, and then we come up to a regular A5 power chord on the fifth fret of the low E with my first finger and the seventh fret of the A string with my pinky and again we’re doing it this way because we got a big stretch here we’re gonna do. So for this we start here and we’ve got one and two and, and then we’re gonna keep our first finger where it is and we’re gonna move our pinky all the way up to the tenth fret, again a big stretch, for three and four and; so we’ve got one two and three and four and. Then we have B flat five; so your first finger will move up a fret and the note on the A string will move down a whole step. So now I’m on the sixth fret of the low E with my first finger and the eighth fret of the A string and you can use your third finger or your pinky, whichever is more comfortable for you and we’ve got a whole measure of that; one and two and three and four and. Then the next measure we stay here for the first two beats; one and two and, and then the note on the A string is going to be flattened a half step so we get that diminished sound. So we have; one and two and three and four and one and two and three and four and, and then it just starts over again, that’s the whole intro…
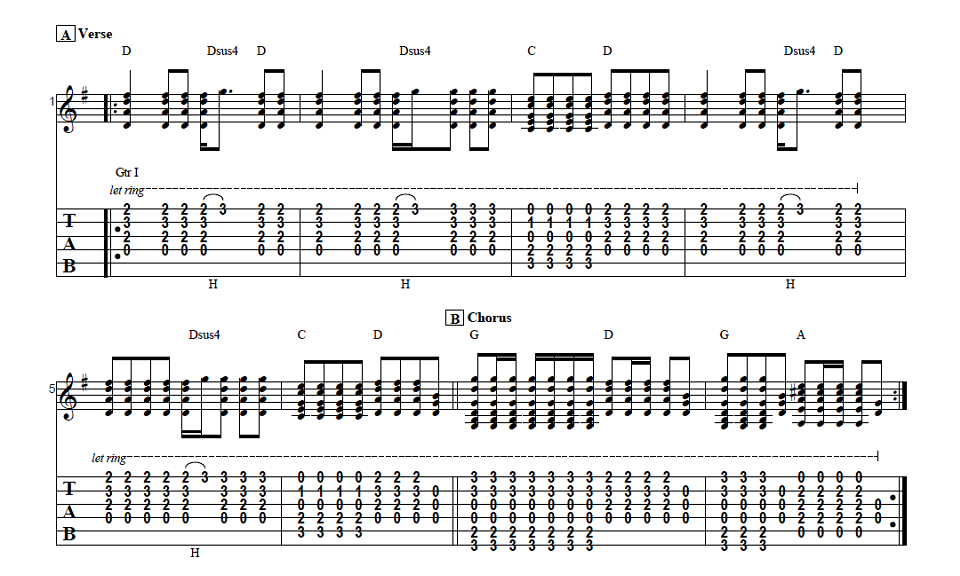
Verse
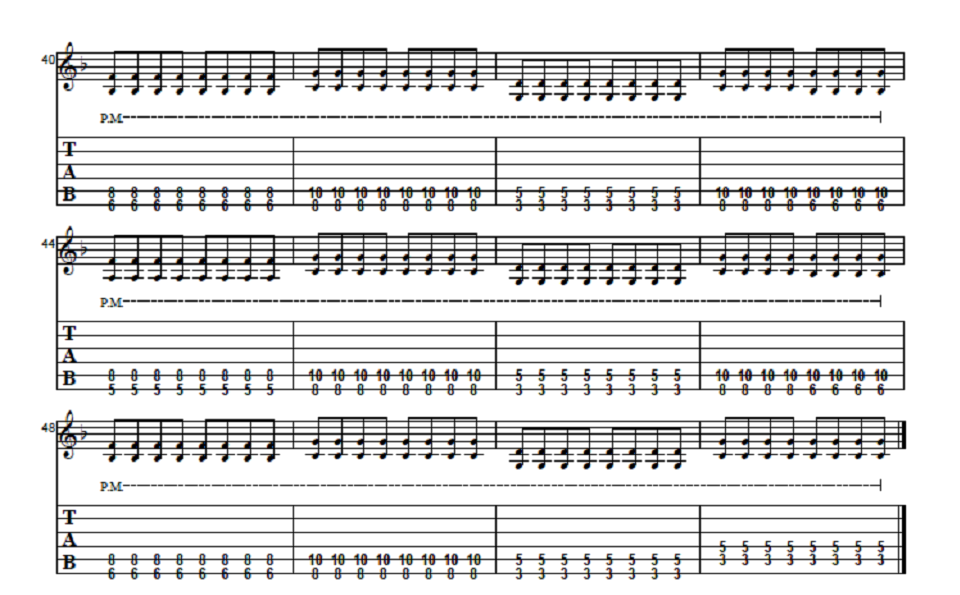
So the next part we’re going to be looking at is the verse. So for the verse we start off with the D5 so fifth fret of the A string first finger seventh fret of the D string I’m using my fourth finger which you can use your pinky or your third finger it doesn’t matter and you might even see me going back and forth between the two, I just kind of let my hand do whatever it wants to. So we’ve got one and, and then we rest on the downbeat of two and then we start this little riff on the end of two. So we have one and two and then and three and four and. So it’s starting on the A string three five then we go to the third fret of the D string and we’re just going to do a little tiny quarter step band and then back to the fifth fret of the A string back to the third fret and then we come back and do that same thing again. Now that same D5 power chord and then we come back three five three and then to the fifth fret of the D string and we’re gonna do a bend and release back to three, so a second measure and then back to the third measure which is the same as the first she just doesn’t do the bend and then back to a D5 power chord for one; so the first four measures of that verse… All right so then after that starting on the fifth measure of the verse which is measure 13 on your transcription we have a whole measure. So now it’s basically doing like what the intro was doing but we’re not going to palm mute; so now we have one and two and, and then it just basically starts over. So the second time through it’s a little bit different on the ending… so here’s the difference. So after we do measure 25, let me come up here to the A5 and then not move all the way up here to the 10th fret and we go to the B flat 5 for a whole measure and then we move up a whole step; so now we’re at ten and eight so we’ve got C5 and we’ve got one and two and three and, and we rest on four, one two three four and then that’s where it leads us into our chorus.
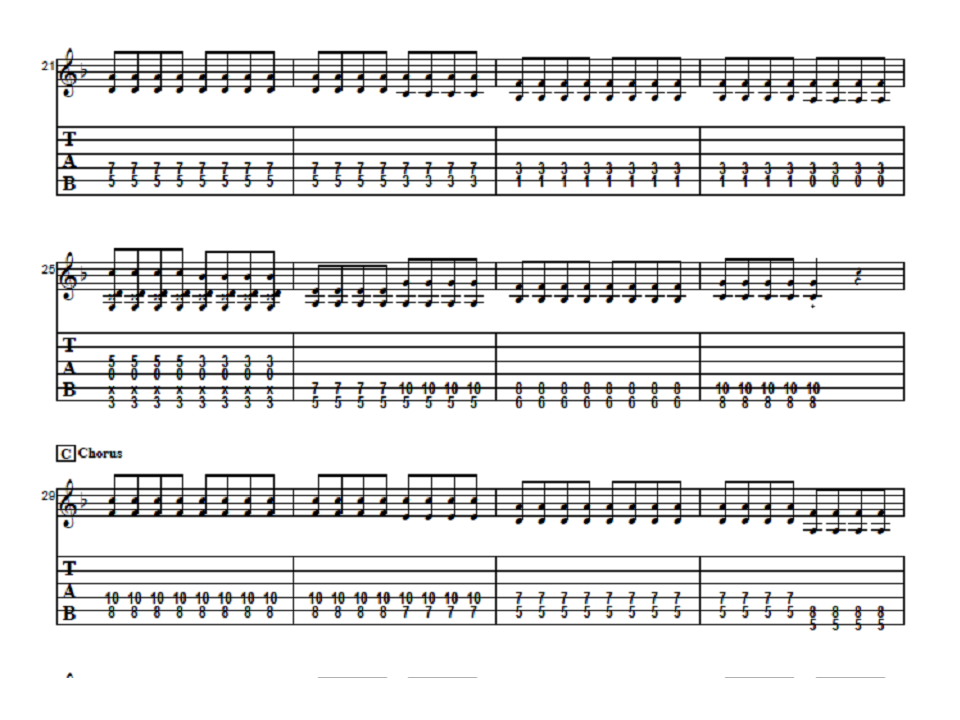
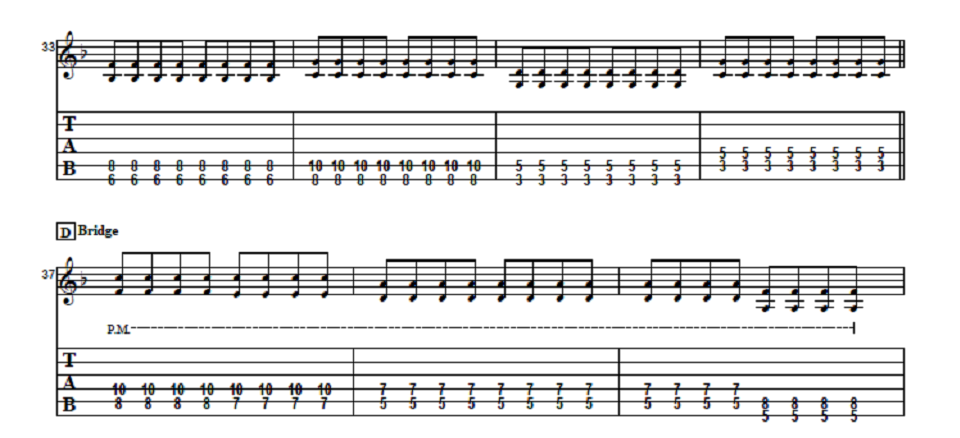
Chorus
All right so for our chorus, after coming out of the verse we just move that chord shape up a set of strings so now we’re at this the eighth fret of the A string with my first finger and then the 10th fret of the D string with your third or fourth and that’s F5. So we’ve got a whole measure of that and then we’re going to make a change so we’ve got one two and three and four and one and two. Now we just move our first finger down a half step to the seventh fret and now we just come down to a D5 and we’ve got a measure and a half of that one and two and three and four and one and two and then we’re going to move back down to the low E. So our first finger is on the fifth fret and our pinky is on the eighth fret of the A string… then her first finger just moves up to the sixth fret for a whole measure and we move that up a whole step; so now we’re at eight and ten and then down to three and five and then move it up a set of strings so we’re now at the third and fifth frets of the A and D string. So I’m going to do the last part of the verse leading into the chorus… and then it just then it just repeats the whole thing. So as you can see all these stretches are kind of tough, but this is gonna be really good for your fretting hand to get these stretches out and this is a cool song that can give you some ideas of things you can do with these dyad chords to create a melody.
Conclusion
So if you like this lesson be sure to give me a thumbs and leave me a comment down below if you have any questions or if there’s something you’d like to see covered in a future lesson. If you have not already done so please subscribe to the channel and hit that notification bell so that way you don’t miss out any of the content that we upload throughout the week. Anyway that is all I’ve got for you today. Thanks for watching and have a great day.