Check out this free lesson from Guitar Control on How To Play Come Together By The Beatles. Be sure to click the link for the free tabs for this lesson.

How to Play Come Together By The Beatles
Check out How to Play Come Together On Guitar – Beatles Come Together Guitar Lesson Intro and Solo Parts.
What an awesome song! I absolutely love this song and think it is so fun to play. It’s pretty simple, it has some moody tones, and an awesome message. Today we are going to learn how to play Come Together on guitar! The Beatles are one of few bands that are able to cover a million different moods, styles, and sounds. They were an ever changing, growing, and experimenting band. This song is great for a the beginning guitarist as well as the pro. The main riff is simple but really fun to play, and the solo is simple BUT requires attention to detail to execute it perfectly. Anytime we have bends involved it takes extra care, because remember you aren’t just bending to wherever you want, you are bending to a specific pitch. Let’s get started!
Step 1: A Closer Look at The Intro Riff
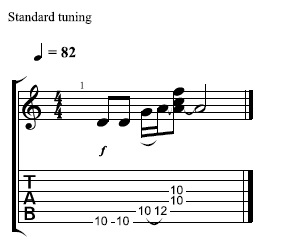
So to start learning how to play Come Together on guitar, we put our first finger on the 10th fret, 6th string and we pick it twice. Then on the 5th string we hammer on 10th fret to 12th fret. A hammer on is when we pick one note and then slap a different finger down onto the next fret we want to hear, on the same string. This creates a smoother sound than picking twice. Hammer on’s do require lots of control, so make sure you’re holding your guitar confidently so your hammer on rings out strong and clear. So one attack with your pick, and then a slap.
Then we drop our pointer on the 10th fret barring both the 4th and 3rd strings. This means I’m using one finger to hold down multiple notes. After we pick both the 4th and 3rd strings letting that barred 10th fret ring out, we slide down towards the headstock. This technique gives this riff so much attitude and really makes it stand out. When sliding make sure to keep your fingers pressed down and do not release them till the riff calls for you to, otherwise you loose all the sustain and sound. So keep the pressure down and push your hand to the next desired note. This is the key to a strong slide!
You can also play this riff in the open position! To play it in the open position we use the exact same notes, but now we pick the open 4th string twice. Then we hammer on on the 3rd string, 2nd fret, to the open 3rd string. And now we bar the 1st and 2nd strings on the 1st fret. You don’t have much room to slide down towards the headstock like we did in the other position so I would just hang on that bar a little longer than before. Feel free to play this riff in either position! They are both right and both sound great!
Step 2: The Solo!
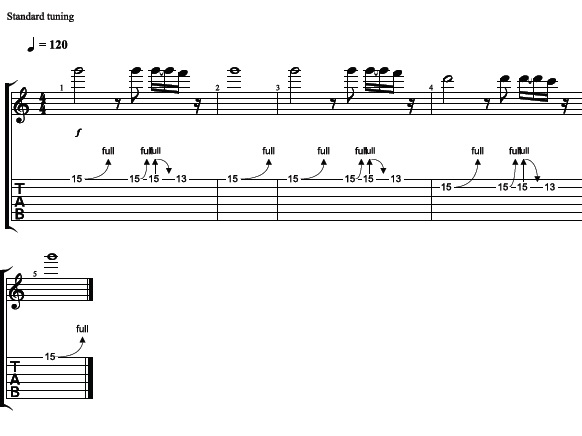
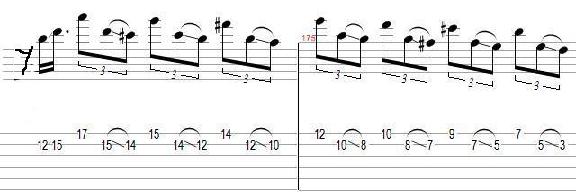
Now for the solo! So this solo has two harmonies, and we’ll go over both of them! So first the high harmony. It’s a bunch of whole step bends, it’s fairly simple but it is important to make sure we are actually bending a full step. To check yourself, for a whole step bend you go up two frets, pick that note. Let yourself really register what that pitch is. This is the note you are trying to bend to, so you want to match this picked note, with your bend. So now go back to the fret you’re bending and try and match it.
So we start with one bend up. I’m raking the first bend, which means I’m dragging my pick down the strings above the string I am bending, while leading into that bend. It’s a really cool bluesy technique. So I wasn’t kidding when I said this solo had a lot of bends. For the first phrase we are only bending the 15th fret, 1st string and we’re doing so like this; bend, bend, bend-release, bend. Bend-release means we bend up and hold the note out while we bring it back down, so it sounds like it went both up and back down, the other bends are all just up.
For our second phrase we do almost the same thing, until we get to the bend release part. We now pull off to the 13th fret, 1st string from the 15th fret, 1st string, and go straight to a whole step bend on the 15th fret 2nd string. And then we end with bending on the 15th fret, 2nd string. Pull off to the 13th fret, 2nd string and end with a bend on the 15th fret, 1st string.
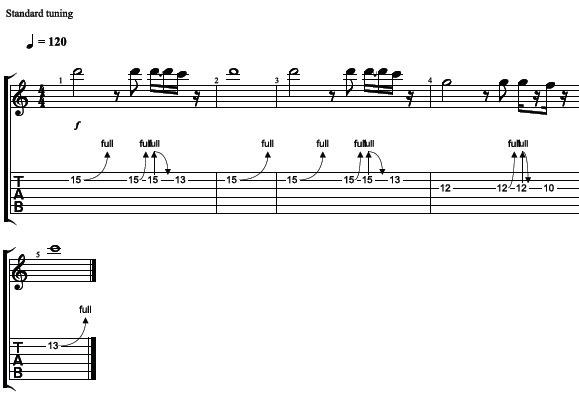
For the harmony, we are playing the same rhythm but different notes. Its very important you play them the same though because you want to sound tight with the other harmony, since they are playing at the same time, whether you’re recording yourself or playing along with someone else.
Our starting note is now the 15th fret, 2nd string. So same fret but different string. So we do our first phrase all on that note, bending up, up, up and down, and up. Then same thing for the second phrase, bending everything on the 15th fret, 2nd string but now our pull off is to the 13th fret, 2nd string and after we go straight to a whole step bend on the 12th fret, 3rd string. Our last phrase we bend the 12th fret, 3rd string and end with a bend on the 13th fret, 2nd string. If you enjoyed learning this solo be sure to check out how to play Layla on Guitar by Eric Clapton.
Recap: How To Play The Main Riff and Solo To Come Together By The Beatles
I hope you enjoyed learning how to play Come together on the guitar! Remember there’s two different ways to play the intro and there are two harmonies to the solo! Make sure to watch those bends and be sure you’re bending full steps and even more important than that…be sure to have fun and stay tuned for more lessons soon!