Hey, how’s it going this is Darrin Goodman with Guitar Control, I want to teach you how to play the Main riff well why don’t you call it the main riff that really recognizable drift from “The trooper” by Iron Maiden. This lick actually has a harmony so I want to teach you how to play both parts so that way you can play it with a friend and you can you know have the harmony or maybe you have like a looper pedal you can play one part and then play along with it.
 [/contentwall]
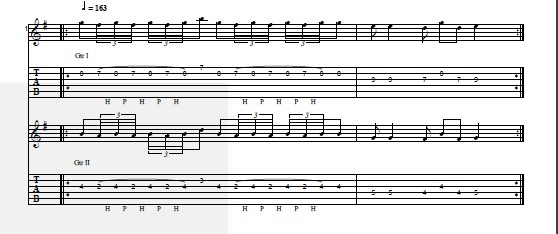
Check the image above to follow the chords and tabs.
First let’s take a look at the melody, the main lick what guitar one would be playing so we’re starting off you’re going to place your second finger on the 2nd string on the 8th fret and then you want to take your first finger and actually it’s just this start with that if you take your first finger and put it on the 7th fret and barred across so that way you’re getting the first three strings and then you can take your second finger and have it here to place on the 8th fret of the 2nd string and then you’ll also be fretting a note with your third finger on the 9th fret of the 3rd string like a little chord there kind of it would actually I guess you wanted to be technical it would be it’s an E minor triad, so start off we got your first finger barred across the three strings and your second finger on the 2nd string on the 8th fret with your second finger so you pick that note.
Now you’re going to take that finger off the second finger off and you’re going to pick the 7th fret and then you’re going to do a hammer-on and a pull off from the 8th fret back to the 7th fret and play it twice, so you pick you hit that finger off hammer, pull, hammer, pull and then to the 1st string on the 7th fret, also your first finger is already barred across there since they’re pick hammer, pull, hammer, pull and then from there you go back and play. You basically do the first part of it again except this time you’re going to replace the 7th fret of the 1st string with the 8th side of the 2nd string so you do that same exact riff, now you’re going to go to the 9th fret of the 3rd string with your third finger take that finger off, now you’re back to the 7th fret of the 3rd string, 2nd string back to the 7th fret of the 3rd string the 9th fret of the 3rd string and that ends.
So the whole thing just simply repeats, so when you’re playing this in these lower strings are going to want to start making a bunch of noise if you’re playing with distortion you’re going to start hearing them making a lot of racket so you want to keep them quiet so I just simply take this part of the palm of my hand and I just rested on these lower strings so that way they don’t ring out and make a bunch of noise.
Now for the hammer-on and pull-off part if hammer-on and pull-off are a new technique to you, they’re going to takes a little bit of practice to get them to where you know they sound smooth so one of the tricks is that when you do the pull off itself is it’s not just like your lifting your finger up like this, you actually kind of have to drag it up a little bit so it picks the string so if this is a new technique to you then a good exercise you could do and you can do this you know anywhere you know just on any strings and you in fact you should play it on different frets and different strings so just so the way the strings feel the position your hand is on the fret board the spacing the frets you know it’s all going to be different just simply that’s oh you can do that just do that on different frets different strings you know different positions to help you get that to help you get that technique down.
Next I want to do is I want to show you the harmony, so on the harmony for this is played down without lower, so now we can get a little better view so it’s the same principle as far as the timing and the technique it’s just played lower on the fret board and it’s being played instead of being played on the first three strings it’s played on the 2nd, 3rd and 4th string. Now we’ve got 2nd fret of the 3rd string with your first finger and to the 4th fret with your third finger, so instead of having that now we’re going to be down here so this one is probably going to do this and the one that you’re going to want to practice first to kind of get the technique down if it’s new to you because down here it’s going to be a little bit harder because the frets are farther apart and you’re making a stretch of a whole step instead of just a half step.
So here same idea, now we’re going to go to the 3rd fret of the 2nd string and then do that again so just like before you play the riff twice and on the first time it’s going to add with the 3rd fret of the 2nd string and on the second time it’s going to end with the 4th fret of there just like here it ended with that first half ended with the first of the 7th fret of the 1st string and the second half with the 8th fret of the 2nd string. From there you’re going to go to the 5th fret of the 4th string with your fourth finger and then to the 4th fret of the 4th string with your third finger 4th fret of the 3rd string so I just simply take that third finger back but you don’t want the notes ringing over the top of each other so you want to spare on that 5th fret of the 4th string so though that whole section and then simply repeat and then if you play the harmony by itself.
It sounds a little bit, this is more if you’re just playing by yourself this is definitely the part that you would want to play I guess we just play this by yourself itself it sounds a little strange it doesn’t quite you know doesn’t quite sound the way that it should but when you play them both at the same time you know with it with another person it sounds it sounds really cool.
I hope you got something out of that you know if you if you like this video leave some comments and let me know what you think and I hope you enjoy playing this you know it’s a good one like I said to play with a play with a friend or if you’ve got a looper or you could even simply just record one part of it you know like with your cell phone you know and then just play along with that you know so that way you know you get the practice of playing along with the other person you can hear what the harmony sounds you know the two parts sound like when they’re played together and it sounds pretty cool. Don’t forget to subscribe on our You Tube Channel and we’ll see you in our next video, thanks for watching.
[ninja-popup ID=715]


