In this Guitar Control lesson video instructor Shawn Daniel, will show you how to expand your “Fretboard Knowledge Using Just 1 Chord”. A fun kind of guitar exercises, a little song thing that we are going to do. Where going to take one chord, and use it to explore the entire fretboard and talk about different things you can do with just one single chord. A great expansive way of understanding everything.
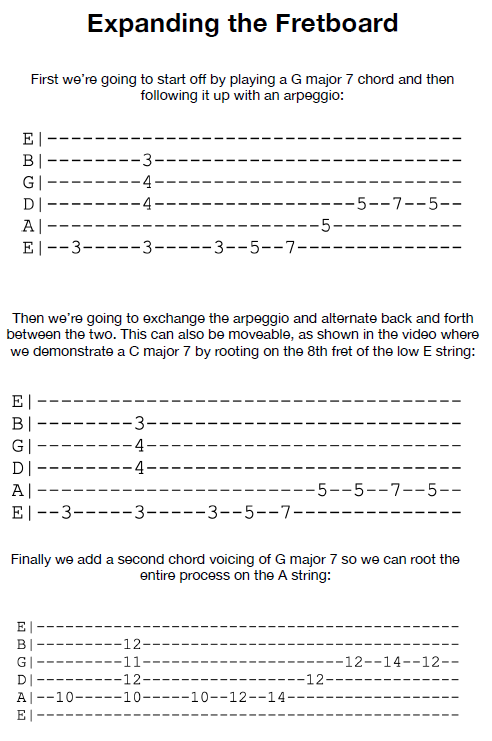
Check the image above to follow the chords and tabs.
Step 1: Starting with the Key of G
Starting with the key of g, as if we are not playing a regular g major chord, in fact, if you want to talk about just how you can take stuff in the key of g and maybe kind to justify it like turn a regular g major a minor, b, c, d, e minor, f sharp g, key into like seven chords, I am going to link you to another video talking about Chord Scales and how to chords basically any jazzy type music. If you have never seen a g major seven chord, you might want to watch that first basically, here is what we got we are replacing a g major open chord with this g major seven chord basically a lot of people, kind of get turned off by the names of some of the more extensive chords, extended chords right g major seven is just a g major plus the seventh note in its scale.
It is always easy to find the seventh note of any scale, the g on the third from the lowest string is the seventh note, is always a note right before it. We can play f sharp through one, two, three, four, five, six, seven, or go back one. Any way we can add an f sharp to a g major. We are to make a g major seven chord. The easiest way to do this is to take the f sharp on the e string, the high e string second fret. There is one really easy chord voicing you can do, but I want to use this g major seven chord voicing. My pointer fingers on the low e string third fret, my ring finger is on the f sharp on the d string fourth fret, and pinky is on the f fourth fret of the g string, middle finger on the third fret of the b string. What we are going to do is to take and start to riff a little bit after that.
Step 2: Talking about where the Riff comes from and learning Hand Shape
We are talking about where that riff comes from. First, we talk about these notes in a g chord. We do have a, g, a, b, d note, and an added f-sharp. Memorizing it all can be a lot, but learning a handshape is not that difficult. You have to take the root note and take the fifth fret and go to the seventh fret, so this is our way to get from a, g to a, b third fret to the seventh fret and then to the other notes. We need for a g major chord is this note right here a, d, and a.
Step 3: Chord Voicing
Open d string is a traditional open chord voicing, but we want the d on the fifth fret of a string. Start by playing the chord one note at a time, arpeggio style. Taking that chord voicing, we must strike the root note and then getting it down, up and kind of like the middle part of the string set like the d and g strings and then another down stroke to kind of my hand time, so it is root down up down and then into that arpeggio. The first thing I want you to practice, but it does not sound super complete, so we add some more notes we could add the major seven here if you want you are going to have the option to do that because this is eventually going to be how you are going to explore the fretboard and not just really kind of repeating what we are talking about but really using this knowledge to make you up to your own stuff right so we have got g major 7 that is going to be the main riff.
We are going to start with right we have that arpeggio down a string there is the g on the d string the fifth fret seventh fret back to the fifth fret so basically just a little flourish that is following up that arpeggio.
Step 4: Alter
Another thing we can do is alter a little bit, so it sounds like it has some variety when you go back and forth, so instead of going do it on a string all right after the arpeggio, I just stayed on a string, alternating back and forth between just the last 5, 7, 5 either on the d string or a string, but we are starting on that g major 7 every time, second time then alternate. Where else can you use this? you can use it absolutely anywhere. So what is another chord that you usually see paired with the g major chord c would be the first right thing. The c on the low e string is the eighth fret. Do the same shape, but now we are starting on the eighth fret of the low e string same chord voicing, so now my root note is a, c on the low e string pointer finger skipping a string and then the eighth fret on the b string with your middle finger down back and forth one thing you may notice is the sound of that slide is really kind of like a fun thing that you can do. We all do that after the last one start back on the g and then slide it all the way and then arrive there again, and then now my ring fingers lined up with the 12th fret to slide back, do this on absolutely any chord of g and c always sound pretty good together.
I also want to do another g chord with just a different voicing but the same as what we have already done. Go to a string where the first g that you will find on a string. You can count through all the notes the tenth fret of a string. Now it takes longer to count forward than to find on the twelfth fret. It is always going to be the note that you start on a flat g. We will do the same thing, but now we are in a different spot, since we are rooting on a string, we need a different chord voicing. That is why many of this can be done with just the same chord and using it to explore mainly, having the g on a string pointer finger, right ring finger 12 on the d string middle finger, 11 on the g string, pinky on the 12 b string that is the same chord as this just a different voicing the same notes g, b, d, f sharp, and then once you start on the root note everything else stays the same.
That g, a, b arpeggio is now 10, 12, 14, remember d it is just the open d string, but now we are on the 12th fret because that is where the octave of d is g major 7, and then do the same as what we did before, but now we are on the g string 12th fret 14 to 12. Again that two fret space is also just known as a whole step. You can hammer on and pull off like that, or you can pick each time. It is a good opportunity to maybe work on your alternate picking up and down, so let’s go back and forth between just a g chord and forget that there’s even another chord like a c chord in this regression we all talk about a second but g again with the lower, okay so it’s really kind of like a fun thing that you can do because you can start in the low part and you kind of navigating around then you go higher and then navigate around and then you can just move that shape all over the place all you have to do is find a root note you can do this all in the key of a it says to find an a the fifth fret on the low e string right same chord voicing but now we’re a pointer finger fifth fret on the e string, your ring finger pinky, and the sixth fret of the d and g strings and your middle finger is on the fifth fret of the b string. The same thing as we’re just starting of a different location, you can go higher.
Now I’m on the 12th fret of the a string, because we combine them with open chords that you already know between. That g to c progression, we have a lot of different options now we can do the g here or here and we do the c here or find the c on the a string a, b, c third fret so one thing that you could do is work on both of them back to back instead of going from g to c even though, I like the sound of that slide.
You can make it a little more efficient by just going from here to this seat, again that is a lot that you can do in just one spot with just two different chords. Anytime you see something in the key of g instead of just going to g, to c, to g, to c now you can kind of go, and eventually be able to click really fast with those lines. That’s what I love about practicing arpeggios, is that you can kind of like take them all over the place and it really increases you will be shocked at how fast your hand speed increases with just being able to kind of do one really simple arpeggio run with a flourish, so definitely if this was a little bit over your head check out that lesson that we are going to link below because it goes through an entire chord scale learning a different chord for each chord that you will find in the key of g and then you can use these tips in addition to those chapters and just become more aware of the fret board and have just a better complete understanding of it.
So if you have any questions do not hesitate to comment and then let us know what you want to see more, suggestions of different songs or types of lessons you want to know and we’ll get back to you. In the meantime check out other lesson in the link below or other great videos on the Guitar Control YouTube Channel by myself and other fine instructors thanks for watching.