Hey folks… Country guitar patterns are the bomb!
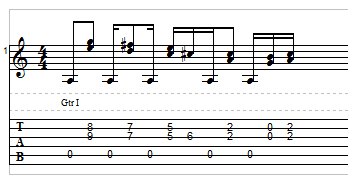
Here’s one I came up with today that’s very instructive.
Check it out and see if you can create
your own killer patterns.
Btw, if you want to learn from the master
at this stuff go here:
Hey, guys. Claude Johnson from guitarcontrol.com.
How’s it going today? I hope you’re doing great.
I’ve got a nice little lesson for you and also
I’m going to tell you a bit about this guitar,
which a lot of people have asked me about. It’s
a Spear RT-ST. I’ll tell you about it in just
a minute and also tell you how you can get one
if you’re interested. But first, let’s go into
the lick of the day, which is a nice, country
rhythm pattern. This is a really cool pattern.
It goes a little something like this.
So let me break it down for you. I’ll tell you
how to get into the rhythm and how to do your
own variations. What we’re doing here is
balancing off the A, what I call it. I kind
of started off with this little intro. That’s
not really part of the lick.
I would start the lick basically on the A string
and like I said, you’re balancing off the A string.
So what we’re doing here is playing the A string
and then little double stops. A double stop is a
two-note chord. So we’re playing double stops on
the G string and the B string. What I’m doing is
I’m picking with my pick the A string and then I’m
using my middle finger and ring finger on my picking
hand to pluck the G and the B strings together. So
my middle finger is plucking the G string and my
ring finger is plucking the B string. I call this
the pick and pluck technique. So you’re picking
the low note and plucking. Let me just play it
through real slow, once.
You’re ending on the 2nd fret and then repeats
with the open A string. And then again. The
first one is the 9th fret and 8th fret; 9th
on the G, 8th on the B. That’s with my middle
finger and 1st finger. Then I’m going to play
the 7th fret, 7th fret with my middle and ring
finger. Then I’m going to use my 1st finger to
just bar the 5th fret and 5th fret, and I do a
little hammer-on to the 6th fret. Then I’m down
here. Again, 1st finger just on the 2nd fret,
and then open. So again…
Now as far as the rhythm goes I’m going to give
you three ways you can think about this. One is
just to feel it out. We play it… So just get
that. Kind of feel it. I mean, that’s really the
best way because you can internalize it. You
really want to get into the rhythm of it. And
by the way, the expert on all this chicken
pickin stuff is Sol Philcox. You can check-out
his course at guitarcontrol.com/chicken. So
check that out. Check out the chicken, right?
Once you get into the rhythm of it you can
play your own variations, too.
The second way to feel the rhythm or to play
the rhythm is just to count it. I always like
to count things out sometimes. So if you’re
counting one, two, three, four you can do —
I would count it like this: one, two, three-and,
and, one-and, two-and, and, four-and. It’s a
little bit sped up. It’s complicated. This is
probably the most complicated way to do it.
But if you’re one of those people that likes
to count it out, once again: one, two, three-
and, and, one-and, two-and, and, four-and.
So the third way and my favorite way to think
about the rhythm is that it’s basically a sped-up
shuffle. So we talk about the shuffle rhythm,
if you’re familiar with blues. If you want to
really get this, what you do is you count in
threes. So it’s like one, two, three; one, two,
three. And then you hold the one and the two
together so you have this: one, three; one,
three; one, three. Then you speed it up a
little bit for this pattern.
We’re going to leave-out the little embellishments
like… So you can just do this. Then what you
can do is just add-in either that or this hammer-
on or this hammer-on. So that’s basically all
it is, just that shuffle. You can, like I said,
just start to get variations.
If I’m just going to look at these two strings
here, open, open, 2nd fret and then you have 5th
fret and then this one, the hammer-on. You can
also do this as well. This one, this one, which
is the one we started on. It’s also nice to go
up to it instead of just starting and going down,
you could go up. You can go up here. This one,
and there’s your octave. You get all those
possibilities that you can play around with.
I hope you enjoyed that lesson. A lot of people
have asked me about this particular guitar. It’s
a Spear RT-ST. It’s a Telecaster-style guitar,
which obviously means it has a bolt-on neck.
The neck is made of Canadian hard maple and the
body is made of American alder and has sound
shapers inside the body which gives it a great
resonance. The top is — it’s a steel top, but
it’s just for looks. It doesn’t affect the
resonance of the wood. It’s got Spear pickups,
which sound amazing.
Nothing against the Fender Telecaster, but
with the Spear you get a really great sounding,
great playing guitar for about a third of the
price. And you can actually get this guitar
through Guitar Control. Just go to guitarcontrol.com/rtst.
We’ll actually give you the greatest guarantee
in the history of the guitar industry. No one
else is doing this. It’s a full 90 day money
back guarantee with free shipping both ways.
So we’ll ship the guitar free and if you don’t
love it we’ll pay to ship it back. So go ahead
and take advantage of this. Just go to guitarcontrol.com/rtst.
Thanks for watching and have an awesome day.


