Hey, how’s it going this is Darren Goodman with Guitar Control, bringing you this video lesson, today I want to show you how to play the Intro for “Love Story” by Taylor Swift. This riff on the recording is actually played on a banjo and this has been transposed for the guitar. This is a good finger picking riff for you beginners out there, you’re just getting new into finger picking not a whole lot, you have to do with your left hand, and it sounds pretty cool it’s a good exercise for your right hand.
[contentwall]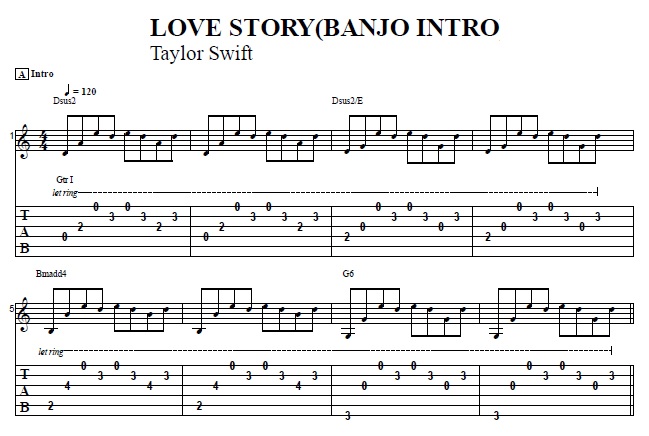 [/contentwall]
[ninja-popup ID=715]
Click on the tabs link above to follow the chords.
This riff as far as your picking hand goes is the same sequence the entire time, the only thing that changes is that the bass note that you play with your thumb, switches to two different strings, but your first, second, and third finger continuously doing the same thing. The pattern for it, like on the first chord you’re going to thumbs on the fourth string, first finger on the third string, your second finger will be on the second string, and your third finger will be on the first string. So it’s thumbed first, third, second, third, second, first, and second.
I recommend that you practice what you’re doing with your right hand – or your fretting hand rather to get that sequence down. The first chord that we’re going to be looking at in this, and also what you’re going to do with your left hand is fairly stays the same. If you display the D chord, then I’m sure you already know fourth string open, first string on the second fret of the third string, third string on the third fret of the second string, and then D on your second finger down on to the second fret of the first string, but we’re doing D suspended too, so we’re going to keep that second finger off the first string open, so that’s the first two measures.
Then we go to the third measure, we have our first chord change so all’s you do is simply take your first finger and move it from the third string to the fourth string and do the exact same picking pattern on the same string so we’re still four, three, one, two, one, two, three, two, and then move on to the next chord B minor add four.
We’re going to take your first finger and we’re going to move it again this time, we’re going to move it from the fourth string to the fifth string, still on the second fret but we’re also going to take your fourth finger and you’re put it onto the fourth fret of the third string and the picking pattern is going to remain the same, it’s just your thumb instead of playing the fourth string now is going to move to the fifth string.
Now, the final chord is g6you’re going to move take your first finger off and move your second finger to the third fret of the sixth string, after you’ve moved your third finger to the sixth string, the first three fingers will pick no strings three, two, and one, but your thumb will play the sixth string and when we move up to that chord – (I forgot to mention you will remove your fourth finger from the third string).
It’s now played open, now it’s will be six, 3, 1, 2, 1, 2, 3, 2, 6, 3, 1, 2, 1, 2, 3, 2, and that’s the entire sequence and then repeats the whole sequence. I really recommend that you work on your right hand especially, if finger picking is new to you. If you’re completely new to it and you have not really worked with finger picking before, if you look through the channel there’s a video that I did on finger picking for beginners and it goes over the whole technique on how to do everything and the technique for your fingers itself for plucking the strings. I hope you enjoyed and you got something out of it.
Make sure to subscribe on our You Tube Channel and we’ll see you in our next video lessons, thanks for watching.