How to Play Twilight Zone by Golden Earring
In this Guitar Control video lesson instructor Robert Baker, is going to show you how to play the “Twilight Zone” chords and all the main riffs in this classic Golden Earring song. This is a really cool song, and actually very simple. Even the solo is not too difficult. So this is a great one to learn quickly and for all level of players, especially for beginners. However if you are an advanced player and you want to dive even deeper into this song, there are definitely a lot of additional intricate parts.
Step 1: The Palm Muted Riff
This riff is kind of confusing but not. They are using a pretty simple pattern but they kind of flip it around. It’s kind of funny because the Twilight Zone chords are B minor, E, and F and thats all that they’re basically outlining here in this riff, so this entire song is basically these chords except for the pre-chorus.
For the first part, Robert uses his point mostly and starts by picking the 2nd fret 5th string, then the open 4th string, then the 2nd fret 3rd string, back to the open 4th string. Then he repeats it again. It is important to take notice to the rhythm and timing, the notes are the same, but the first time through is different that the second rhythmically.
Robert is adding in some palm muting and also choking the strings a little bit with his fretting hand to give this riff a real stiff sound and that’s what you want for this if, you don’t want the notes to be trailing off.
The second part to this riff starts with an open 6th string, then the 2nd fret 5th string to the 2nd fret 4th string, to the open 4th string. Repeat that twice and do the same thing we did with the first part of this riff, where you repeat it twice but the rhythm from the first time is different than the second. So the first part of the riff and the second part of the riff have the same rhythm in that both of these parts are played twice with the first time through being different from the second.
The next part of this riff is based off of an F# minor chord, so the easiest way to play it is to just make the F# minor power chord shape and keep it held down while you arpeggiate the chord. The term arpeggiate means to hold a chord shape but instead of strum it, you pick the strings in a pattern one at a time. So the first part of this riff was based off of the B minor chord, the second off of E, and now for the third part we are basing it around the F# minor. If you aren’t familiar with the F# minor bar chord, place your pointer finger on the 2nd fret 6th string and bar it all the way down through the 1st string, so putting pressure on every single string on the 2nd fret. Then place your ring finger on the 5th string 4th fret, and your pinky finger right under it on the 4th string 4th fret.
To play this part you don’t technically have to put your ring finger down on the 5th string because we are not using this note at all, but with it down it’s an F# minor chord, which is the chord Robert was referring to. You may have noticed that Robert didn’t place his down for this riff because it’s just one extra finger to worry about and we aren’t going to use it so there is no reason for it to be there. The notes we are using are the 6th string 2nd fret, the 4th string 4th fret, then the 3rd string 2nd fret, and then back to the 4th string 4th fret. Same amount of times and rhythm as the previous two shapes.
And remember, Robert is playing this with a heavy mute, he still gets the strings to ring together a little bit, but really likes the staccato feel of muting this riff. And that is that riff! You will definitely be here lot’s more of it in this song. Remember the timing of it is very important, the way that you time the notes out.
Step 2: The Verse
The verse starts with a B minor chord. So simply just strum it! If you don’t know how to play the B minor chord I’ll walk you through it. First place your pointer finger on the 2nd fret 5th string and then bar it so that you are putting pressure on the entire 2nd fret from the 5th string all the way through the 1st. Then place your ring finger down on the 4th string 4th fret, your pinky right under your ring finger on the 3rd string 4th fret, and your middle finger down on the 2nd string 3rd fret. After B minor, go to E minor. If you haven’t played an open E minor chord before you can either use your middle and ring finger or your pointer and middle finger to press down the 5th and 4th strings 2nd fret, all the other strings are played open. I use my middle and ring finger, so I have my middle finger down on the 2nd fret 5th string, my ring finger down on the 2nd fret 4th string and then I strum from the 6th string all the way down through the 1st. If you use your pointer and middle, your pointer would be on the 2nd fret 5th string and your middle on the 2nd fret 4th string, and again playing all the same open strings, strumming from the 6th string though the 1st. Then to F# minor which we went over earlier but this time instead of aggregating it we strum. After the F minor, return to B minor. If these barre chords are giving you trouble check out Robert’s other lesson on how to learn barre chords on guitar.
Step 3: The Chorus
The chorus has a little more distortion going on and there’s about three different guitars playing, but we are of course only going to be focusing on one. We are focusing on the guitar that is walking down. This part is moving a one power chord shape. A power chord is when you just play the root and the 5th of the scale together. Power chords are not major or minor, and the benefit to them is that unlike open chords where each chord looks totally different and uses different fingers and frets, a power chord is one shape that you simply will just move to the root of the power chord that you want to play. You can add in the octave if you want or leave it out, that it’s totally optional. I will explain how to play the power chord shape with the first chord we use, but after that I will just give the fret number.
This riff starts with a B5. The B note we are going to use is on the 6th string 7th fret. Place your pointer on the 6th string 7th fret and your ring finger on the 5th string 9th fret. If you want to add in the octave, place your pinky directly under your ring finger, on the 4th string 9th fret. Then just strum these three strings, the 6th, 5th, and 4th. If you only want to play the two string version you would only strum the 6th and 5th strings, so only strum the amount of strings that your fingers are holding down frets on. Also if you are doing the two string version you don’t have to use your ring finger to hold down the 5th string, you can use your ring or pinky finger, whatever you feel is the most comfortable. So after that E5 move this same power chord shape down two frets to the 5th fret playing an A5 power chord now and strum once. Then move down another two frets to the 3rd fret and play the G5 power chord strumming it once, and then move down one fret to the 2nd fret now playing an F#5 also just with one strum. Then play all of those chord again. B5, to A5, to G5, to F#5.
Robert mentions that he knows this isn’t necessarily the most exciting thing to play….just one strum on each chord, so what he does is he adds in some palm muting and chugs though in more of a straight eighth note rhythm and demonstrates this at the 6:53 minute mark. For those advanced players you will notice that behind this rhythm guitar there are a lot of things happening that you can figure out by ear or add in your own licks if you want to take this riff one step further.
The very end of the chorus is an open G major chord, place your middle finger on the 6th string 3rd fret, your pointer on the 5th string 2nd fret, your ring finger on the 2nd string 3rd fret, and your pinky on the 1st 3rd. You can simplify the G chord if you need to by playing the three string version instead The reason you can do three or four strings is because the 2nd string open is a B note and the 2nd string 3r dfret is a D note and both notes are in the G major chord, making that string have two different options. So everything would be the same but you wouldn’t place any finger on the 2nd string and you would not use your pinky on the 1st string 3rd fret, you would use your ring finger. This part comes in directly after the power chord walk down. Robert strums the open chords mostly on beat one and four of the same measure. See the video at the 7:36 minute mark to see him play both of these parts back to back.
Step 4: The Solo
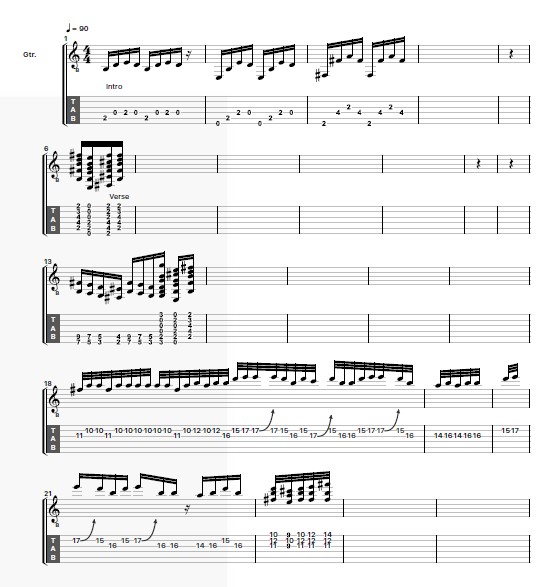
Now for the solo! Directly after the solo you will go back into the arpeggiated part and everything we have covered is pretty much the entire song! To start this solo place your middle finger on the 11th fret 3rd string and pick it once, then go to the 10th fret 2nd string with your pointer and pick it twice, then back to the 11th fret 3rd string with your middle finger but this time pick once. Then you are actually just going to pick the 10th fret 2nd string a bunch of times holding it down with your pointer finger. While playing this note add a little bit of vibrato to it. Then go back to the 11th fret 3rd and pick it once and then back to the 19th fret 2nd string once and then stay on the 2nd string but go to the 12th fret and pick it twice adding some vibrato. Then back to the 10th fret 2nd string and then back to the 12th fret. That is the opening section of the solo.
Now go all the way up to the 16th fret 3rd string with your middle finger, then pick the 15th to 17th frets on the 2nd string using your pointer to ring fingers. Then you are going to be bending the 17th fret 2nd string with your ring finger. Then pick the 17th fret 2nd string, then pick the 15th fret 2nd string with your pointer, back to the 16th fret 3rd string with your middle finger, to the 15th fret 2nd string with your pointer.back to the 17th fret 2nd string and bend again. Then the 15th fret on the 2nd string to the 16th fret on the 3rd string. Then you pick the 16th fret 3rd string again. Then pick the 15th fret to the 17th fret, bending that 17th fret 2nd string again, I know this is getting repetitive, then to the 15th fret 2nd string. Now to the 16th fret to the 14th fret both on the 3rd string and then play that phrase again, the 16th to the 14th frets on the 3rd string, ending this phrase back on the 16th fret on the 3rd string.
Now pick the 16th fret 3rd string again, then go to the 15th fret 2nd string to the 17th fret on the 2nd string and now we’re almost home free! Bend the 17th fret 2nd string again, then pick the 15th fret 2nd string using your pointer finger to the 16th fret 3rd string using your middle finger, then back to the 15th fret 2nd string. Then bend the 17th fret 2nd string again, then pick the 17th fret 2nd string, then pick the 15th fret 2nd string and then bend the 17th fret 2nd string. Then pick the 16th fret three times, to the 14th fret back to the 16th fret all on the 3rd string. Then pick the 16th fret 3rd string to the 15th fret 2nd string back to the 16th fret 3rd string. Then end by picking the 16th fret 3rd string to the 14th fret 3rd string back to the 16th fret 3rd string. Then we have a little chord shape, place your pointer on the 10th fret 1st string, ring finger on the 12th fret 2nd string, and middle finger on the 11th fret 3rd string. Stum it all down in a straight eighth note rhythm heavy palm muted for two measures, this a B minor voicing.
Then do the same rhythm and palm muted but now on the pointer finger on the 9th fret 3rd string, ring finger on the 10th fret 2nd string, and pointer on the 9th fret 1st string. Also for two measures and this is an A major voicing. Then go back to the first chord, the B minor and play it again in the same way for two measures. Then you are going to go to a new shape. Place your pointer on the 11th fret 3rd string and middle finger on the 2nd and 1st strings on the 12th fret, play this in an eighth note rhythm for one measure, and then move your pinky only out of this shape to the 14th fret 1st string, so pointer is still on the 11th fret 3rd string, middle finger is still on the 12th fret 2nd string, and pinky is now on the 14th fret 1st string. Then strum that for 2 measures, all eighth notes but stop on the second measure, beat 3. And that is the entire song!
Recap: How to Play Twilight Zone by Golden Earring
I hope you enjoyed learning the “Twilight Zone” chords, main riffs, and solo! What a fun song and a great one for beginners. Remember to pay high attention to detail, refer back to the video if you need to.