Guitar Control presents instructor Darrin Goodman with an easy strumming rendition of Let It Be by The Beatles. Be sure to click the link for the free guitar tabs to go along with Let It Be by The Beatles.
Introduction
Hey everybody how’s it going? This is Darrin with GuitarControl.com bringing you this video lesson and today I want to show you a really simple acoustic guitar rendition of Let It Be by the Beatles. So if you’re familiar with this song, which I’m sure you are, you know the song is actually played on the piano and the only guitar that’s really in it is when there’s the guitar solo. So this is just a simple kind of strumming rendition of the chords from the piano and everything, but just made for the acoustic guitar. So be sure to click on the link in the description for the tabs and let’s get close up and take a look.
Let It Be Chords
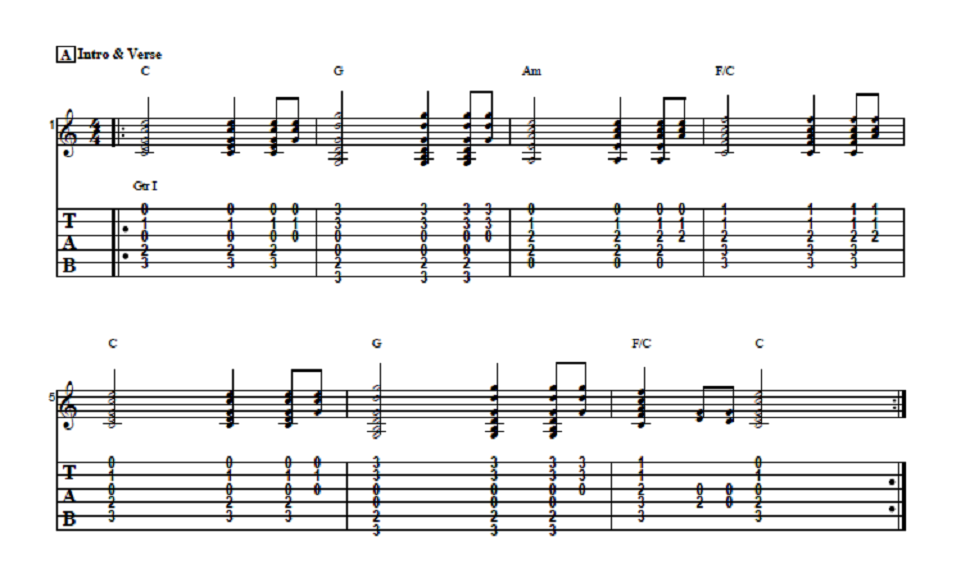
All right so the first thing let’s just go through the chords that we’re going to be using with this. So we have C major; so my third finger is on the third fret of the A string, second finger is on the second fret of the D string, G string is open, first finger on the first fret of the B string and the high E is open… Then we have G major; so I’m on the third fret of the low E with my second finger, second fret of the A string with my first finger, the D and G strings are open and I’m on the third fret of the B string with my third finger and the third fret of the high E with my fourth finger. Then we have A minor; so for A minor we can simply take the shape we did for C major, but you just move your third finger from the third fret of the A string so it’s on the second fret of the G string. So the A string is now open, second fret of the D string with my second finger, second fret of the G string with my third finger, first fret of the B string with my first finger and the high E is open… Then we have F… Okay so there’s a couple of ways that we can play this F. We could do the full on barre chord like this, which as you probably already know is a lot more difficult or we could do it like this… but the way I like to do it is actually like this… so it’s actually not F, it’s actually F over C (F/C); so I’m on the third fret of the A string with my third finger and the third fret of the D string with my fourth finger and then the second fret of the G string with my second finger and then my first finger is barring the first fret of the B and the high E. So the simplest way to play this is actually remove your pinky and move your third finger up so we’re just playing the first four strings, but I really like the way this one sounds… it has a nice full sound to it.
The Universal Strum
All right so like I said this is originally done on the piano and I did like a finger style rendition of this a couple years ago that goes like this… I’ll leave a link for that here if you want to check that out, but for this we’re just gonna keep it really simple. So we start off with the intro and the verse, which is the same thing. You start with C and the strum for this is just using the universal strum. So that’s a down stroke as a half note, so like one two and then for beat three we go one two three four and so a half note and then a quarter note and then two eighth notes; one two three four and so that’s down down down up. So we do that up stroke when we’re changing chords and we’re just hitting the first three strings and while that’s ringing we switch chords.
Verse & Chorus Ending Riff
So for that little riff right there, and this little riff is repeated, it’s at the end of every verse and the intro and then it has like an extended part that we’ll look at later for the chorus. All right so for this little riff we start off we just strum F and then the easiest way to do this is instead of removing all of your fingers just leave your first finger where it is and then take your middle finger and move it from the second fret of the G string to the second fret of the D string and now you’re going to strum the D and G strings together, the G string is just open, and then remove that finger so that the G and D strings are both open and strum them again and then put your fingers back on for C. So this is why you want to leave your first finger here so that way it’s just easier to make sure you stay in place; so that’s like one two and three four. So that’s the intro so the intro and then it goes into the verse which is the same thing… So now we’re going to look at the chorus.
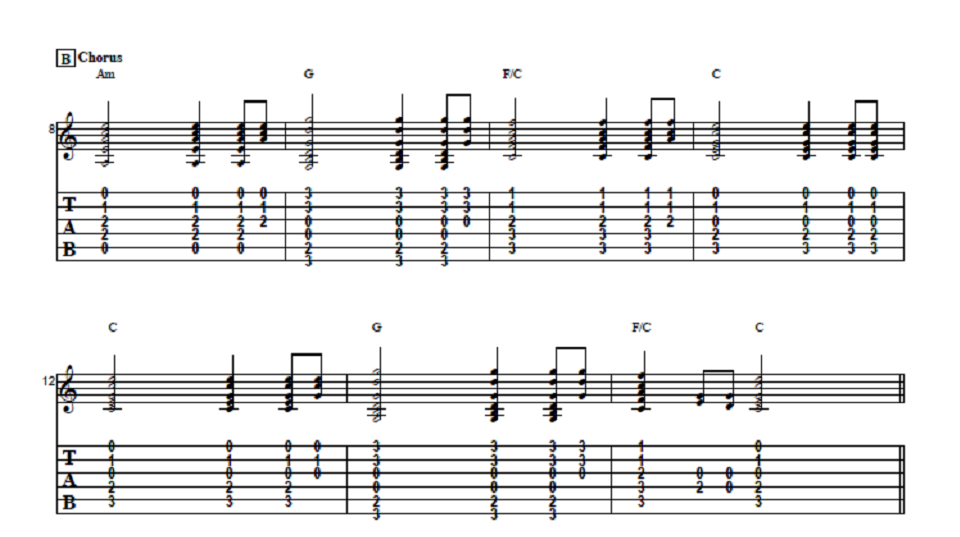
Chorus
Now with the chorus on this it’s the same chords, we’re just changing the order up a little bit, but with the same strumming pattern. So we start off with A minor to G to F and to C. We play this C for two measures so you do the strumming pattern twice and then to G and then that ending riff again. All right so that’s the intro, verse and the chorus and that just leaves us with the interlude that comes before the guitar solo and again at the end of the song. It uses partially that riff that we went over, but there’s more to it.
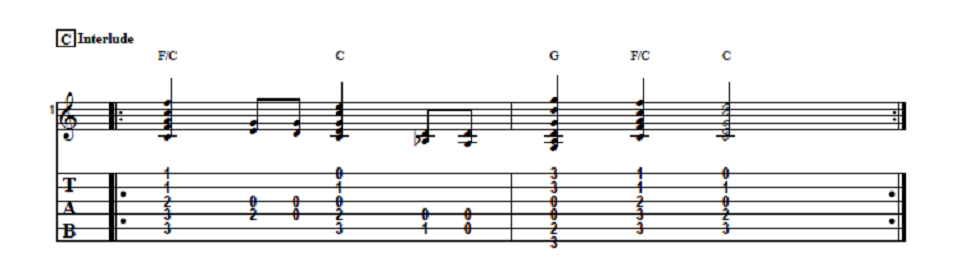
Interlude
So we start off with the riff we did before and then you’re going to put your first finger onto the first fret of the A string and you’re going to hit the A string and the D string open together and then remove your first finger and play both of those strings open and then G, F and C and that will end the whole thing. Then it goes into the actual guitar solo, but we’re not going to go over the solo, but the rhythm guitar part during the solo is just the same thing as the verse…
Conclusion
Alright so I hope you enjoyed that and you got something out of it. If you like the video give me a thumbs up and leave a comment down below if you have any questions about this lesson or if you have any requests for future lessons. If you have not already done so please subscribe to the channel and hit that notification bell so that you don’t miss out any of the content that we upload throughout the week. Anyway that is all I’ve got for you today. Thanks for watching and have a great day.