What’s going on everybody Shawn Daniel, with Guitar Control today we’re learning my favorite song off the Taylor Swift Folklore Album “Invisible String”, a really cool song got a few different parts, rhythm and picking of it, that makes it kind of special.
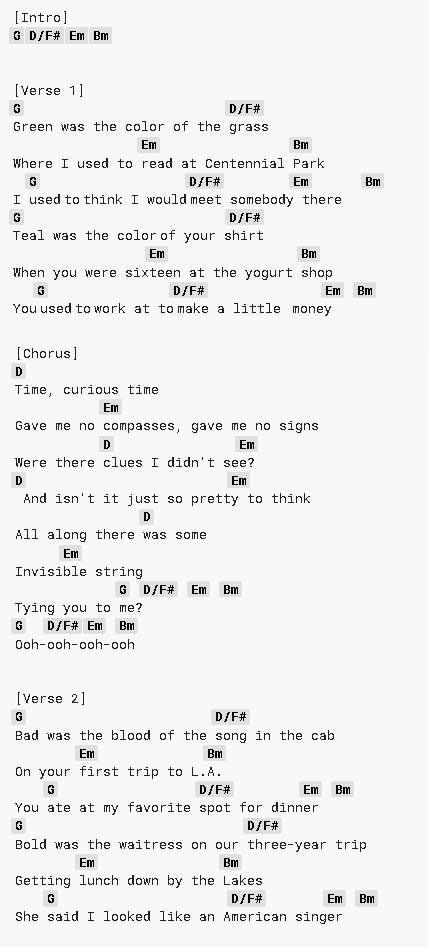
Make sure you check the image above to follow the chords and tabs.
We’re going to do the easier version, which is representation of the entire arrangement. It’s going to sound like this (music), that’s just only the verse and then there’s a couple other parts. Let’s just get right into the verse chords not too difficult chord wise, but let’s talk about how we’re going to play these.
We’re going start with the g major chord, my middle finger is the low e string third fret pointer finger, second fret on the a string. My ring finger is grabbing the third fret on the b string, I’m going to play with the pick, you can play it with your fingers however you want more than just a like a bar one, two three, and four, and it’s more of like a one, two, three, and four, and one, two, and three, and four, and one, two, and three, four, and one, two, and three, and four, and that’s how we can get that dual guitar vibe they have on the album version and make it kind of sound a little bit just like it with one guitar.
The way I’m doing that, is on the one count and again remember counting musical counting is super important. One, two, and three, m4, and one, two, and three, m4n. You can hear where the dynamics and the accents are. On the one I’m just going to strike the root note which is the g the low e string third fret one, two, and three, and four.
Now on the two I’m going to go further into the chord, I’m going to aim for the a and the d string one, two, and right there this is a two and an, is going to be a down and up. Now you can try to aim for those two strings or if you want you can get the a string down and the d string up, one, two, and three, and four, and the three is going to be the next accent one, two, and three. We’re hitting it not necessarily harder but we’re getting more strings.
I’m getting more of the meat of the chord which I might get the middle four strings that I am aiming for. But I definitely want the top melody, which is going to be your ring finger on that b string that d note one, two, and three, and four. Now the end of three, I’m just kind of coming up around the b string and then four on the end of four. I’m getting the lower middle part of the string set one, two, and three, and four, and one, two, and three, and four. In the song it only stays on this chord for one bar but it’s a great way to kind of practice that rhythm.
If you want to really kind of aggressively hear, what you’re trying to play with the accent make sure you palm mute it. I’m just locking my palm into the bridge. So I don’t get as much of a sustain so, I can really hear where those accents are kind of coming in. That’s going to be the vibe, the tempo, the feel of the song. Now we can really substitute different chords into that same pattern.
First thing we’re going to do is, we’re going to go to a d slash f sharp chord. It’s just a d major chord, but with the f sharp in the bass. That’s why I wanted to use this g major chord voicing where your ring finger is on the b string because you can pivot off of it into this. Keep your ring finger where it is, your middle finger goes down to two, on the g string and your pointer finger grabs the f sharp the second fret on the low e string same thing as one, two, and three, and four. Starting with that bass note which is an f sharp, the reason it’s a slash chord is because the bass note is not the root note of the chord remember with the g, I’ve struck that low e string first, the g is my bass note energy that’s why it’s just a regular g major chord one, two, m three, m four, and a d chord with the f sharp in the bass. Sometimes I’ll just call it a low d chord.
After that we’re opening up to an e minor chord middle finger second fret on the a string ring finger second fret on the d string our root note is now again the bass note e.
One, two, and three, and four, and same strumming pattern and then end up on b minor pointer finger second fret of the a string ring finger and pinky four d and g, respectively middle finger. Three b you can borrow, if you want your pointer finger to kind of pull double duty and get two a and two e or you can play the middle four strings of that b minor chord and not worry about what’s on top melody wise. So that’s the whole progression for the verse g, d slash, f sharp, e minor, b minor then when we apply that strumming, picking and it kind of has the vibe of the original, but it’s just like a single acoustic guitar type deal.
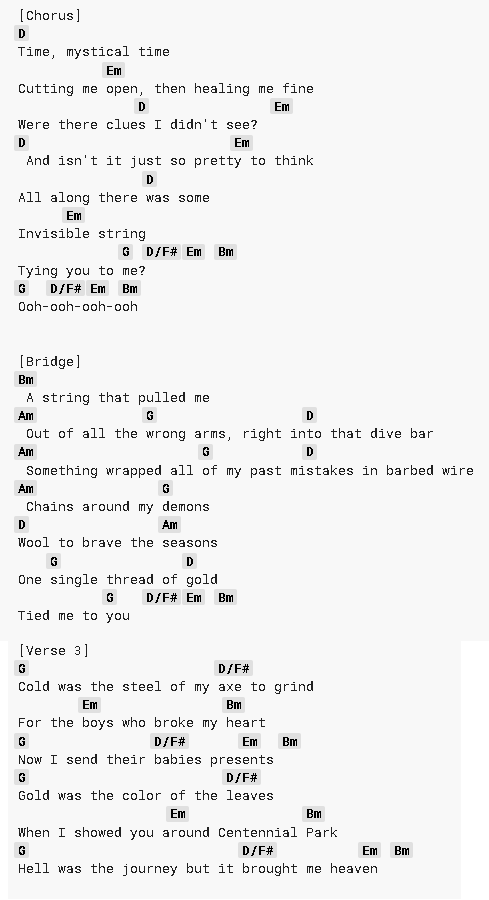
We go to the chorus which is really easy, it’s just d to e minor essentially, but now we want that f sharp on top because that f sharp is now part of the melody of the vocal line. We kind of grab a traditional d major chord, middle finger two on the high string ring finger, three on the b string pointer finger, two on the g string, and then you’re going to do this until you go back to the regular verse, run of course.
What you may have noticed is that every chord in the chorus have double the amount of bars on each chord, so we have a bar of d and another bar of b then a bar of e minor and another one, two bars of each. You’ll notice for that d major chord the bass note is going to be the d string, just open so there’s my root note.
Another thing you may have noticed because it is kind of a quick thing to be able to keep that in time. I’m leaving that chord early so if I was going to count it one, two, and three, and four, and one, two, and three and four, and one, two, and three, and four, and one, two, and three, and four. The cool thing about this key specifically, in a lot of keys even if it’s not in the key, you can hit that open string set on that fourth beat of the bar and then just hit open to buy yourself time, to get to the next chord one, two, and three, and four, and e, see how it doesn’t sound bad it’s just kind of neutral. Playing that neutral just open string set in time is a great way to buy yourself time to kind of get where you’re going.
The next part we’re going to do is the bridge and it’s really the same vibe except, we just have the introduction of an a minor chord. Pointer finger first fret on the b string ring finger, second fret on the g string middle finger second fret on the d string, and now our bass note and root note is open a. Now we can grab the same kind of vibe, we have two bars of a minor, and a bar of g, and a bar of d.
This is the first time where the cores in the progression don’t always have the equal amount of time; we have two bars of a minor a, bar of g, and a bar of d. One, two, three, four, one, two, three, four, one, two, three, four switch. I can still do that thing with my hand, where I’m jumping. Again I like using the traditional voice of the major chord, here you can do the low d there too if you want more of a thicker sound, but I think it sounds just fine going from here to here might be a little bit easier on your fretting hand.
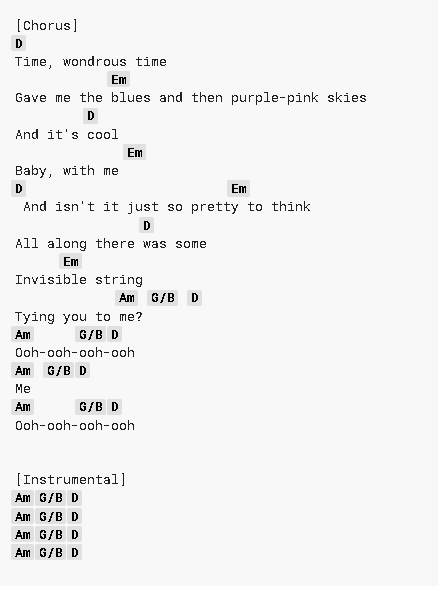
The only other part is an outro, which honestly is the same thing as of the bridge that we just talked about. I’ve seen chord charts having the bass, this note right here in g chord. Like a, g with a g slash b chord, means it’s a g major chord, except the bass note is going to be a b so when you take your middle finger away and we’re just left with 2a open, d open g3 b you can also get your pinky on the third fret of high string, like a g major chord. Still the bass note is a b second fret of the a string also known as an inversion. We can do the same thing with that a, b and it might not seem that different, so here I’ll do both of them right a minor inversion d or a minor it all just depends on what you want the bass to sound like.
If I were to play it without any of the strumming just the bass it would be, the a having that b kind of gives a little bit, It kind a affects the resolution of the song in a different way which I think they chose that particular voicing for the outro because it’s just keeps going, keeps pulling you in like an invisible string, basically just a couple different parts.
We’ve got the verse chords g, d, e minor, b minor, then we’ll ride that home to the verse chords d the two bars each e minor and eventually, you’ll go back to the verse chords. When you get out of the chorus, the only other part is the bridge a minor g, d, which also works in the outro of the song, but what I can’t stress enough is to keep that rhythm steady one, two, and three, and four, and one, two, and three, m4, and one, two, and three, and four, because it’s not just this song you want to keep a steady rhythm, steady tempo. I think this is a great song to practice at and just another well-written song by the Queen of Modern songwriting.
Thanks for checking, if you have any questions or comments or feedback leave it in the comment section we’ll get back to you because we’re always looking for different song choices that you guys want to hear, anything else let us know and we’ll talk to you soon.

