Check out this easy rendition of Lights by Journey from Guitar Control instructor Darrin Goodman. Be sure to get the tabs to go along with this easy acoustic guitar lesson.

Introduction
Hey everybody how’s it going? This is Darrin with GuitarControl.com bringing you this video lesson. Today I want to show you a somewhat simplified acoustic rendition of Lights by Journey. I’ve tried to kind of simplify this to make it just an easy kind of a strumming song that you can play at a barbecue or camping or something, but I still wanted to kind of keep some of the elements from the original in there because they’re kind of a staple in the sound of the song. So this is not an exact rendition of exactly how they’re playing it, it’s just an arrangement that should just be a little bit easier to play especially if you’re somewhat of a beginner. So be sure to click on the link in the description for the tabs and let’s get close up and take a look.
Lights Chords
All right so first thing let’s just go over some of the chords that we’re going to be using in this. We’ve got D; so my D string is open, I’m on the second fret of the G string with my first finger, third fret of the B string with my third finger and second fret of the high E with my second finger. Then we have B minor seven (Bm7) and there’s actually two ways that we’re going to be playing this. The way I’m going to show you right now is like what’s used in like the verse. The Bm7 that’s in the intro is a different voicing and we’ll look at that in a second. So unfortunately it’s a barre chord and we’re barring the second fret the first five strings with my first finger and then I’m on the third fret of the B string with my second finger and I’m on the fourth fret of the D string with my third finger. Then we have C; so third fret of the A string with my third finger, second fret of the D string with my second finger, G string is open, first fret of the B string with my first finger and the high E is open… We will be doing some other stuff like D suspended two (Dsus2) and D suspended four (Dsus4). So if we take the regular D major and you remove your second finger so that the high E is open that’s Dsus2 and then if we put our pinky down on the third fret of the high E then that’s Dsus4. So that’s just like kind of a riff thing that we’ll talk about later.
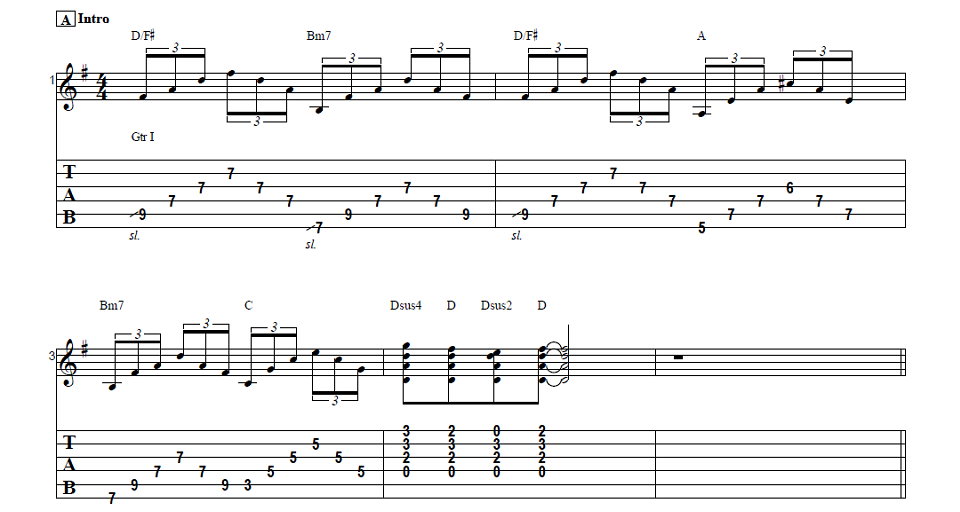
Intro
So for the intro we’re going to start off we’re using our third finger and we’re going to do a slide from nowhere to the ninth fret of the A string and simultaneously we’re going to drop our first finger down so it’s barring at the seventh fret across the D, G and B strings… so that chord by the way is D over f sharp (D/F#). Then we’re gonna do a slide from nowhere with our first finger to the seventh fret on the low E and we’re going to do a Bm7. So this is the different Bm7 voicing than what I was talking about earlier. So with this voicing we’re just gonna barre all the way across the seventh fret across all six strings and then third finger onto the ninth fret of the A string… So when I’m doing this here and I lay this down I’m sliding up on the A string and then I’m going to the D, G, B, G and D and I’m doing the slide from nowhere on the low E; A, D, G, D, A… So that’s like the first part of the intro. So we have the D/F#… Bm7… back to the D/F# and now we’re going to do an A major barre chord. So we’re going to come down here and we’re going to barre all the way across the fifth fret across all six strings, second finger on the sixth fret of the G string, third finger on the seventh fret of the A string and fourth finger onto the seventh fret of the D string; that’s A. So we’ve got… and there I’m just going E, A, D, G, D, A and then we move back up to that Bm7, same picking, now we go to a C… So this C barre chord, you could do the open C, but I just don’t like the way that one sounds as much for this, but if barre chords are like kicking your butt and this one is going to be harder to play than these ones are typically, so if you have trouble with that you can go ahead and use the open C. But what it is here is my third finger is barring the fifth fret of the D, G and B string and then I’m just picking up the C here on the third fret of the A string. Here I’m going A, D, G, B, G, D. Now we’re going to go up here to the D and we’re gonna do Dsus4; so you can put your pinky down and you take that off to D and then take your middle finger off to Dsus2 and put it back on for D. So that’s the whole intro and then that’s where the verse starts and the vocals come in, actually it’s not the verse it’s the chorus that starts out first.
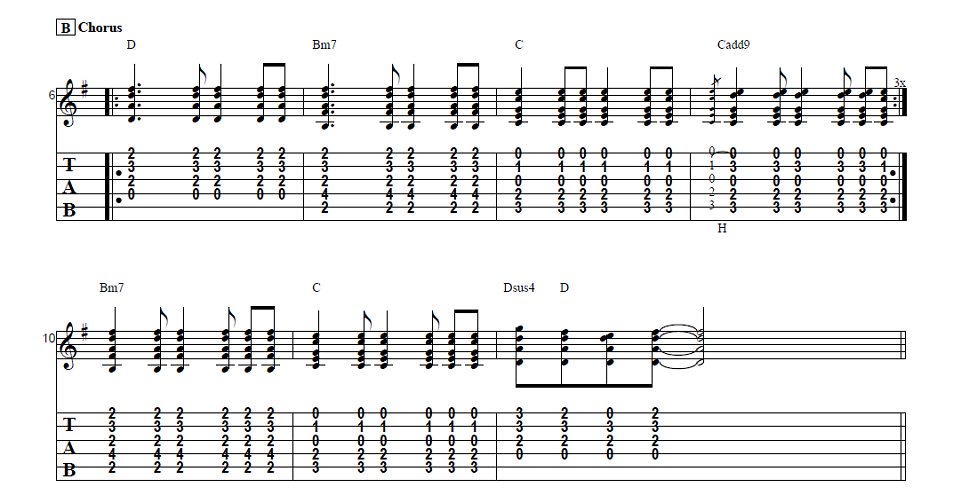
Chorus
So the chorus actually starts on the downbeat so we got D. So the strumming on this, I’ve kind of talked about this stuff before, you don’t want to be tied down and be like “oh I’ve got to do this exact strum pattern”, because what it’ll end up doing is if you make a mistake it’ll throw you off time and sometimes it’s really hard to come back. So it’s really a thing you just kind of want to learn to feel it, there’s the strum shown there on the transcription, but you should use it more as like a guideline and just really try to feel your way through it. If you’ve never tried to do this before it at first for a lot of people is really difficult and it feels impossible, but you’ll get it, I know you will, you just have to put a little bit of time into it. So it starts off for us here with D and I’m going; down, up, down, down to Bm7 to C. Now here we’re going to use the regular open C; so third fret of the A string with my third finger, second fret of the D string with my second finger, G string is open, first fret of the B string my first finger and high E is open. So when we get to that C we’re going to do that little hammer-on to the third fret of the B string… it just kind of puts a little bit of a high melody in there. So you get the C… and then back to the one. So when you put your pinky down there, don’t remove your first finger, leave it there on the first fret of the B string so you can go back to it and then it just then it just repeats and does those four measures three times… So just like that part we did on the intro at the end of it the the chorus ends with that too; so we have the Bm7, C and then you go to the D, Dsus4, D, Dsus2 when it goes into the verse parts.
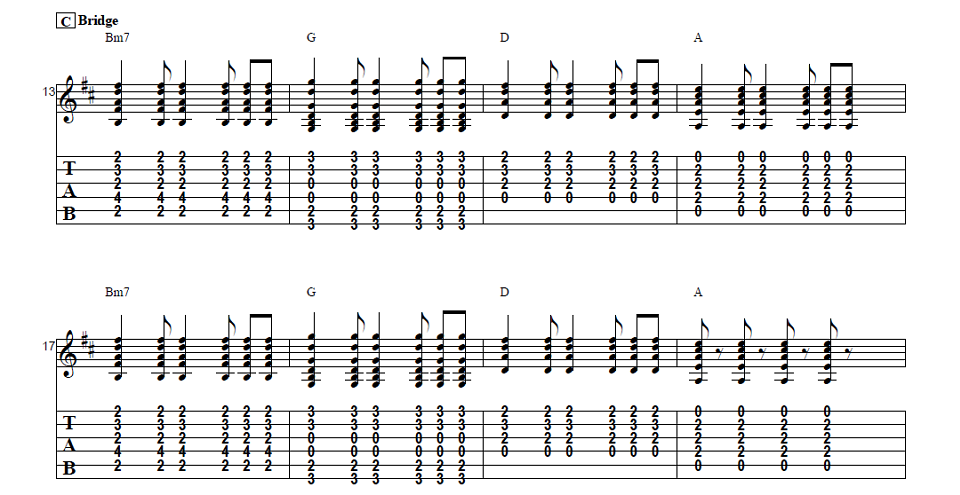
Verse & Bridge
The Verse is the same thing as the chorus… Okay then this leads us into the Bridge. So we start off with a Bm7; so really quick third fret of the B string with my second finger, second fret of the A string with my first finger, D and G strings are open and I’m on the third fret of the B string with my third finger and the third fret of the high E with my fourth finger. So we have; Bm7, G, D and when we go last part of the bridge it goes to the A from the D back to Bm7 and then two measures of D and then that little riff that ends each section of the song. So there’s just the three parts to the song; the intro, the chorus and the bridge.
Conclusion
That’s it, that’s all the parts to the song. Like I said, not an exact rendition of how they do it, but it’s perfect for jamming and doing like a sing-along. Something I really recommend you do is learn these and then what I like to do is just print off the lyrics and then I just put the chords where they appear above the lyrics so that way I can follow along vocally with my eyes. Even if I’m not trying to sing because when you when you sing it really helps, it’s like your jaw and your strumming arm are kind of connected and it just really kind of helps to get everything nice and smoothed out. All right so I hope you enjoyed that you got something out of it. If you like the video please give me a thumbs up and leave a comment down below if you have any questions about this song or any other guitar related stuff that I can see maybe I can answer for you. If you have not already done so please subscribe to the channel and hit that notification bell so you don’t miss out any of the content that we upload throughout the week. Anyway that is all I’ve got for you today. Thanks for watching and have a great day.