
How to Play Dear Prudence On Guitar
In this Guitar Control video lesson instructor Jon McLennan is going to show you how to play “Dear Prudence” on guitar by The Beatles. This is a great song to kick start your finger picking. In this video Jon is going to focus on the Intro only and really break it down. He is using an acoustic guitar himself, but you are welcome to use an electric on clean, or grab your acoustic, too!
 [/contentwall]
Click on the Tabs button to follow the chords and tabs.
Step 1: Tips On Getting Started
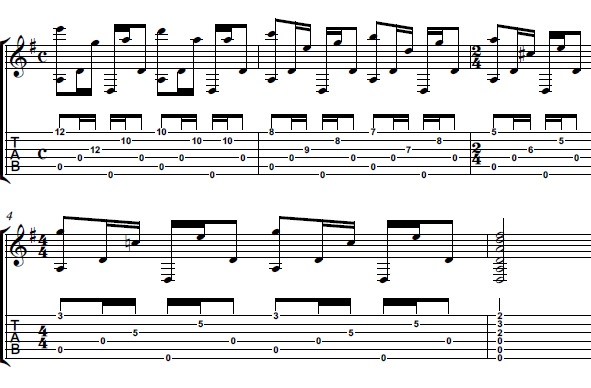
Step one in learning how to play “Dear Prudence” on guitar to help prep you with a few tips! This song is in Drop D tuning, so Jon has lowered his 6th string down one full step, taking it from the standard E, to a D. If you aren’t familiar with Drop D tuning, all it is is lowering only your 6th string. So your 6th strings becomes and D instead of an E and everything else remains the same as it is in standard, so the 6 is a D, but the 5 is still an A, the 4 a D, the 3 a G, the 2 a B, and the 1st string is still an E.
Step 2: The Chords
We are going to start with these three note fretted chords, these triads. For the 1st shape, we start out on the 3rd string 12th fret with our third finger, then your pointer on the 2nd string 10th fret, and your pinky on the 1st string 12th fret. You are going to strum that triad with a D note in the bass, just picking the open 4th string above the frets you are holding down, strumming from the 4th string all the way down through the 1st string.
Then you are going to go to a D shape, and this is just a little baby D chord, barring the 2nd and 1st strings with your pointer on the 10th fret and placing your middle finger on the 3rd string 11th fret. Strumming from the 4th string down through the 1st again. Then you are going to drop this shape down a whole step to a C shape. Same exact shape but now your barre is on the 8th fret 2nd and 1st strings, still with your pointer, and your middle finger is holding down the 9th fret 3rd string. Then he moves down to a G chord, placing his pointer on the 7th fret 3rd string, his ring finger on the 8th fret 2nd string, and his middle finger on the 7th fret 1st string. This looks just like an open D chord that you are probably familiar with but we are on the 7th fret, and it’s a G when played on the 7th fret. So just like a stock open D shape, relocated up the neck on the 7th fret.
The next shape looks like the same we did right before the D shape on the G, But is now an A. Barre your pointer finger on the 5th fret on the 2nd and 1st strings and place your middle finger on the 6th fret 3rd string. This is an A chord with a D in the bass, since you are going to strum down from the open 4th string, which is a D. Then the last two chords are a C triad, place your ring finger on the 5th fret 3rd string, your pinky finger right under it on the 5th fret 2nd string, and your pointer on the 3rd fret 1st string.
Again with the D in the bass, strumming from the open 4th string down. And then ending with our last chord! An open D chord. To play an open D chord you place your pointer finger on the 3rd string 2nd fret, your ring finger on the 2nd string 3rd fret, and your middle finger on the 1st string 2nd fret, and again and of course, strum from the open D string, strumming from the 4th string down through the 1st, just the stock D chord you are probably familiar with.
If you are enjoying this Beatles song, be sure to check out our other lesson for how to play Come Together by the Beatles for another awesome, but very different Beatles song. To see john review all of these chords in order, slowly, go to the 2:11 minute mark.
Step 3: Finger Picking
Once you have those chords down we can work on our strumming/picking hand, and that is where we really start breaking up these chords, arpeggiated, and really coming up with a cool finger picking pattern. So go back to the very 1st triad we learned, ring finger on the 3rd string 12th fret, pointer on the 2nd string 10th fret, and pinky on the 1st string 12th fret. Now back to our finger picking hand, you are going to start with your thumb on the 5th string, and middle finger on the 1st string. You are going to want to stick to using the same fingers, Jon is really only using thumb, pointer, and middle fingers in this song.You want to use the same fingers so you are consistent and when you are practicing the pattern you are also using the same fingering and it just keeps it clean and easy. Just like when we play chords and learn and practice them, we play them the same way with the same fingers each time, unless a song really specifically calls for it or there’s a special reason.
Sometimes there can be reasons for changing but when you’re learning something new you just want to pick one way and really burn it into your brain, and of course, pick the way that’s the best way to play the part for the song. So that is what Jon is showing you with this pattern. So using your thumb and your middle finger doing that pinch, thumb on the 5th string and middle on the 1st, playing them together and almost pinching them since the thumb on the 5th string pushes down to sound out the note and the middle finger pushes up to get the 1st string to ring out. Then you are going to move your thumb down to pluck the 4th string and your index is going to pick the 3rd string. See the video at 3:34 to hear John play the first half of the pattern.
For the second half, your thumb is going to drop down to the 6th string, and then your middle moves up to the 2nd string.Then Jon actually uses his thumb again for the last 4th string. You are basically just going to now take this finger picking pattern and apply it to all of the chords we learned. You play it just one time on every singly chord except when you get to the C, where your ring finger is on the 3rd string 5th fret, your pinky is right under it on the 2nd string 5th fret, and your first finger is on the 1st string 3rd fret. You are going to play the finger picking pattern twice on this chord. Then to the open D chord and where you are just going to strum once, not finger pick this one, and that’s the intro! Then you go into the rest of the song. To see john play the entire intro go to the video at the 4:50 mark.
Recap: How to Play Dear Prudence On Guitar
I hope you enjoyed learning how to play “Dear Prudence” on guitar! This is a great introduction into finger picking lesson by one of the most popular bands of all time, The Beatles. This song is truly beautiful and very fun to play. Enjoy taking these same finger picking concepts and applying them to other songs, to your own, or just mess around and write something new with them. It’s always great to not only learn the song, but learn from the artist and take it with you to spark your own creativity.
[ninja-popup ID=715]