How to Change Chords Faster
In this Guitar Control video lesson instructor Robert Baker, is going to give a few of his personal tips on How to Change Chords Remarkably Faster. Minimizing the movement from our fretting hand when we are changing chords etc. A lot of time when we are not paying attention we cost ourselves speed. Your changes don’t have to be lightning fast but the point of changing chords quickly is that you of course get to the next chord quicker but you also don’t have such a jerky movement you would have when trying to last minute change to a chord or something like that. This is a great way to cut down the risk of that happening. These steps might actually slow you down a bit at first but the outcome will be a much quicker chord changes. Today Robert is going to give us a few example chord progression to work on our changes and demonstrate and give tips on How to Change Chords Remarkably Faster.
Step 1: How to Play the Chords
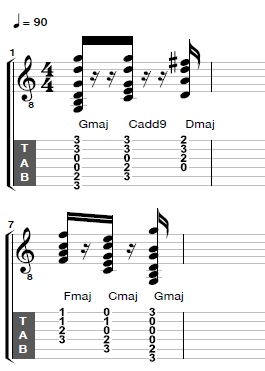
First things first of course when learning How to Change Chords Remarkably Faster, we need some chord progressions to change! For the first chord progression Robert starts with the 4 finger G Major shape. To play this shape, place your middle finger down on the 6th string 3rd fret, place your pointer down on the 5th string 2nd fret, your ring finger down on the 2nd string 3rd fret and your pinky holding down the 1st string 3rd fret. Strum all the strings from the 6th string down. Then he is going to move to a Cadd9 chord. This change is extremely simple since these chords have two notes in common and almost look identical. The only difference is you are going to move both your middle and pointer fingers down a string each. So your middle finger now holds down the 3rd fret 5th string and your pointer holding down the 4th string 2nd fret, then of course your ring finger remains where it was for the G Major, holding down the 2nd string 3rd fret and pinky still holding down the 1st string 3rd fret. Then he goes to a D Major chord. This chord still has one finger in common with the other two chords, but only one. The note in common is your third finger, your ring finger will still remain on the 2nd string 3rd fret, pick up your pinky off the guitar neck since you do not use this finger for the D Major chord. Then you can kind of make your pointer and middle finger into a peace sign, and place your pointer on the 3rd string 2nd fret, and your middle finger on the 1st string 2nd fret. Strum this chord for the open 4th string down since the open 4th string is a “D” note and this is a D Major chord. Then we are going to go back to the Cadd9 chord and then back to the four finger open G chord.
Step 2: How To Change The Chords
Now it’s very very common if you’re a beginner, don’t feel bad about this, but a lot of times beginners go strum the chord and then take all of their fingers off the fretboard and then place them back down creating the next chord shape from scratch, Why this isn’t good is because some chords have notes in common. If you utilize this you already have sped up your transition. So don’t worry, it just takes a little bit of practice and then you will break this habit right away and be able to Change Chords Remarkably Faster.
So Robert starts with the G Major chord and then transitions to the Rock N Roll Version of the Cadd9. Remember that these two chords are very similar. All we do is move both our middle finger and pointer from the 6th and 5th string while playing the open G major to playing the 5th and 4th strings for the Cadd9. So they are both moved down one string. So remember making sure you leave the fingers down for the notes that stay the same and also not completely lifting up your fingers off the fretboard for the notes that change. Just simply sliding them across the strings, moving down from the 6th string to the 5th string. So just simply kind of hopping them down. Robert actually never left the fingerboard, he left his fingers still kind of touching the strings a little bit and just kind of went down to the 5th string. You should always try to remain as close to the fingerboard as you can. So again, we have now transitioned from the G major chord to our Cadd9 chord.
Step 3: Adding Strumming
So first let’s go back to our G chord and add some strumming. A simple down strum, but what Robert is doing is kind of cutting the chord in half. First playing the lower strings of the chord and then the higher strings, alternating in between each strum. Low, high, low high. Do this four times and then transition to Cadd9 doing the same thing. So one thing Robert is doing is he is playing the Cadd9 but he is kind of overshooting the middle finger, using it to go a bit above the 5th string 3rd fret root it is supposed to be holding and just barely touching the 6th string. He is doing this to mute the 6h string and make it so if we choose to strum all 6 strings we will not hear the undesired 6th string to ring out. Sometimes you do want to hear the 6th string but since this is a C chord we want to heard that low C we are holding down with our middle finger on the 5th string 3rd fret to be the lowest note heard. Even though you may hear it when you pick it muted but it just sounds kind of dead or muffled, when you play it with the desired notes in the chord, you can’t hear it with the other open strings ringing out much louder. What that does is lets you focus more on the rhythm and the groove versus being worried about accidentally hitting the low E string which wouldn’t sound very good in this particular chord. Robert is now strumming, down down down up up down down. Then to the D major chord, this chord requires us to move three fingers. You keep your ring finger down as we mentioned earlier since it stays the same in all three of these chords. Then pick up your middle finger and move it from the 5th string 3rd fret to diagonally down to the 1st string 2nd fret and drop your pointer down one strung, from the 4th string 2nd fret to the 3rd string 2nd fret and your pinky goes up off the fretboard and is not used in this chord. Then practice moving back and forth between the Cadd9 and the D chord working on the transition. Be sure to not rush this or move too fast because we are looking for a very smooth very slow transition. Moving back and forth getting comfortable with this change. For another great song on working on transitions check out our lesson video for how to play Rock N Roll by Led Zeppelin.
Step 4: Order Of Operations
Robert describes the way he thinks about changing chords as almost an order of operations. First ones first. Hen he goes to the D chord he needs to make sure he is playing the 4th string, the open D note, open. This buys him a little bit of time and you will notice, when he transitions, his fingers fall down into place. So moving between Cadd9 to D, his middle fingers is already moving from the 5th string 3rd fret diagonally down to the 1st string 2nd fret and at the same time he is dropping his pointer finger down one string while also lifting up his pinky finger to now hold down nothing. And of course, our ring finger was already down where it needs to be. So Robert makes sure that he has all of these fingers down to make sure he can play the open D chord. So let’s move back and forth between these using the same strum pattern and playing the chords for one measure each. This strum being the one hit per beat alternating from the focus on the low strings to the high strings every other time.
Step 5: The Next Chord Progression
Lets continue to our next strumming pattern to Change Chords Remarkably Faster. We are going to keep the strumming the same because this lesson isn’t about the strumming but about focusing on controlling the movement of our hands. So let’s start with a chord that is dreaded and feared by guitar players all over the world, an F Major chord. Followed by C Major and then a G Major. If you think this G Major looks kind of funky to you, it’s the same chord we were playing before, just slightly different.
Let’s go ahead and start with the F Major chord. Start by barring the 2nd and 1st strings with your pointer finger on the 1st fret. Then place your middle finger on the 5th string 2nd fret and your ring finger on the 5th string 3rd fret. Then strum from the 4th string all the way down to the 1st. Do four strums on this chord, moving the focus of the strum from low to high. Then change to a C major chord. To play a regular open C Major chord, place your ring finger down on the 5th string 3rd fret, your middle finger down on the 4th string 2nd fret and your pointer down on the 2nd string 1st fret.
Now remember how we moved from the G major to the Cadd9 where we just kind of rolled our fingers back and forth between two strings. To change from an F Major to a C Major you move your barred 2nd and 1st strings to only holding down the 1st fret 2nd string. Then move both your middle and ring finger from the 3rd and 4th strings there are holding down for the F Major, up one string, to the 5th and 4th strings. So earlier we did the opposite, dragging our fingers down from the 6th string to the 5th, but this time we are kind of doing the reverse and moving two fingers both just up one string. Now move to the G Major chord. Remember how we mentioned the G looks different for this example. To move to this G, move your ring finger and pointer each up a string again. Now placing your ring finger on the 6th string 3rd fret and your middle finger on the 5th string 2nd fret. You don’t need your pointer anymore, but you will want to place your pinky down on the 1st string 3rd fret and that’s your G Major! So watch how easy these movements are. F to C to G. All moving the middle and ring fingers up or down one string making you Change Chords Remarkably Faster.
Recap: How to Change Chords Faster
I hope you enjoyed Roberts lesson on How to Change Chords Remarkably Faster. What a great lesson filled with tons of personal experience and advice on how to put the time in right the first time and to only have to learn things once. This lesson is a simple thing that gets overlooked all the time by guitar players. So remember slow down, make sure you get it right the first time, and of course, as always, have fun with How to Change Chords Remarkably Faster.