How to Play Highway to Hell Solo In this Guitar Control lesson video Instructor, Robert Baker, is going to show you how to play Highway to Hell guitar solo! A follow up to his Highway to Hell riff lesson. If you haven’t already, be sure to check out that video as well. There are lots …
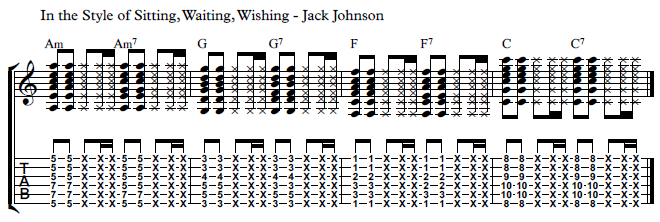
Check out this lesson on How to Play Sitting, Waiting, Wishing By Jack Johnson – Easy Acoustic Guitar Lesson from Guitar Control instructor Jon MacLennan. Introduction Hey how’s it going? My name is John MaClennan, thanks so much for hanging out with me in my studio today; I hope you’re doing fantastic. I want to …
Check out this Easy Guitar Lesson on How to Play “Don’t Fear the Reaper” by Blue Öyster Cult. This step by step video, taught by Guitar Control instructor Jon MacLennan, along with the free tabs will have you rockin’ this guitar classic in record time.
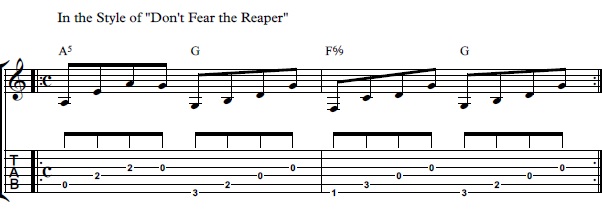
Hey how is it going? I hope you’re doing fantastic. My name is Jon MacLennan and I want to give you a guitar lesson today in the style of Blue Oyster Cult, Don’t Fear The Reaper, this is a really cool arpeggiated riff. So let’s zoom in and break it down.
Don’t Fear The Reaper
So the main riff for Don’t Fear The Reaper is based off of just three chords; an A5, a G and F6/9 and a G again. So what we’re going to do is we’re going to start on that A5 where I play that with just two fingers. I put my second finger on the fourth string second fret and then put my third finger right underneath it on the third string second fret and then I arpeggiate each note like this… and then I played the third string open. Then I move to a G chord which I play with just two fingers, my third finger and my second finger on the third fret and the second fret here. And you can see I’m on the sixth string and then the 5th string, they’re just kind of diagonal, and then I just go down four strings like this starting at the sixth string and go. So if I put those two together it sounds like this…
Then I move to basically an F6/9 which all you gotta fret is one and three here. So I’m on the sixth string 1st fret, 5th string 3rd fret and then I keep those fingers kind of up on the tips because I’m going to let the two strings below ring open. You really want to try it on the tips to get this sound, they’re bringing out and then back up to that G sequence again. So if I put that together slowly they’re all eighth notes. You can do it all on down strokes with the right hand.
Conclusion
Right on well I hope that helps you out. Be sure to click the link below to subscribe and we’ll catch you in the next video lesson. Thanks for watching How To Play “Don’t Fear the Reaper” by Blue Öyster Cult.
GET Jon Maclennan’s courses by clicking in the links below – GO!!! ➜
In this Guitar Control video, Instructor, John Maclennan, is going to show you Easy Acoustic Guitar Lesson on How to Play “Eight Days a Week” by The Beatles. This is a great song to get your strumming going, working on a little bit of a bass note strum pattern. We are going to take a closer look at this riff and really break it down in depth. And what better band to learn anything to do with chords and chord progressions than the Beatles.
I remember in my music business class when another student asked if you can copyright a chord progression, and the teacher replied, if you could then The Beatles could sue everyone.
GET Jon Maclennan’s courses by clicking in the links below – GO!!! ➜
How to Play Eight Days A Week by The Beatles On Guitar
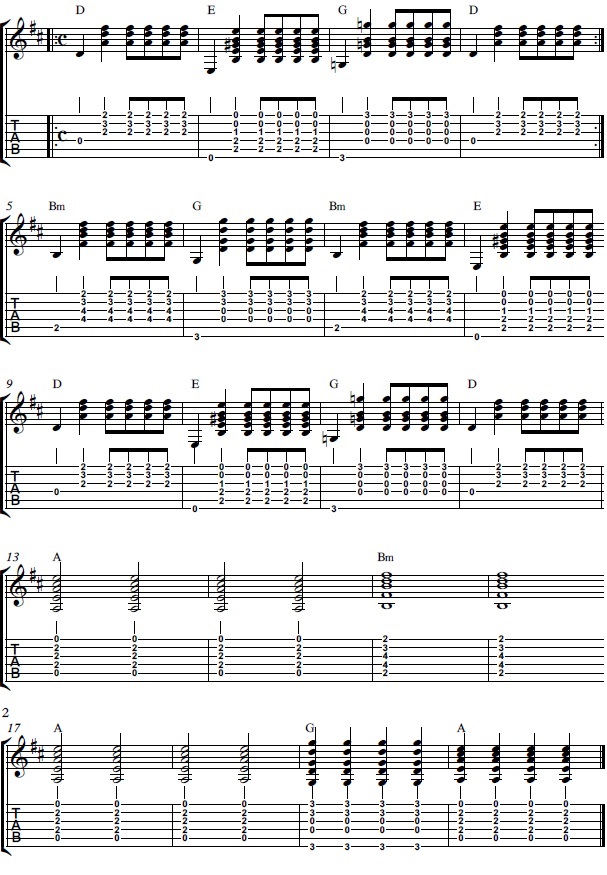
Step 1: The A Section Let’s take a closer look at these Eight Days A Week guitar chords. The A section begins with an D chord. To play an open D chord, place your pointer finger on the 2nd fret 3rd string, your ring finger on the 3rd fret 2nd string, and your middle finger on the 2nd fret 1st string. For the open D chord you strum from the 4th string down since the open 4th string is a D note. After you play the open D chord, you then move to an open E major chord.
Whenever someone writes a capital letter for a chord name and nothing after it, that also means it is a major chord. So whether you write D or D major, they are both the same chord. Now back to the E. Place your middle finger on the 5th string on the 2nd fret, then place your ring finger right under it on the 4th string on the 2nd fret, and place your pointer finger down on the 3rd string 1st fret. Then strum all six strings down from the 6th string all through way through the 1st string. Then to a G chord.
The way that John is holding down this chord is actually very interesting, it’s not the normal way to hold it down, it’s the same notes but the fingering is different. More of a folk style way to play it. The folk style way to play this chord has you placing your third finger down on the 6th string 3rd fret, your third finger is arched over and just barely touches the 5th string to mute it. In this way of playing the G chord you actually do not want to hear that 5th string. Then place your pinky finger holds down the 3rd fret on the 1st string. Strum this chord from the 6th string down all the way through the 1st string as well, again you won’t hear that 5th string because you are muting so its still ok to strum it since it won’t ring out, it is indifferent. So for this G you only have two fingers on the fretboard, your ring finger and pinky finger. Then after that G go back to D.
The verse is basically just D, to E, to G, back to D and then repeat. It starts and ends with a D so when you repeat the D will feel doubled. If you are enjoying learning this song, be sure to check out our other lesson how to play Dear Prudence for another The Beatles classic to add to your repertoire.
Step 2: The Strum The way they are strumming this verse is pretty interesting. It’s really cool and really makes this song have a lot of life and character to it. First he is picking the lowest string of the chord and then strumming down down up down up for each chord. Same strum on all of them. So again with his strumming hand he is hitting the bass note and then strumming before he strums the whole thing. This almost gives the effect of having a bass player playing with a guitarist. Sounds a little bit more two dimensional than if you were to just strum regularly.
Step 3: Section 2 Then you are going to go to a B minor, which this is a barre chord. So take your pointer finger and barre it on the 5th string 2nd fret all the way down through the 1st string. Then place your ring finger on the 4th string 4th fret, your pinky right under it on the 3rd string 4th fret, and your middle finger on the 2nd string 3rd fret. Strum from the 5th string all the way down through the 1st string. Do the same strum we did before.Then you are going to go to a G chord again.
We are going to play this G chord a little differently than we did before though. We play almost just like a stock G chord, where you would have your middle finger on the 6th string 3rd fret, your pointer on the 5th string 2nd fret, your ring finger on the 2nd string 3rd fret, and your pinky right under it, on the 1st string 3rd fret, strumming all the strings from the 6th string through the 1st string. But again John is leaving out that 5th string, so don’t worry about placing your pointer finger on the 5th string 2nd fret, and use your middle finger again to really arch and just lightly touch that 5th string muting it so you won’t hear it when you strum. So holding down the 6th string 3rd fret with your middle finger and also using it to mute the 5th string, just like you did earlier, but now the chord uses both your ring and pinky fingers on the 2nd and 1st strings, both on the 3rd fret and same strum on this chord, too.
So far for this part we play B minor, to G, back to B minor and then to an E major. The same E major we did earlier. Then go back to the original chord progression from section A. The next section is the chorus where he signs, “Eight days a week…” Where you would just strum an A chord. To play an A chord hold down the 4th, 3rd, and 2nd strings all inside the 2nd fret and strum from the 5th string down. He does this for two measures but for each measure he strum does one strum and holds it out the whole measure. A whole note rhythm. Then to B minor to E, and then a build in G to A. Then go back to the top of the song and that is all for today’s lesson!
Recap: How to Play Eight Days A Week by The Beatles On Guitar I hope you enjoyed learning these Eight Days A Week guitar chords! This is such a beautiful song, it is simple yet there are a few really cool special qualities to it and things that make it a stand out song. For a song that is mostly just strumming open chords, that strum is so distinct and you know right away that it is this song. I think that would almost be harder to do with just chords. So remember dont only learn the song, but learn from the artist. Think about what they do to make there song’s just a little different and how they stick out among the rest. Bring these elements into your own playing and let them help spark your creativity, and of course, as always, have fun!