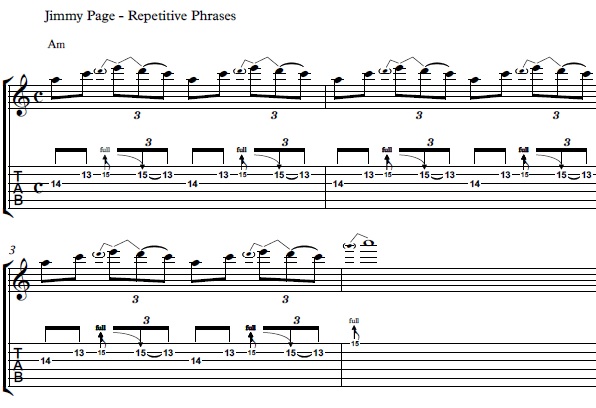
Killer Repetitive Phrases in the Style of Jimmy Page – Lead Guitar Lesson on Classic Licks
[contentwall]  [/contentwall][ninja-popup ID=715]
GET Jon Maclennan’s courses by clicking in the links below – GO!!! ➜
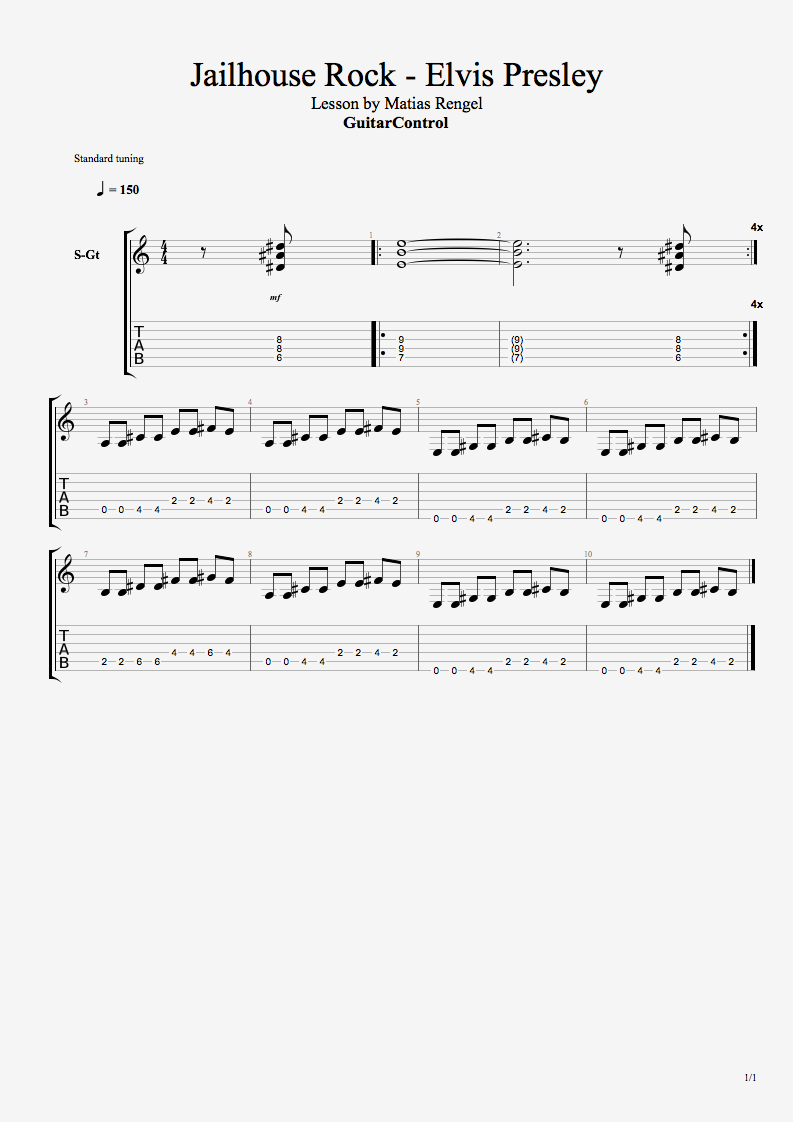
How to Play “Jailhouse Rock” by Elvis Presley – Classic Rock Song Guitar Lesson
Hey this is Matias Rengel with Guitar Control, we’ll be learning this song “Jailhouse Rock” by Elvis Presley.
[contentwall] [/contentwall]
Click on the Tabs button to follow chords and tabs.
This song has two different parts that we’re going to be checking out the first one is the beginning is you have half step down so if you want to play along with the song you make sure your tune half step down on your guitar and if you don’t know what a half step down is , I will show you at the end of the game so you’re going to put your index finger on the 6th fret of the 5th string and ring finger on the 8th fret of the 4th string pinky finger on the 8th fret of the 3rd string. Now you want to play only the 5th, 4th, and 3rd, don’t play on the other string. You’re going to repeat that eight times first starts and now we start singing right there.
So the full times always start singing at the 4th and the 5th time if you put a 4th time against so what I want you to do is be very careful with not playing the strings and for that middle finger is going to help you mute the six, the pinky is going to help you move the second and the first is mute a little bit by the index right you’re going to play that the strings no matter what if you hit and so basically you start earlier after the fourth a 1, 2, 3, 4, so that’s for that part now for the next part what’s going to happen so what you going to be doing it’s actually the same thing over and over but just me changing strings or changing positions but the shape if you see it as a drawing the shape is going to be the same so for the first one you’re going to play the open 5th.
Now I think it would be better if we do it without any rhythm at first we just see the notes and then I show you specifically in the rhythm so for the first one you have open 5th 4th fret of the beat 2nd fret of the 4th, fourth fret of the fourth second to the fourth. Now what’s going to happen is you going to play each note twice you’re going to put a little bit of a shuffle in there you know like okay so practice that just that practice that we talk so now I’m using this no I’m using these fingers like open obviously nothing here index here and then ring once again there if you want you can do from there what you’re going to play this exact same thing but you’re going to play it a string up so you’re going to play using six and the 5th right now you were using the 5th and 6th and 4th. Now we’re going to use in the 6th and the fifth so you would do the same thing over 15 4th fret of the six on the 5th 4th fret on the 5th song and again you play each note while so do you have you got this and then go to this.
Now there are two notes that we are not playing twice which is basically the last ones we do okay and you repeat that thing twice now see how we land there you’re going to play the 2nd fret of the 5th 6th fret of the fifth fret spread of the 4th 6th row the 4th for and then go back to the open the first one so you have it now you could play potentially this one is their way if you want you could just do this is too much of a stretch for you can do sacrum stays the same in 1st fret of the 4th four fret of the fourth then 1st fret of the third and then fourth of the four so now I think it’s cooler if you mute the strings a little bit with this part right there supposed to right now check this out that when I go into this one I only play it once just once so really we got to see so we go twice.
I hope you’ve enjoyed this lesson it’s a really cool song by Elvis Presley this is like a classic so make sure you download the tab to learn what I just showed you even better and make sure to subscribe on our You Tube Channel and we’ll see you in our next video lessons, thanks for watching.
[ninja-popup ID=715]
Killer Guitar Lesson on Connecting Pentatonic Scales Shapes w/ Robert Baker
[contentwall]  [/contentwall][ninja-popup ID=715]

Classic Licks Played From “Hey Joe” In The Style Of Jimi Hendrix | Watch it now
Hey, how’s it going this is Jon McLennan with Guitar Control, I will break down some Classic licks by Mr. Jimi Hendrix from a song called “Hey Joe”. I really love this song and it’s one of the few tunes that Hendrix doesn’t tune down a half step on, he put some great licks up here in a pentatonic minor.
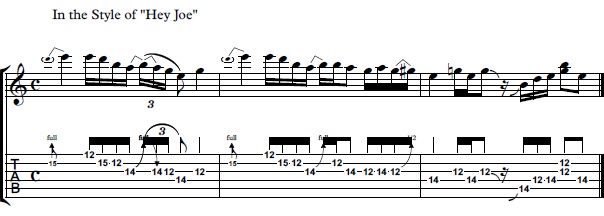
The first Bend is on the 15th fret of the 2nd string, bend up a full step using your third finger then you play the same note on the 12th fret of the 1st string and you descend pentatonic scale 15, 12, 14, and on 14, you bend it up a whole step release and pull off down to 12.
Then you add two more notes 14, 12, 14, on the 4th string 12 on the 3rd string, so I’ve got the first phrase and it’s your entire minor pentatonic scheme, basically this is a blues. Hendrix was a great blues player then he returned back up to that 15th fret on the 2nd string same thing this time slightly different ending so what we did was one once we get to that 14 bend grab our first finger to play the 12th fret on the 2nd string then back to natural 14 and then play 12, 14 pull off to 12 on the 3rd string and then you get that 12, you push it up slightly a blues bend and resolve on the note E 14th fret 4th string, so the second phrase goes like this bend a little too high there so I’ve got both phrases together those little I mean there’s so many little nuggets in there and what I do there is just 12, 14, 12, but I use a double stop, then you can slide into 14 just go up pentatonic scale.
There you have it those are some classic licks from “Hey Joe”, be sure to practice them over and over and add them to your bag of tricks. Make sure to subscribe on our You Tube Channel and we’ll see you in our next video lessons, thanks for watching.
GET Jon Maclennan’s courses by clicking in the links below – GO!!! ➜
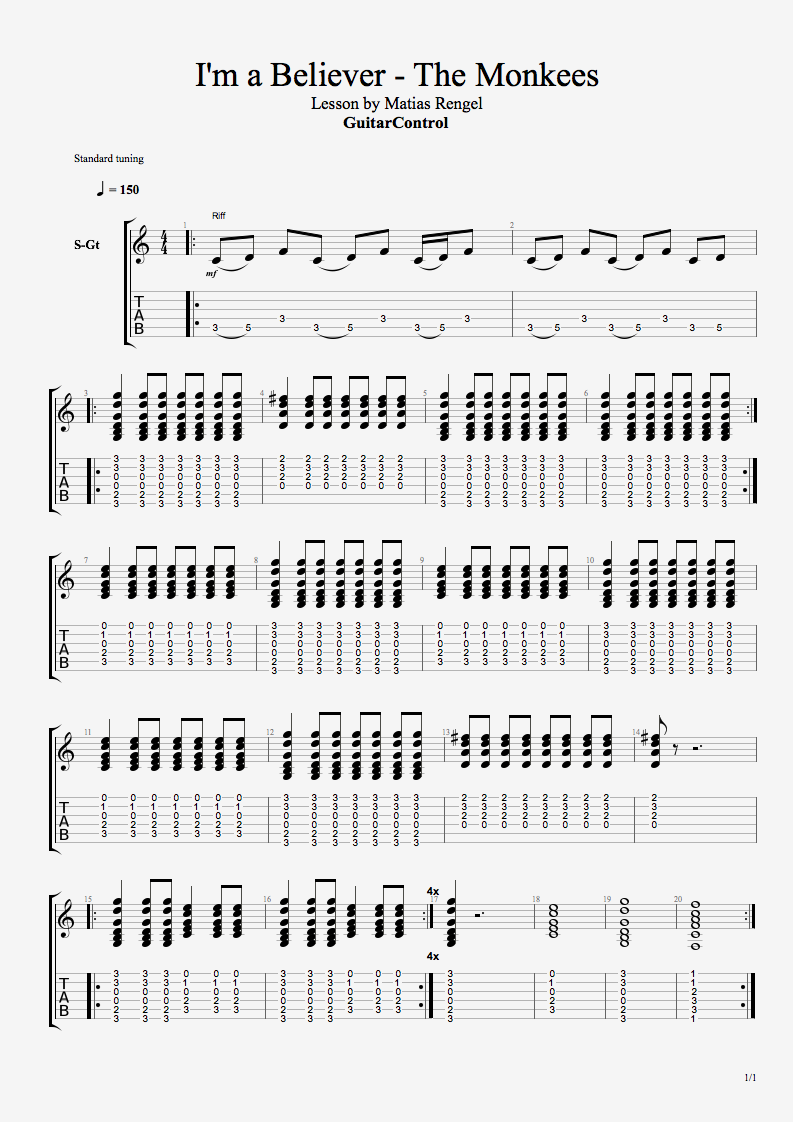
“I’m a Believer” by The Monkees on Guitar – Made Easy on Video
Check out this How To Play “I’m a Believer” by The Monkees – Easy Guitar Song Lesson For Beginners from Guitar Control instructor Matias Rengel. Step by step video instruction and the free tabs will have you rockin’ this classic in record time.
[contentwall] [/contentwall][ninja-popup ID=715]
Introduction
Hey this is Matias Rengel with Guitar Control and today you’re gonna be learning I’m a believer by the monkeys. As usual there’s a link in the description where you can download the tabs so make sure you click on it and let’s get down to it.
I’m A Believer Riff
So for this How To Play “I’m a Believer” by The Monkees lesson we have a riff and a chord progression that is happening, we have a verse and a chorus. So the first thing that I would like to show you is the riff because it’s the coolest part. So the riff goes a little bit like this… So what’s happening here we have the index finger on the third fret of the fifth string, coming on to the fifth fret of the fifth string.
Then what you’re gonna put your index finger a little bit like this, bending a little bit and you’re going to play the third fret of the fourth string just like that. So repeat that and then you’re going to play it at the same speed, but now the third time you want to believe it faster. So that’s for the beginning of the song and this part is also going to appear at the end of the song. Okay so now for the verses for How To Play “I’m a Believer” by The Monkees.
Verse
We have a G major; middle finger on the third fret of the six, index finger on the second fret of the fifth, third finger on the third fret of the 2nd and pinkie on the 3rd for the first. Now the rhythm that we’re going to play with this song, specially in the verse, is going to be down, down, up, down, up and down… so that’s going to be for the G. Then we’re going to go into a C and we’re going to do down, down, up, down, up, down and then we go back to the G and we’re going to repeat the G twice. Okay now to the chorus for How To Play “I’m a Believer” by The Monkees.
Chorus
For the chorus we start with the G and we’re going to divide this in groups of four chords. It’s going to easy, so we have down, down, down and then we go to the C, down, down, down, again to the G, down, down, again to C, down, down and we’re going to repeat that four times. Now you repeat the riff that the song starts with.
Conclusion
There you have it. That’s I’m a believer by the monkeys. I hope you enjoyed this lesson. Remember to subscribe to our YouTube channel. I have over 150 lessons here and they are uploading new lessons every week by me by other teachers. Thank you so much for watching.
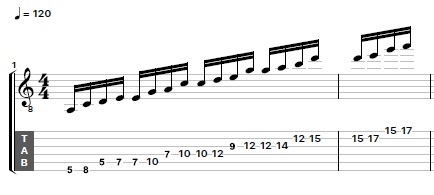
How to Sequence Your Pentatonic Scales – Lead Guitar Lesson w/ Robert Baker
[contentwall]  [/contentwall][ninja-popup ID=715]
How to Get New Sounds Using Guitar Modes – Easy Acoustic Guitar Lesson w/ Sean Daniel
[contentwall]  [/contentwall][ninja-popup ID=715]
– Click here to get Sean Daniel’s first instructional guitar package – GO!!!
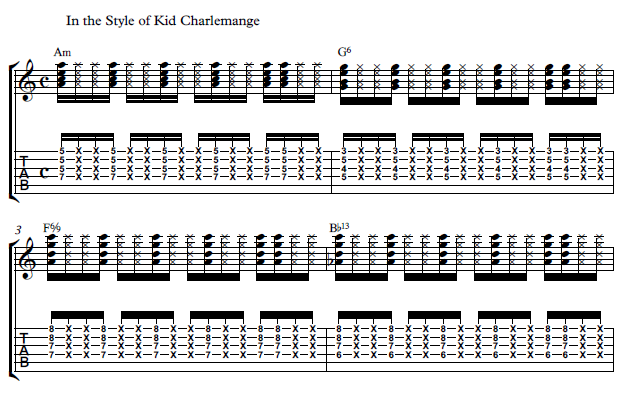
Kid Charlemagne Chords by Steely Dan | Easy Video Guitar Lesson
Hey, how’s it going this is Jon McLennan with Guitar Control, I want to give you a guitar lesson today in the style of Steely Dan’s “Kid Charlemagne”. The entire band is amazing on this track and the guitar part is a really great worthwhile study and you can see how he uses jazz shapes and great chords for playing funk on the top four strings.
I start off with my first finger on the 8th fret of the 6th string then I put my third finger on the 10th fret of the 5th string, middle finger right on the 9th fret 3rd string and then pinky on the 11th fret 2nd string, so this gives you a C7. Now I’m only playing those notes that I’m fretting then you go to an A minor chord, now what I’m going to do first is to try and keep all these notes on four strings just to keep it real and consistent.
So I’ve got A minor 7, 5, 5, 5, then I go to a G6 which is 5, 4, 5, 3, then an F 6, 9, which is 7,7, A, A, and last to a B flat 13 which is 6, 7, 8, one finger on each note so all these chords for the most part like this one here that they don’t have a lot of times real low strings being played because you’ve got a bass player you’ve got keyboards you’re just trying to stay on the upper strings to kind of stay out of the way so basically each chord is one measure long one and then what I’m doing is playing the 16th note patterns with my right hand so this will be like a motor it’s just going through the changes and then as I feel I actually push so it’s real just about you know that kind of ticking sound those clicks than it is getting the cord clean and you’re more of playing a rhythmic rule then you are like a harmonic roll but then when we do and when we look at those actual chords they’re are really sophisticated chord.
You know it’s complex harmony, and don’t forget to keep practicing those shapes and just keep going until each one is so smooth and effortless you don’t have to think about changing between them there’s also an amazing guitar solo on this track you should check out Larry Carlton is the guy who played it and be sure to hit subscribe on our You Tube Channel and we’ll see you in our next video lessons, thanks for watching.
GET Jon Maclennan’s courses by clicking in the links below – GO!!! ➜

How to Play California Dreamin by The Mamas and The Papas on Guitar – Made Easy on Video
Hey, this is Matias Rengel with Guitar Control, we’ll be learning this song called “California Dreaming” by The Mamas and Papas.
[contentwall] [/contentwall]
Click on the Tabs button to follow chords and tabs.
The first thing we’re going to be learning is the arpeggio of the song so for that we’re going to use an A minor chord and we’re going to be altering it a little bit so for the A minor chord we have the open 5th and the open 1st and we have the middle finger on the 2nd fret of the 4th and 2nd fret of the 3rd string then we have the index finger on the 1st fret of the 2nd string just like that.
Now what we’re going to play the 4th string and the 3rd string and then we’re going to play the 2nd string but we’re going to play it open after removing the index finger so and then we’re going to play once again the 3rd string then we’re going to bring down the pinky to the 3rd fret of the 2nd string and then you remove the pinky and play the 1st fret of the 2nd string and open fret open 2nd string so we repeat that part.
Basically that’s like what the main guitar is doing and then repeats that three times and then at the end you bring down the middle finger to the 2nd fret of the 5th string in that’s your E7 suspended 4. Now the second guitar is actually coming in in the recording coming in like a little bit later and he’s a so right you got this one and then the chord starts, so I mean I guess you could potentially play both of them together if you can figure it out.
I mean original is they are playing it separately but from there we go into the chord part for the core part we have an A minor and then you’re going to a G for each each you place your middle finger on the 3rd fret of the six index finger on the 2nd fret of the 5th and ring on the 3rd fret of the 2nd string and pinky finger on the 3rd fret of the 1st string just like that.
Now from there you’re going to an F major you have the index finger on the 1st fret all the strings and then you got the ring finger on the 3rd fret of the 15 key finger on the 3rd fret of the fourth and middle finger on the 2nd fret of the 3rd so then from there you’re going to repeat the G and you’re going to go into E7 suspended 4 that we learn at the beginning the one that had the middle finger on the 2nd fret of the 5th and ring finger on the 2nd fret of the third you can remove the ring finger and leave the index on the 1st fret of the 3rd turning it into an E7 instead of E7 suspended 4, so we are G, E7 suspended 4 from there we’re going to play an F so the F is going to be the final chord we’re going to say that that’s part of this group of chords that we just played.
Now for the next part were going into a C and then the feed you have a the ring finger on the 3rd fret of the 5th wheel pin on the 2nd fret of the 4th open third and index finger on the 1st fret of the 2nd and open first.
Going to E7 back to A minor going to 87 back to a minor then to an F7 suspended 4 and now is going to start repeating check what’s going to happen A minor, G, F, G, E7 suspended 4, E7 and repeat again. Basically you have three different that are happening you have A minor, G, F, G, E7sus4, E7 and F. Now the 2nd progression comes E7, A minor, F, E7sus4, E7. Now the 3rd progression comes and repeats three times A minor, G, F, G, E7sus4, E7 and you repeat that one time.
Now for the rhythm, what I like to play this rhythm for this song so we got down, down, up down, down, up down. so basically the only one that changes in the E7sus4 you go down you keep going down upon the ground so we could say one against the one it’s only down and then to see for his down, up, down, up, so run down three four. Now from there you went to E7 and you play down, down, up, in a F in the same with the next one, now the second time we do the next progression I’m the other ones if we’re not going to do since we don’t have the F anymore whenever we go into the E7 suspended 4 and then were going to repeat the same way progression the same rhythm.
That’s your “California Dreamin” by the Mamas and the Papas, a super easy song I mean I think it’s really cool once you like what I would recommend is that you write down write this, you can download and tell which has the probably has the progression on the chords and their page that are playing but I would recommend you the that you download the tab and that you analyze what I’m doing and that you divide this in three different progressions in that C however you want to see it in your brain in your mind and just like and see it visually don’t try to like be like oh there’s the name and see it as a combination of chords okay what I like to do I like to see the roots of the course electricity a dis an a G Ness G so that helps me visually to see what is the next core and like a drawing of the different progressions that are happening but remember that this song is originally play on the 4h fret with the capo so if you want to follow along do that and I believe that it’s not in exactly in 440 in the tuning it’s not accepting 440 I think it’s different so I am not sure what it is maybe 436 437 you could tune it to exactly play along with the song but I would recommend that you find the key that works best for your voice and just playing that key I think that would be the best actually they chose that and it’s not you’re not less of a player if you don’t play an original T just find the key that works for you for singing and that’s it hey but anyways that’s it for today.
I hope you’ve enjoyed this lesson there’s a link in the description make sure you download it to their what I just showed you remember to subscribe to our You Tube Channel and we’ll see you in our next video lessons, thanks for watching.
[ninja-popup ID=715]