Showing 4,606 Result(s)

Landslide by Fleetwood Mac Played with a Capo on Acoustic Guitar – Made Easy with Video

Hey, how’s it going this is Jon McLennan with Guitar Control, I want to give you a guitar lesson today this is the little finger style 101 with Fleetwood Mac’s “Landslide”. It’s a beautiful song and it’s an amazing guitar part we’ve got a capo on the 3rd fret.

[contentwall] pic [/contentwall]

Click on the Tabs button to follow the chords and tabs.

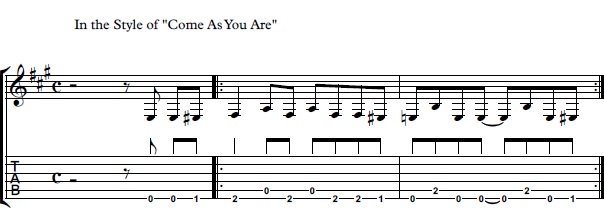
I’m going to begin on a C chord 3, 2, 0, 1, 0, then I’m going to walk down to a G over B, and the way that I play that is second finger on the 2nd fret 5th string open 3rd fret with the pinky on the 2nd string I just play those inner four strings. I’ve go from a C like this to a G over B it’s important that you use your second finger and pinky don’t go like this with your first and third then I move down to an A minor 7, it’s like a C chord you just remove your third finger pretty sweet then back up to a G over B.

So you might want to start by practicing these grips and do it with the recording go one to two beats on each chords 2, 3, 4, 1, 2, 3, 4, 1, 2, 3, 4. Now I’m just playing this without a pick, right now you can do it with the pick and play hybrid style but I like kind of the warm sound of using my fingers. So what’s going on here is I’m going thumb, index, thumb, middle, and then thumb, index, thumb, one E and two E and the three. So I really just use three fingers here of the right hand and I keep that pattern consistent and then move it through the cords it is really slow one okay well be sure to take it slow and make sure that you’re doing that finger-picking pattern in the right order that’s very important go slow and get the fingers right copy just with just what I was doing. Make sure to subscribe on our You Tube Channel and we’ll see you in our next video lessons, thanks for watching.

GET Jon Maclennan’s courses by clicking in the links below – GO!!! ➜

16 Ultimate Guitar Chords Lessons

Related Post

The Easiest and Most Important Guitar Theory Lesson For Beginners – Guitar Lesson w/ Sean Daniel

How To Play a Groovy Jazzy Chord Progression – Jazz Guitar Lesson

Hey, this is Matias Rengel with Guitar Control, today I’ll be teaching this really cool group it’s a little bit jazzy and combines a lot of chords in different rhythms.

[contentwall] pic [/contentwall]

Click on the Tabs button to follow the chords and tabs.

So the first thing that I would like to show you is the chords and then we’re going to go into the actual rhythm of this, we have many things happening here most of them are on the same chord but different inversions the first one we start with our index finger on the 6th fret of the 6th string then we don’t play the 5th were palm muting it and the middle finger is going to be on the 7t fret as well as the ring finger 7th fret of the 4th and 3rd then we got the pinky on the front of the 2nd then we got an inversion of this chord because that will just play in B flat major 6, then we got inversion in front of your 7.

So for that we’re going to take this two right here and we’re going to move them one fret up and change the string so they’re going to be on the 6th and 5th fret on the 5th and 4th and then the pinky is going to go on the 10th fret of the 2nd string and the index on the 7th fret of the 3rd then we’re going to go into this one for some A7 you could say is an a7 sharp 5 or a 7 alter to play entirely you also got other to it but did you say isn’t a 7 altered or an alt and we’re going to place the index finger on the 5th fret of the 6 don’t play the 5th once again then middle finger on the 5th fret of the fourth ring finger on the 6th fret of the 3rd and pinky and 6 further of a second and then go to an inversion of an A7 which is this. For that we have our middle finger on the 7th fret of the 5th ring finger on the 7th fret of the 4th we have the index finger on the 6th fret of the 3rd and pinky on the 8th for the second.

We’re going to go into this one for this one we have our index I like to put the index all across the 3rd and bring the middle finger on the 5th fret of the 5th ranked finger on the 5th fret of the 3rd and pinky on the 5th fret of the s2nd then we bring the same thing chord don’t remove any of the fingers just bring it up so your middle finger is on the 10th fret and the index fingers on the 8th now what you you’re going to do is remove these fingers and just basically put your ring and pinky on the 10th fret of the 2nd and 1st and we’re not going to play the force you could but don’t play it in this case and we’re going to press with the index finger also the 3rd.

Now this is a little bit challenging even for me but I’d like to introduce new things every time I do these lessons and I try to learn very well but at the same time I try to play stuff that is like very normal to me so every time you get something new so if you see me that sometimes it’s a little bit challenging even for me is because I literally made it specifically for research for this lesson, I put a lot of effort into its own and by the way you should also try to not try sometimes you find yourself like playing stuff all the time and it’s very important to challenge yourself from play things that you wouldn’t normally play.

Now we’re going to learn the rhythm, so what we’re going to do is we play with our thumb the 6 and then with our index middle and ring open for turn 2nd you’re going to slide out the pinky so you slide it up to the 10 and then you practice that and then do the same thing here so now you can have a little thing there that you can practice you can just like loop that until you get the group rights to the same remember slide Simon all the fingers bring down hand and then play now here we’re going to go into this one obviously there’s no slide here why do I play the core I seem to hear but this time here’s the pinky choose the chord, now the 2nd time that I play this around it is a quarter now for a little bit of a relief right so for that you’re going to have your index on the 3rd fret in fact you don’t even need this one here you just have the index there, you do is play there the six and the second at the same time up against the 4th we wear two threads up into the 5th.

Now it’s really cool if you give it like a little bit of a shuffle that’s going to make it like moving, like you’re walking. I hope you’ve enjoyed this lesson it’s a little bit challenging but it’s super interesting, it sounds really cool so anyway as you saw there’s the link in description make sure you click on the tab so you can learn what I just showed you and remember to subscribe to our You Tube Channel for daily inter lessons there are so many teachers and so many styles and levels so hit the subscribe button and I would love to know what would you like me to teach you next so leave a comment down below with your answers thank you so much for watching.

[ninja-popup ID=715]

The Beatles’ “Dear Prudence” – Fingerpicking Acoustic Guitar Lesson Made Easy

Hey, how’s it going this is Jon McLennan with Guitar Control, thank you so much for hanging out with me today I want to give you a guitar lesson in the style of the Beatles “Dear Prudence”. This is a great song, kick start your finger picking and we’re going to break down the intro.

[contentwall] pic [/contentwall]

Click on the Tabs button to follow the chords and tabs.

First I’m going to break down the left hand and just a couple comments 1  in drop D so I’ve lowered that 6th string down from E o D and then I’ve got these sort of three note kind of fretted chords up here these little triads and my third finger is going to start on the 3rd string 12th fret then my first fingers 10th fret and then my pinky is on the 12th fret so I’ve got 12, 10, 12, with a D in the base and then I go to a D shape and this is just a little baby D chord 10, 10, 11, and then that drops down a whole step to a C shape and then I’ve got 7, 8, 7, which is a G cord but it actually looks like a stock a little D shaped just relocated up here then I’ve got 6, 5, 5, which is an A chord with a D in the base and then the last two chords are a C triad 5, 5, 3, again with a D in the base and then a D chord, that D chord is just your stock 2, 3, 2, so I’m going to run through those real quick slowly here.

We go get those down and then we can work on the right hand and this is really where you know we start breaking up those chords and arpeggios. I’m going to start with my thumb on the 5th string and my middle finger on the 1st string and I want to stick using the same fingers, I really use these three thumb index middle and I want to be consistent as I’m practicing the pattern. I’m trying to use the same fingering just like if I played a chord if I play the D chord I wouldn’t one time play it this way and then the next time play it this way and then the next time switch my fingers like this you know there are reasons for changing but when you’re learning something new you just want to pick away and sort of burn it in and pick the way you know that that works out the best for the song.

So that’s what I’m going to show you with this pattern so we’ve got our thumb and our middle doing that pinch then the thumb comes down to the 4th string and then your index is on the 3rd string so the first half of the pattern goes like this and then the 2nd half your thumb drops down to the 6th string and then my middle moves up to the 2nd string and then I actually use my thumb on the last D-string there so the whole pattern is like this one and you’re basically just going to repeat that for each chord so it will go chop it down and on this one we’re going to do it twice then we start into the that so the whole intro goes kind of slide the chords you hear that on the record you know you it’s kind of sliding from one.

Don’t forget to subscribe on our You Tube Channel and we’ll see you in our next video lessons, thanks for watching.

[ninja-popup ID=715]

GET Jon Maclennan’s courses by clicking in the links below – GO!!! ➜

Fingerpicking Minor Chord Guitar Lessons

10 Guitar Exercises, Techniques and Songs - Guitar Lessons

How to Alternate Bass Lines on Acoustic Guitar

How To Play Come As You Are by Nirvana

Want to learn One of the Easiest Guitar Riffs Ever? Beginner Guitar Lesson on “Come As You Are” by Nirvana from Guitar Control instructor Jon MacLennan.

[contentwall] come as you are [/contentwall][ninja-popup ID=715]

Introduction

Hey how’s it going? My name is Jon MacLennan and I hope you’re doing fantastic. Today I want to show you a guitar riff in the style of Come As You are by Nirvana. So let’s zoom in and break it down.

Playing Tips

So the first thing you got to realize if you want to play along with the recording you gotta tune down your guitar a whole step and then you’ll be able to play along with the recording; I’m in standard just for today’s purposes. One thing I have added to the tone which is classic on the recording is a watery sounding chorus pedal.

Come As You Are

So I’m going to start how to play Come As You Are by Nirvana by hitting the open E twice then you put your first finger on the first fret sixth string and then you put your second finger on the second fret. So you walk in like this and then you play the fifth string open and then back to open. So I’m alternating between that too and that’s zero and there the strings are right adjacent to each other so you need to make sure that your second finger is up on its tip so that that other note can come through. If it’s down like this you’re going to get a muted string in there so you have to keep it all in the tips. And then you play two twos on the sixth string and walk back down and the fifth 00, the sixth 2 and then walk back up and then you start over. So if I played it slow it’s like one two three.

Conclusion

Alright well I hope that gets you started play Come As You Are by Nirvana. I remember the first time I heard Nirvana I was just a kid and it was down at my friend’s house down the street. We were like jumping on his trampoline and his dad had these huge speakers in the backyard and he was like check this out man, I’m going to put on nirvana, check out this band and he put it on and we would just blast it and hang out in the backyard. Anyway don’t forget to hit subscribe below and we’ll see you in the next lesson. Thanks for watching how to play Come As You Are by Nirvana.

GET Jon Maclennan’s courses by clicking in the links below – GO!!! ➜

How to Add Scales to Spice Up your Guitar Riffs – Rhythm Guitar Lesson on Riffs w/ Robert Baker


pic

Beginner Guitar Riffs Lessons