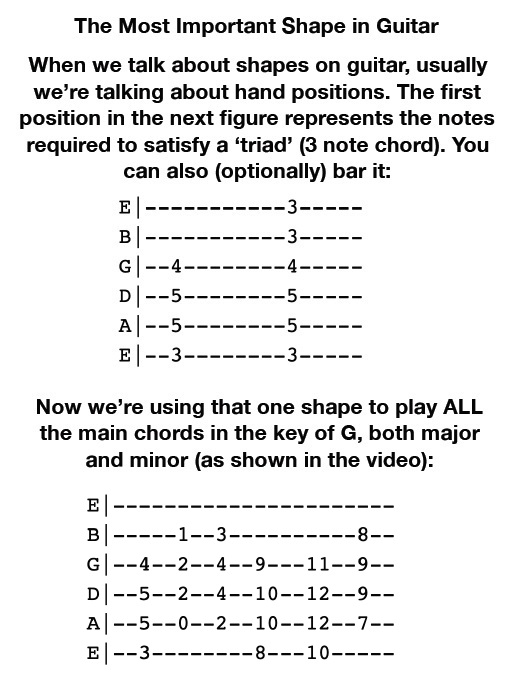
Cool Guitar Groove With Chord Inversions And More – Neo Soul Rhythm Guitar Lesson
[contentwall]  [/contentwall][ninja-popup ID=715]
[/contentwall][ninja-popup ID=715]
[/contentwall][ninja-popup ID=715]
 [/contentwall][ninja-popup ID=715]
 [/contentwall][ninja-popup ID=715]
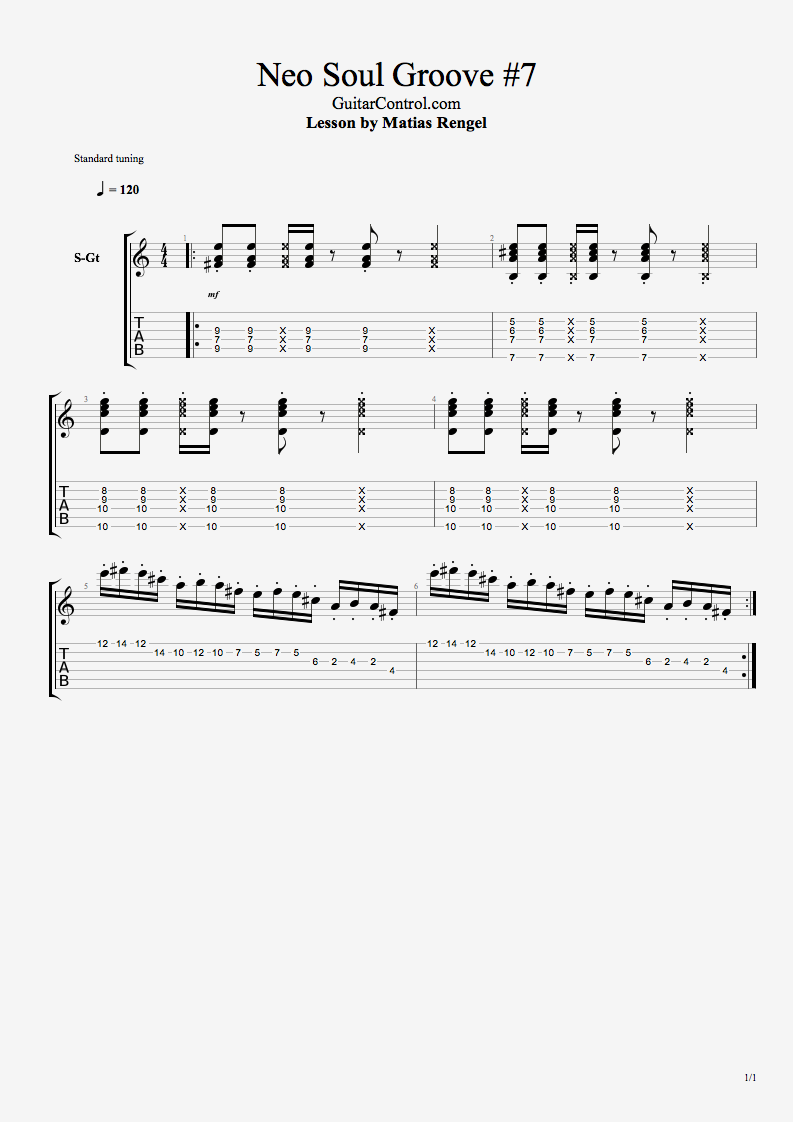 Check out this Killer Neo Soul Chord Progression + Lick – Rhythm Jazzy Guitar Lesson from Guitar Control instructor Matias Rengel.
 [/contentwall][ninja-popup ID=715]
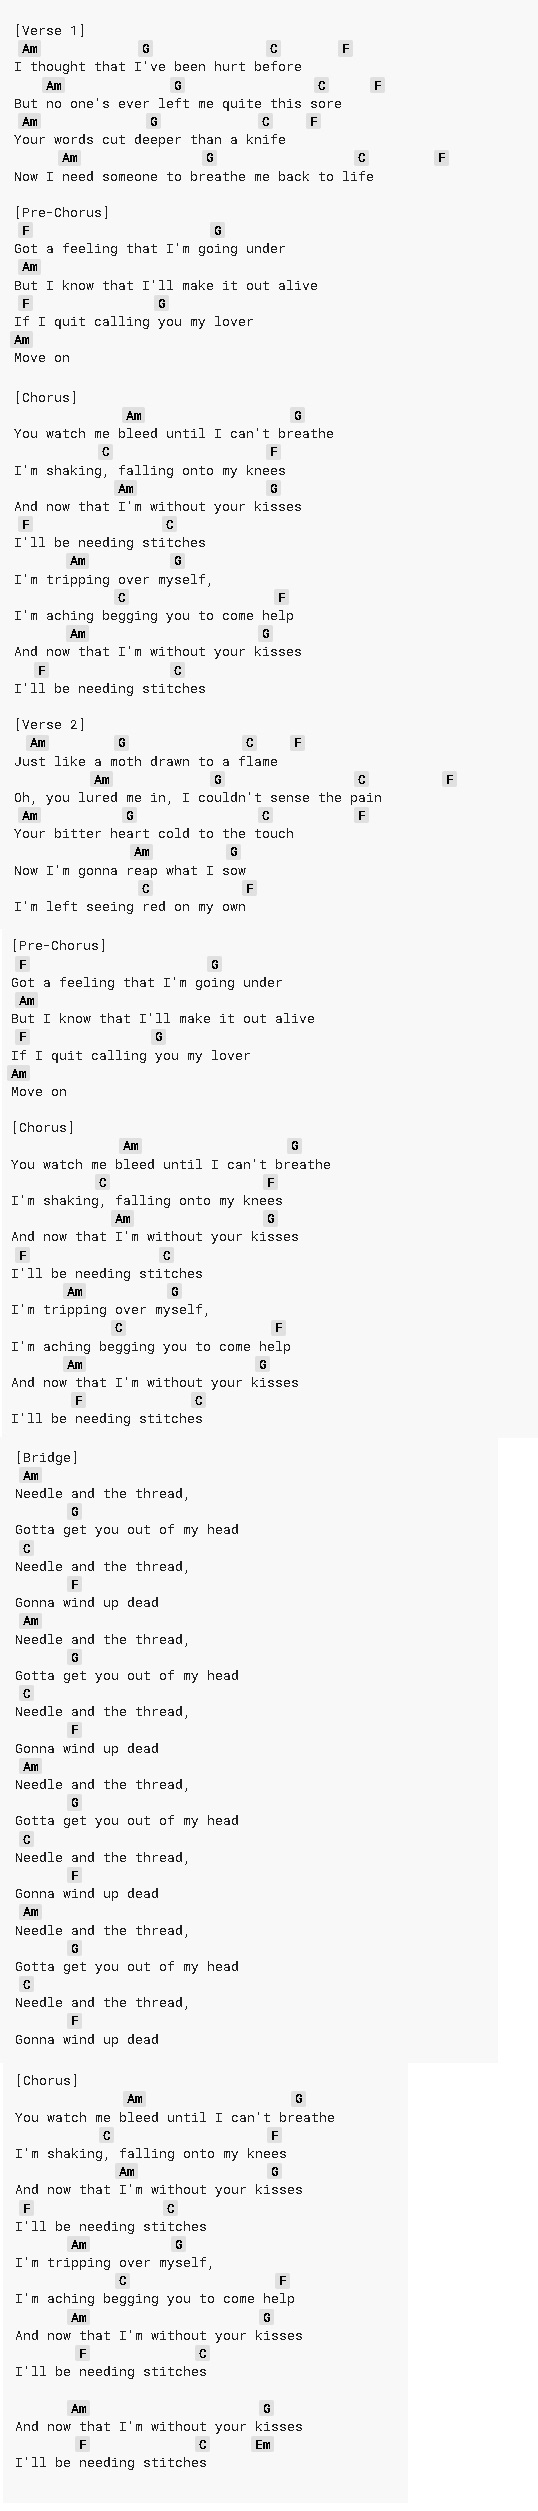
Check out How To Play “Stitches” By Shawn Mendes – Easy Acoustic Guitar Lesson w/ Sean Daniel.
Killer free lesson with step by step video instruction and free tabs (just click the link) taught by one of our most popular instructors. Enjoy!
[/contentwall][ninja-popup ID=715]
Check out How To Play “Stitches” By Shawn Mendes – Easy Acoustic Guitar Lesson w/ Sean Daniel.
Killer free lesson with step by step video instruction and free tabs (just click the link) taught by one of our most popular instructors. Enjoy!
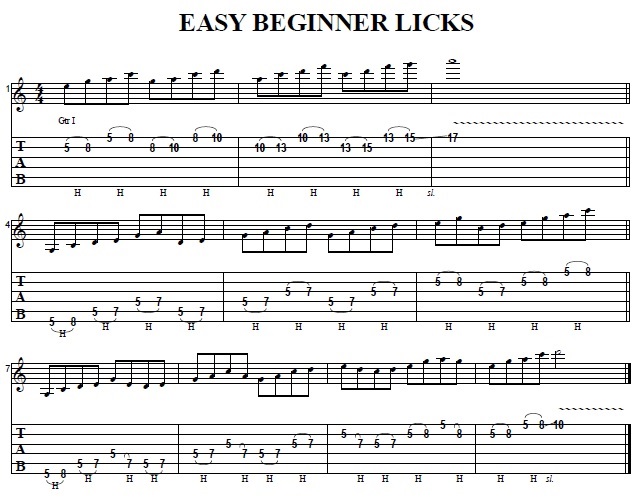
Hey, how’s it going this is Darren Goodman with Guitar Control, in this video lesson I want to show you how to play a kind of cool rock and blues thing. This is something I wrote a long time ago and never really had a name for it, but a friend said hey this sounds like “Dirty Blues” so that’s what we’re going to call it.
[contentwall]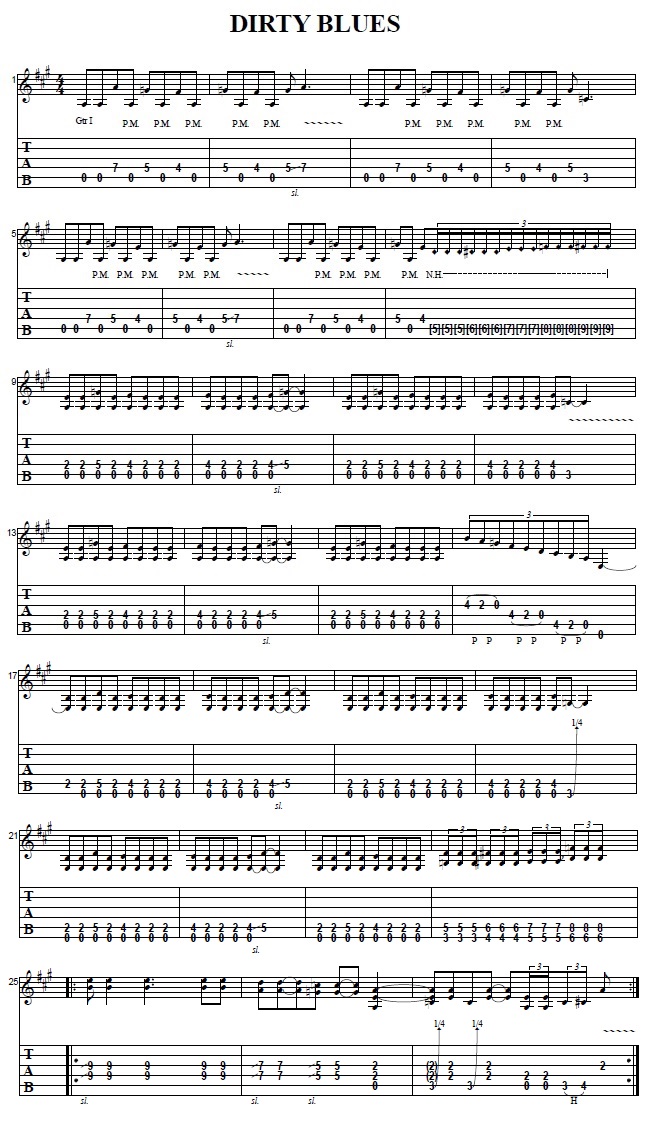 [/contentwall]
[ninja-popup ID=715]
Click the Tab button to follow the chords and tabs.
This first part revolves around A, so we’re going to be pedaling the fifth string open which is A. So we’ve got A twice and then we go to the seventh fret of the fourth string and then back to the fifth string open, then fifth fret and fourth string and fourth fret and then back up.
This string is being peddled fourth string we’re on seven and when I go back to that seven I’m sliding on to that first half and then for the second half it’s more or less the same it’s just one part changes. So on the second time, it says sliding up to seven to the third fret of the fifth string throw a vibrato. That’s the riff for the first part.
All right so you play it through all the way through once and then you start over. On a second time you play the first half, so second time through and then we stopped there on four, and then what I’m doing is I’m just lightly touching the string for harmonics and then alternate picking and descending because it gives that kind of cool little rock and vibe to it.
That leads us into the second part, for the second part this is very similar to a blue shuffle that you’ve probably done before. I’m on the second part of the fourth string with my first finger string is open. Again, we’re going to do that same kind of rhythm, the notes that we’re going to be changing are on the fourth string or to the second fret with your first finger on the fourth string and then to the fifth fret with fourth string with your fourth finger fourth fret with your third.
It’s the same rhythm were doing here, the same with pedaling that middle string between each time we change so here now calling off the frets for the fourth string just like on the last one of the first half, and the second half are almost the same it’s just the very end. The first time through, second time, third fret of the fifth string again we’re going to a C on both times, hopefully twice just like we did before the second time through it’s not the whole sequence.
The first half second time through, second half and then we’re going to do this little easy pull off lick. First finger on the second fret of the third string and then your third finger on the fourth fret and we’re going to pick and do the same thing on strings four and five and then we’re going to go down and we’re going to do the basically the exact same thing we did, but we’re going to do it on string six and five.
This time we’re going to the third fret of the sixth string, it’s a G instead of a C all right so this one just like before, will play through it twice but the second time through the second half is different so the second time through first half we’re going to do this little kind of climb thing, so we’re going to go power cord g5. We’re on the third fret of the sixth string with your first finger in the fifth fret of the fifth string with your third finger and we’re going to play that three times and it’s like triplets. Then we move up a half step that will leads us into the final part .
For this final part we’re going to be playing primarily on the fourth and the third string, you can do most of this with just your first finger. We’re going to do a slide from nowhere to the ninth fret to the seventh, and the fifth, and then when we get to that A, we’re going to strum the A take your second finger and go to the third fret of the fifth string which is C and we’re going to give a little bit of a bend.
Grab that third fret of the fifth string and then back to that third strings together and then we got this little kind of riff here at the end. So we have the A and we play it twice and then we do to the third fret of the fifth string with your second finger and then do a hammer on to the fourth fret and follow that second part of the third stage is an A.
Back into that original main riff, again you practice all the parts you know separately and then put them together and stuff. I hope you enjoyed that you got something out of it if you like this lesson be sure to subscribe on our You Tube Channel and we’ll see you in our next video lessons, thanks for watching.
 [/contentwall][ninja-popup ID=715]
Hey, how’s it going this is Shawn Daniel with Guitar Control, we’re learning a classic 90s rock song “Torn” by Natalie Imbruglia. A fantastic song with three different parts, a really great exercise and kind of finding your way around a Key, make sure to check the image above to follow the chords and tabs.
[contentwall]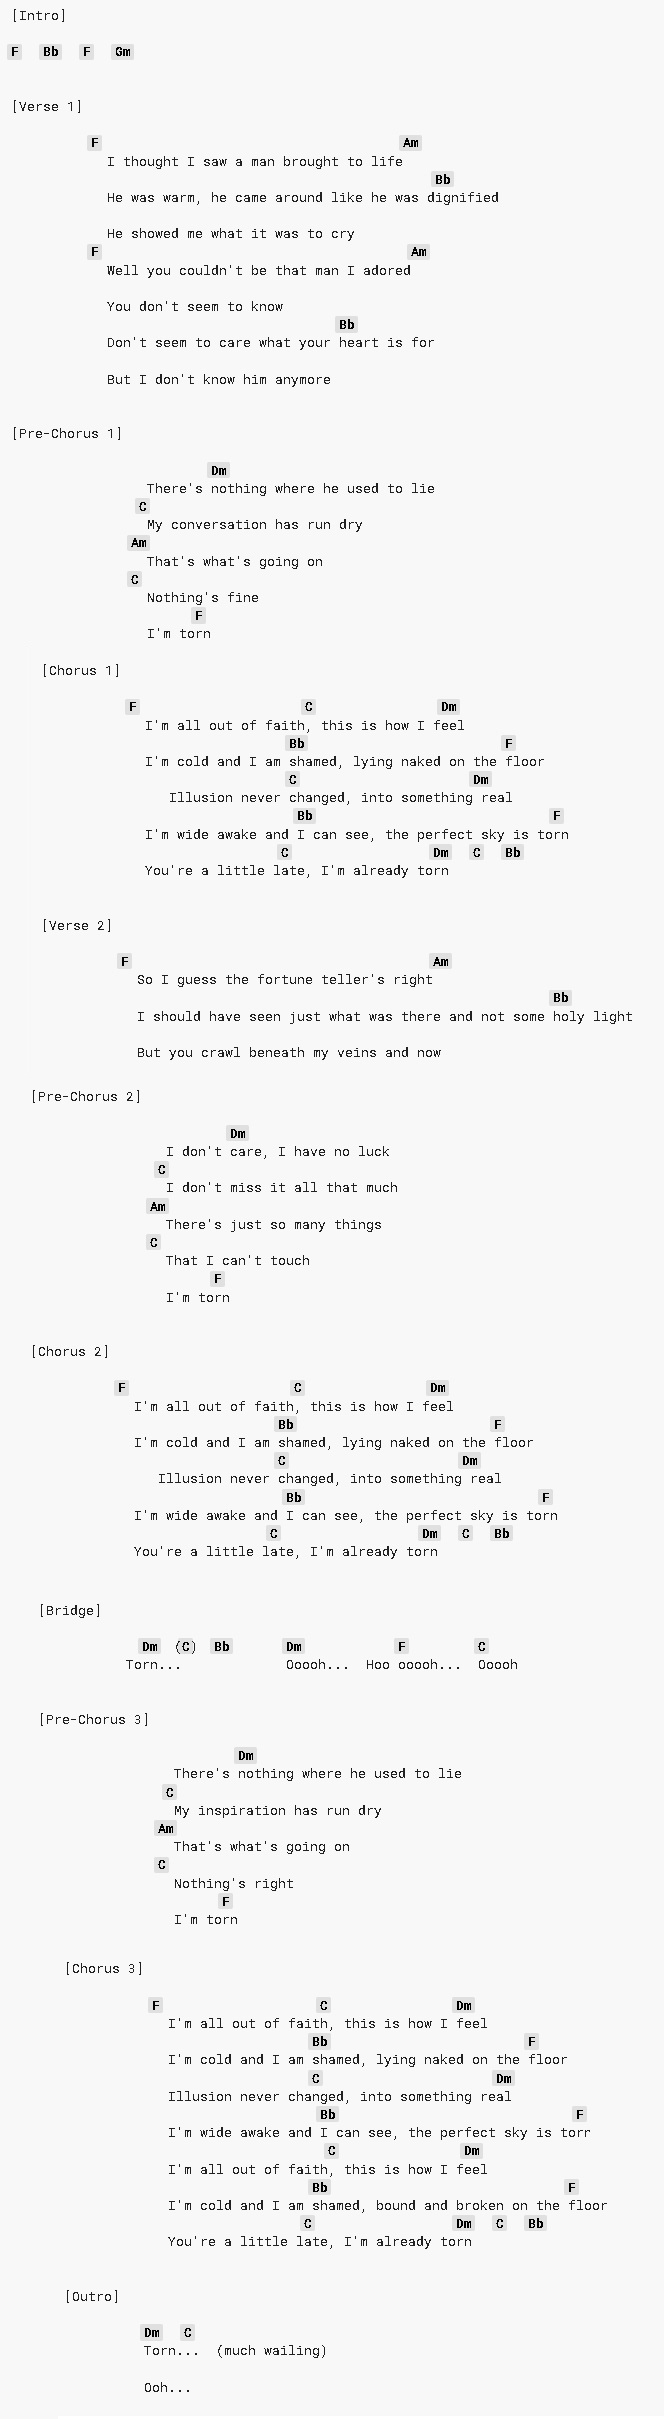 [/contentwall]
Click on the Tabs button to follow chords and tabs.
[ninja-popup ID=715]
So we’re going to start on the 1 chord, F major bar 9th place bar chord. We’re actually going to play just the middle four strings if you hit that high E string as open as an F major 7 chord but we’ve got ring finger 3A pinky, 3D middle finger, 2G pointer finger, 1B. I’m going down, up, down, up, down, up, up, down, up, down. This is going to be our version of how the original is strummed with the rest of the band down, up, down, then down. I’m down, up, down, sometimes I add some to make a little livelier for a solo acoustic presentation but basically the verse is just going to be a key to a minor to B flat major. So we can number these because we learned those notes off as a 1, 3, 4, chord progression. The 1 chord F major down, up, down, up, down, up, up, down, up, down, again down, up, down, up, down, up, down, up, down, to A minor.
Pointer finger 1st fret of the B-string, ring finger 3rd fret 2nd fret of the G-string, middle finger 2nd fret of the D-string highest five strings down, up, down, up, down, up, down, up, down, up, down, up, down, up, down, up, down to B flat.
B flat is tough for a lot of people I see a lot of books teach it like this, where your pointer finger is the 1st fret in high string then you got the 3rd fret of the B-string, G-string, B-string, pinky, ring, and middle relatively. I’m not the biggest fan of this shape I think it’s kind of difficult for readers to do and you’re much better off taking the F major shape and isn’t moving it toward your pointer finger lines up with the 6th fret much easier because going back to F, anyways there’s the 1st fret because it’s where my pointer fingers lined up or where the root note will be in a bar chord F, B-flat as long as you don’t hit the low and high strings you can really just run this one shape from F to a B flat, so playing this way it’s F to A minor 1, 2, 3, 4, to a 4 chord, that’s how my thumb chilling here muting the low E string because that would sound better, my pointer finger making sure the high E string, I’m not hearing the lower of a high string.
F major, A minor, B flat, that’s going to be the entire verse. The next part is going to be the pre-chorus some people call it a bridge. I think if it’s a pre-chorus D minor, C, A minor, C, end of the chorus. So D minor, C , A minor C we can number those again remember what is D and F 1, 2, 3, 4, 5, 6, the 6 board to the 3/4 or the 6 part to the 5 chord to the 3/4 to the 5 chord when you can think of chord progressions as numbers makes everything super easy right F to A minor to B flat that’s 1, 3, 4, much easier to just kind of organize that stuff in my opinion D minor pointer finger 1st fret on the high E string pinky or ring finger on the 3rd fret of the B-string middle finger 2nd fret on the G-string.
Same strumming pattern to a C, pointer finger 1st fret of the B-string, you can play with your middle finger to D, ring finger 3a. I’m a big fan of playing it with your pinky 3a and your ring finger 3e. I just like that better sounds, a little fuller totally (optional) it’s up to you alright. So D minor 6 chord to the 5 chord to A minor which we already talked about was the 3 chord F, G, A and back to C, and then we go to the most common chord progressions in all of Western music history a 1, 5, 6, 4, chord progression.
Millions of songs are transposed to another key, even just like hearing it might make more sense if you did another key real just side note a one, five, six, four, in the key of C would sound like. My song familiar to some people but the point is a common chord progression that you should have under your belt and know how to navigate three different keys start on the one chord and the key of F which is the F to C, easy transition what’s the 6th chord in the key of F, D, D minor to B flat, back to F. So this is the chords of the song, that’s up to speed now this is one example of this B flat, could be better if you want to keep everything in the same ballpark.
That’s why it’s great to know different chord progressions for different things but in my opinion this B flat is a lot easier and will make the sound really good. Totally it’s up to you, I’m not going force you to do anything you don’t want, and we’re just trying to play some Natalie Imbruglia songs.
Here’s a recap, three parts the 1st part is F with the strumming power we’re going to go through the chords out the strumming, early half to A minor to B flat. Remember that’s 1, 3, 4, and when you know the numbers you can easily transpose these to other keys that might fit your singing voice or your singers singing voice better.
After that we have a 6 to a 5, to a 3, to a 2, to a 5, to a 2, to a 1, to a 5, to a 6, to a 4, and that’s it, that’s the whole thing. Make sure to subscribe on our You Tube Channel and we’ll see you in our next video lessons, thanks for watching.
– Click here to get Sean Daniel’s Secrets of Hendrix: DECODED – GO!!
 [/contentwall][ninja-popup ID=715]
[contentwall] [/contentwall][ninja-popup ID=715] Click Here to GET Matias Rengel course The Art Of Rhythm Guitar Made Simple Jazzy Neo Soul Guitar Lessons Killer Neo Soul Chord Progression With Palm Muting Technique – Neo Soul Jazzy Guitar Lesson Beautiful Neo Soul Guitar Chord Progression – Rhythm Guitar Lesson For Intermediate Players How To Play “Gonna Be …