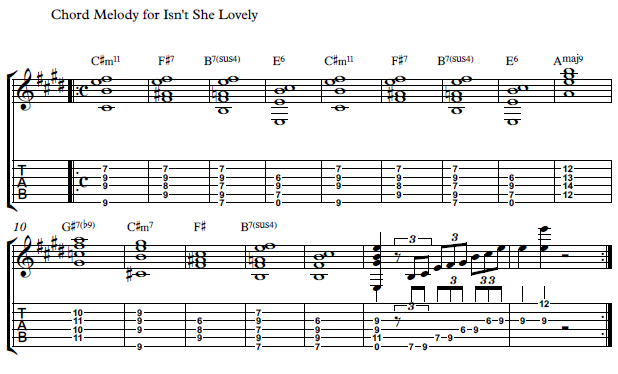
Hey, how’s it going this is Jon McLennan with Guitar Control, I want to give you a guitar lesson today in the style of one of my favorite artists of all time Mr. Stevie Wonder and the song is called “Isn’t she Lovely”. I’ll show you the way of putting the chords and the melody together which is a real fun way to play guitar and it makes you sound nice like a full band.
I’m going to start with my first finger on the 7th fret and I’m going to slide up to the 9th then I play 10, 9, and then I put down the C sharp minor 11 cord which is 9, 9, 9, 7, and then I moved to an F sharp 7 which is 9, 8, 9, 7, and I do the melody again. To now a B7 suspended 4 and here I’ve got 7, 9, 7, 9, 7, then I move to an E6 cord where I’m playing open E 7th fret, 9th fret, 6th fret, now I try to bring it out of the melody notes.
Make sure that the top note of each chord is heard really clear you then you go to the bridge 9, 10, 12, A major 9, 0 3rd name of that cord which is 12, 14, 13, 12, G sharp 7 flat 9, C sharp minor 7, with my thumb a lot Jimi Hendrix F sharp triad 9, 8, 6, that one is down E 7 suspended, B at 9, then I end with this Hendricks. Then you do a walk up on an E major pentatonic scale but starting on the note B.
Make sure to subscribe on our YouTube Channel and we’ll see you in our next video lessons, thanks for watching.
Check out How To Play “Get Lucky” By Daft Punk – Easy Funk Guitar Lesson from Guitar Control instructor Jon MacLennnan. Be sure to get the free tabs to go along with this killer lesson.
[contentwall]
Introduction
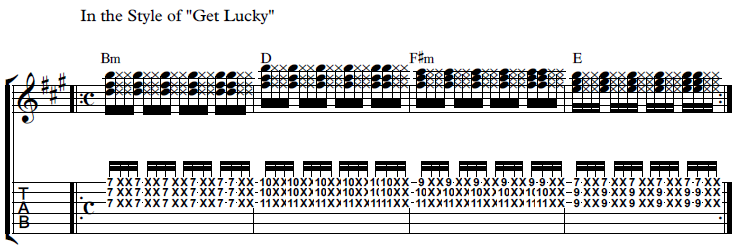
Hey how’s it going? My name is Jon MaClennan and I hope you’re doing fantastic. I just wanted to give you a guitar lesson today in the style of Daft Punk’s Get Lucky. So it’s got an awesome funk guitar part in it using some triads on the top three strings. So let’s zoom in and I’ll break down How To Play Get Lucky By Daft Punk for you.
Get Lucky
I’m starting out How To Play Get Lucky By Daft Punk with my first finger covering three strings at the 7th fret, 1st, 2nd and 3rd that’s a B minor triad, then I move up to a D shape which here I’m basically playing 10 and 11. This is based off your D chord here like this and then I moved to an f-sharp minor chord which starts on the ninth fret and just goes 1, 2, 3, and then I moved down to an E triad which starts on the seventh fret. So let’s review those four chords… now most of the right hand is based out of a sixteenth note rhythm pattern and that sort of sounds like this… So just see if you can do that on muted strings and the rhythm that I play is this so it’s one was it so basically I’ve got that sixteenth note motor going over here with the right hand and then my left hand is doing mainly muting and then at times I punch that chord and let it come through. Don’t worry about trying to get the chords really clean, they should almost just be like a shaker or like a just a tick sound and don’t forget to tap your left foot.
Conclusion
Be sure to practice How To Play Get Lucky By Daft Punk slowly and work with the rhythm. The songs got such a great groove to it and I like doing it on just a strat or something where you can get a nice clean tone on and add a little chorus. Alright well don’t forget to hit subscribe below and we’ll catch you in the next lesson. Thanks for watching How To Play Get Lucky By Daft Punk.
GET Jon Maclennan’s courses by clicking in the links below – GO!!! ➜
Check out How To Play “Everything I Wanted” by Billie Eilish – Easy Acoustic Guitar Lesson w/ Sean Daniel. With step by step video instruction and free tabs, just click the link, and you will be Rockin’ & Rollin in record time.
What’s going everybody this is Sean Daniel with Guitar Control, today we’re learning a really cool new song it’s called “Everything I Wanted” by Billie Eilish. A great singer, great songwriting duo with her brother and basically its super easy sounds great on an acoustic guitar even though the guitar isn’t prevalent in the track it’s something that you can really easily do.
Only three chords and it’s going to sound like this, just a simple strumming pattern we can also eventually get the melody like that if you want option I’ll talk about it both ways. So first things first let’s start out with the chord make sure to click the link below to grab the chart that goes along with it so you can see how it sits with the lyrics starts of the D major 7 one of my favorite chords of all time it’s super easy it’s like a mini bar chord Stephanie’s and playing a D major in my opinion you just hold down the 2nd fret of the highest three string.
Now eventually we’re going to go to an E major ok so however you it helps you get from like this to here is up to you I think a lot of people might find that using your middle finger on the 2nd fret of the G- string your ring finger on the 2nd fret of the B-string and your pinky on the second for the high E-string and then jumping to an E major chord like this where your middle finger is to a ring finger is to D and that could work all right now you’ll notice that when I do this in between I’m just hitting the open string set right it is kind of like a piano part that you can hear in guitar form I suppose but if you want to like actually leave the string set to help you buy time to get to that next floor it sounds pretty fun right now another thing that you could do to kind of get a little bit more of the piano melody in there is really focused on these two notes before you get to the E major chord verses to B to G and then get that easier right so absolutely however you want to do it I think it sounds great even if you just drop it like
I notice the way that I’m strumming about it let’s talk about how we’re going to count this okay and then eventually we’ll get to the next chord but if we just have this D major 7 to E that’s going to be a 1, 2, 3, 1, 2, 3, 4, 5, so it’s still in 4/4 time you still give me an 8 count if you want to count it that way but when we’re pairing chords together like this D and E are the 1st chord will get three counts and the 2nd chord gets five counts so even though we’re switching it doesn’t really make it a weird time signature it’s just we’re switching 3 & 5, 1, 2, 3, 1, 2, 3, 4, 5, 1, 2, 3, 3, 4, 5, they do that a lot in their songs.
So let’s actually go into the next chord the final chord that we need and I will talk a little bit more about how you can kind of fancy the strumming up C sharp minor it’s really super easy don’t be turned off by it is just like an A minor but keep going higher higher and higher, so you can use an A minor shape line your pointer finger up with the 5th fret but it’s going to sound better as a full barre chord. Now a lot of people are scared off by the word barre chord but you don’t have to actually barre for instance traditionally you’d buy the 4th fret highest five strings get your ring finger on 60 pinky six G middle finger five B, I can hear each one of those notes there’s I’m putting the proper amount of pressure pinching with my thumb to get the power through the fret board but if you just get the middle floor don’t worry about the high E-string it looks so sound great in fact if you don’t hit the high E-string you can still kind of get away with using that a minor shape a little bit but we’re not going to cheat here that’s a good tip if you have to do in a pinch but I want you try to really give this form down whether it’s barred or not, so let’s count the whole thing B major 7 to E, C sharp minor to D. Now we’re going to pair those two pairs together right and a three count of five count 1, 2, 3, 1, 2, 3, 4, 5, 1, 2, 3, 1, 2, 3, 4, 5, start again 2, 3, 1, 2, 3, 4, 5, C sharp D. Now the next time you maybe go run 1, 2, 3, 4, 5, I strum it and then get the 2nd fret of the G-string which is an A note if I think that kind of sounds a little bit more like the piano part sharp so even having a lot of space like that number one it’s a great way to practice counting because counting is super important and not enough people really take time to get that into their practice so the counting is really important but also to when it’s a song like this where the chords that never change it’s just the same chord loop over and over again but because the production is so good when you’re trying to recreate it with just one instrument like a guitar it could be boring just to kind of if you just did this the entire time all right it’s such a good chord progression with that major 7/4 but you can get away with it but you know after four minutes it might be a little stale so maybe you start off real one, two, three, four, five, so just drop it like that we’re going to take that same count and then just add a little bit more action on the numbers. So I’d say the numbers I’m talking about the count 1, 2, 3, 1, 2, 3, 4, 5, how I would count this strum that’s 1, 2, and 3 and not down, down, up, down, up, down, down, up, down, up, is for noobs and posers 1, 2 & 3 and all the numbers are down stroke the word and to the hub stroke 1, 2 & 3 & 1, 2 & 3 & 1, 2, I think it’s easier to count 3 & 2 then to count 5 it’s up to you one, two and three and four, five, to me I just count I would never count over a five is just like 1, 2, 3, 1, 2, 3, 1, 2, I think is this easy way for me to do it a lot of people do with that 1 and 2 and 1 and 2 & 3, 1 ,2, 1, 2 & 3, 1, 2 & 3, 4, 5, however you want it do it medium count 4, 1, 2, 3, 4, 1, 2, 3, 2, 3, 4, I want that gun that kind of defeats the purpose to me I’d rather break it up to have the accent up to three and five 1, 2, 3, 1, 2 and 3and 4, 5, 1, 2, and 3 & 1, 2 and 3 and 4, 5, 1, 2 and 3 and 1.
Now the next thing Eleanor talked about is leaving a chord earlier to get to the next one like we talked about how you can actually open the swing set to get to the next chord you do that same thing in time I would rather practice slower and then have kind of mistakes at forming the next chord on time than practicing it where it sounds perfect but you have to stop like that’s fine as long as you’re practicing you’re going to get better. There is a great example of how you’re not actually practicing your timing you’re just practicing chord voicing so no matter how slow you have to do it 1, 2 & 3 & 1, see on the hand of 3, 1, 2 & 3 & I’m off then I’m back down 1, 2 & 3 & 1, 2 & 3 & 4, 5, 1, 2 & 3 & 1 2 & 3 and then once you force yourself to be on time whether it’s practicing like a backing track or god forbid a metronome you’ll find out that my best advice for you for the C sharp minor’ if that’s kind of a problem area is to think is really think of it as an a minor and then even if you have other songs your passion they have it a minor chord in them practice without using your pointer finger just because eventually you’ll be wanting to play barre chords and it really opens up an incredible amount of other songs you’ll be able to do once you get this form down again don’t worry about barring it just worry about getting your pointer finger ring finger pinky and middle fingers down there and getting into this shape quick enough right it’s going to be super valuable for anyone so anyways great song like I said make sure to click the link below to grab the chord chart for it let us know what you think in the comment section and any other songs you want me to teach and I will definitely get back to you we always value your feedback and don’t forget to subscribe on our You Tube Channel and we’ll see you in our next video lessons, thanks for watching.
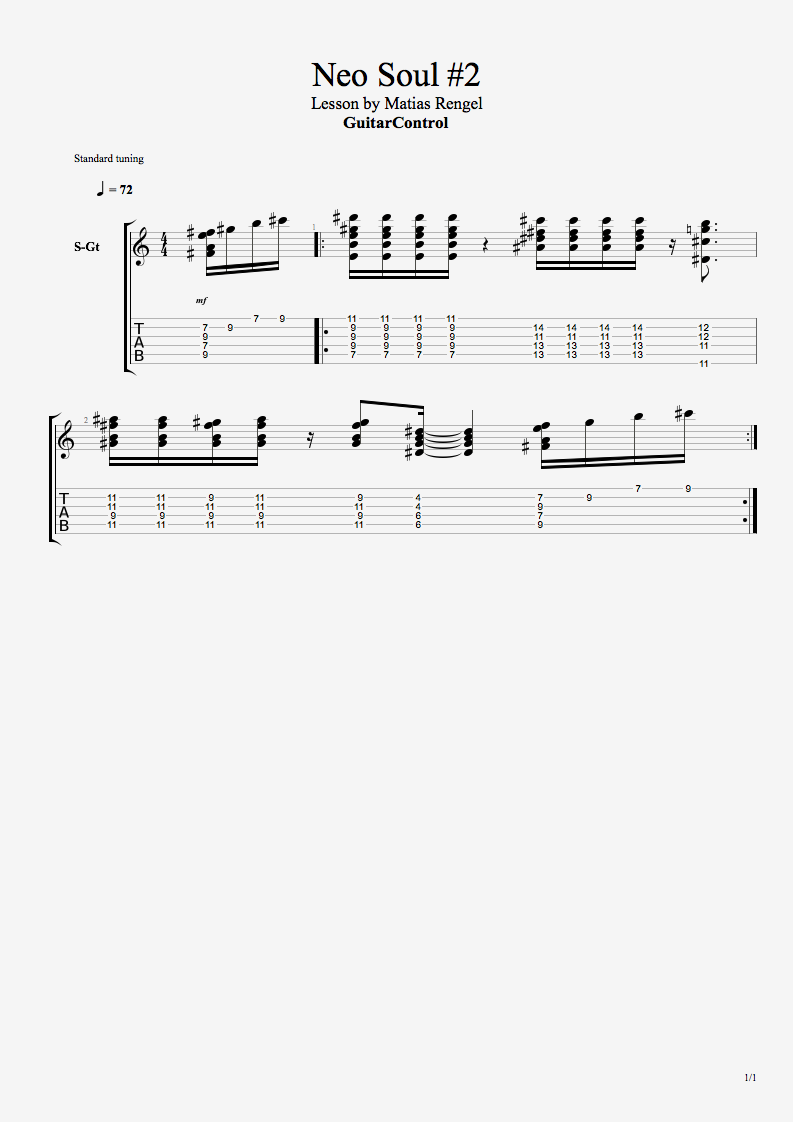
Hey, this is Matias Rengel with Guitar Control, we’ll be learning this really cool new soul groove.
[contentwall] [/contentwall]
Click on the Tabs button to follow chords and tabs.
I’m just playing some sort of an F-sharp minor, so what I’m doing for this chord I’m placing my index finger on the 7th fret all across the string and then I got my middle finger on the 9th fret of the 5th string in ring finger on the 9th fret of the 3rd string pinky finger is on the 9th fret of a second but sometimes I’ll remove it of course and I put it in other strings I play with it and then from there I go into this one, basically an E major 7 it’s this chord I mean you probably know this chord and you know the A major if you move it up.
So what I do is I play these three notes with my ring and then put the fret for that, I have my ring finger on the 7th fret of the 5th. The riff, my index finger design for the 5th ring finger on this 9th fret of the 4th, 3rd, 2nd and the pinky is on the 11th for the 1st then from there I’m going to this one which is an inversion over an E flat minor 7 or a D sharp minor 7, how you want to call it so for this one basically I have my middle finger on the 13th fret of the 5th string my ring finger on the 13 fret of the 4th index finger on the 11th fret of the 9th fret of the 3rd string and pinky finger on the 14th of the 2nd.
From there we go to this one it’s basically an E flat alter so what I do is I have my index finger on the 11th fret of the 6th string middle finger and 11th for the 4th, I’m not playing the 5th so I’m muting with the index finger and then I have my ring finger on the 12th fret of the 3rd and pinky finger on the 12th fret of the second take this out for this it’s the same as the first one but two frets up so it’s the same position but we just have the middle on the 11th fret this one is on the 9 the ring fingers on the 11 on the 3rd and the pinkie on the and then finish it up with this so for this is the G sharp minor so for that the way it smoother I just do it like this of course but you could totally stretch.
I’m doing it because it’s easier to make fingers and do it like this if it’s too much of a stretch so for what I’m doing got the 6th fret of the 5th and 4th string and then with the index I’m playing the 4th fret, now let’s get more into the specifics. The chords that I’m playing now for the first chord, I’ll down the pinky on the nine of the first and then I go into this one I play it four times and from there what I like to do is put my pinky in there and just do one are you want to with the pinky and then three without a pinky for with the pinky fine with the pinky right so the melody that’s happening here 1, 2, 3, 4, and then I come down here and I slide it down.
Now it’s important that you listen to and another thing that I like to do here is I like to tell a different inversion in between the E major 7 and the next chords I like to do the same here before this one so for that 13th fret of the 4th and 3rd, 12th fret of the 2nd and 14th fret of the 1st. Now you can play this with a little bit more beautiful if you want now it really depends I mean you should definitely try to play it slow at first because it’s really hard.
I hope you’ve enjoyed this lesson as usual there’s the link in the description so make sure you click or tap on it to download the top. There are a lot of videos, different styles different teacher’s different levels so make sure you subscribe on our You Tube Channel and we’ll see you in our next video lessons, thanks for watching.
Hey, how’s it going this is Shawn Daniel with Guitar Control, today we’re learning an all-time Classic, one of the most iconic songs in the history of rock music and we’re going to do an easy acoustic representation of it, that you can play on solo while keeping some of the spirit of the original recording. The song is called “I can’t get no satisfaction” by the Rolling Stones.
[contentwall] [/contentwall]
[ninja-popup ID=715]
Click on the Tabs buton to follow the chords and tabs.
It’s all in the A-string where it’s 2, 2, 2, 4, 5, 5, 5, and 4, essentially you can play a couple different ways, but that’s most of it. Now we turn that into a chord progression. This is kind of a version that you can do, it’s only 3 chords super easy via E, A, B7, and back to E, then we’re going to jump back. First start with an E major chord; we’re essentially in the key of E. So it’s open E, little finger to a ring finger to D pointer finger 1G.
Now we’re going back and forth between E and A, for most of the song you want to go from this to this and back. So I’m playing this A major chord which is the next chord progression like this open A, 2D, 2G, 2B, open E, with my middle ring and pinky because it’s really easy to get back and forth between that E.
Let’s do a very simple strumming pattern without adding any kind of dynamics just to down, down, down, up, down, up, 1, 2, 3, and 4, and we just do that on E down, down, down, down, up, down, down, down, up, down, all right and whatever pace you want to do you use lower and move it to A and because we’re doing this version of an A and not this version of an A all you have to do is roll your middle finger and your ring finger back and forth, honestly even if you do it like E minor.
Essentially we just have a couple times around each of these 2, 3, 4, and the 2nd bar to A and the 2nd bar to A, and then back to E, back to A. For the next part we’re going to add new chord we have one time on E, one time on b7, back to E, back to A, so that last part, very bluesy were going from one bar down, down, down, up, down, up, 1, 2 3,and 4, and 5 to a b7.
This chord right here you’ll see it as a B on chord charts but in bluesy type songs and all the stone songs are pretty bluesy are b7, it’s going to be much easier way to use, that she kind of sounds more correct to. So b7 middle finger to A-string pointer finger, one on the B-string ring finger, to out the G-string (optionally) get your pinky on the high E-string if you want, not necessary but again it’s up to you.
So we’re going from E to b7, look how easy that transition is? All you have to do is, if you’re on an E major position your pointer finger you can stay it there and we just swap your ring finger and your pointer finger back and forth and then you can add your pinky go for it. Just really work this out, just like you want that to be as easy going back and forth.
So we got that E to b7, back to E, then down to A, then to the riff, but here’s the problem if you’re doing just an acoustic version it will sounds kind of puny almost like too thin, so what we want to do is we add that riff into chord form. This is where I first learned about all these Classic bands like the Stones and Zeppelin and stuff like everyone would refer them as “Blues Bands” and to me before I really knew this much, about music. I always thought about “Blues Being”, I think I had this misconception that it was just kind of boring music back in the day but then and it didn’t sound anything like the Stones, that’s not really a blues band but once we see the riff inside of an E major chord it makes a lot more sense. So we’re going to do add the low E string to the riff and then once you do that it takes that riff which sounds like a rock riff and then it’s such like okay well that’s where the Blues of it is now right there something super bluesy that doesn’t really sound like the stones. Now instead of just playing the riff like I said 2 2 2 4 5 5 4 we’re heading a low E-string 2 to get open E and 2A the same time.
You can even use different fingers, I promote that you be able to stretch like that because this is a good practice but sometimes it’ll sound better if you go on your finger, and then pointer, pointer middle, that’s something you could. Another thing you can do is to dress the song up a little bit more or even makes that thicker (optional). What I mean by that, let’s take that E chord and I’m just taking the open E, A-string and E-string, going to open to 2, so whenever I have the two in IRF I play it like I never have before 2, 2, 2, 4, 5, then I move this, it sounds fuller. So when you have the riff, a cool acoustic arrangement like one of the stuff we do is like to 2, 2, 4, and 5. Everybody knows, that’s a good way to introduce the song and then you get into the song and goes through the chords. And back to the verse, for me that’s a more cohesive super easy acoustic guitar version of the song.
It’s all about whatever you want to add the kind of melody to it, another way that might be tempted to do is a power chords. You have a single note and you want to beef it up, I think the initial thought is to turn it into a power chord. You have this B note, I want to add its 5th, so its 2A and 4D to make a power chord to beef it up that way go for it. I personally think that when you do that it makes it sound more like a B minor chord when really as we’ve shown we have the key in there it’s really a bluesy extension of an E chord.
Adding the power cord makes seem like a B minor which again I don’t really think is the core of the song. One thing you can do is add octaves, sometimes that sounds pretty good that is pointer finger on melody the whole way 2, 4, 5, and then your pinky, your ring finger is going to grab the two strings down two frets down and then get that open E in there. again a lot of voice you can do this but the point is Classic song just because it is more of like a rock song it has the whole band kind of Ivan there’s no reason that you can’t turn it into a pretty cool acoustically arranged song.
I hope you enjoyed it again make sure you click that link below to get the chords and if you have any questions hit us up in the comment section and make sure to subscribe on our You Tube Channel and we’ll see you in our next video lessons, thanks for watching.
Ready to get your metal on? Check out this Gallop Picking Guitar Technique – Killer Guitar Lesson on Metal Riffs from Guitar Control instructor Robert Baker. With the step-by-step video instruction and the free included tabs (just click the link) you will be rockin’ this must-know technique tonight!
[contentwall] [/contentwall][ninja-popup ID=715]
Introduction
How’s it going? My name is Robert and thank you for tuning in today to GuitarControl.com and today I’m talking about the wonderful metal technique known as the gallop. So if you’ve listened to metal music at all you know what this is all about. I have a kind of a scaled-down version of the gallop, it’s not like a real intense riff or anything, but if you haven’t done this technique this is a great place to start. Now there are tabs for this lesson down below in the description.
Gallop Picking
Now the riff is pretty simple and before we really get into what’s happening there let’s just go over what a gallop even is. So a gallop is basically 3 notes; 1 2 3. So the first thing you have to do is… so it’s very similar if you were just to do like straight… the issue there is a space, like a bunch of fours, that’s 1 2 3 4 1 2 3, you know like that. Now a gallop is 1 2 3 and there is no 4, the 4 is silent is a good way to look at it, we’re removing that note. This is a big reason why I’m always saying a lot of times it’s all about the notes you’re not playing, listen how much more groove and kind of rhythm this has… so there’s a big difference there. So what we’re doing here is first you want to get that gallop done as palm muting, it’s very heavy palm muting, definitely not doing it open, that sounds like a surf song. So what we want to do here is you’re gonna play five on the A string and do a gallop four times. So now the speed I wouldn’t worry about that you right now, we’re gonna focus on getting the rhythm of it down. So were gonna go up to seven on the A… so one more time slow and this time I’m gonna do it with a power chord. So we’re gonna play five on the A and seven… There’s a little trick that’s happening here since we are playing a single note. So gallop number four is actually only two notes to accommodate for that extra note here; so it’s one two three, one two three, one two three one two, and gradually work on speeding up.
Conclusion
Well thank you so much for watching Easy Gallop Picking Technique for Metal Riffs . I hope you enjoyed it. The gallop is a great technique if you’re trying to get into metal music. So aside from that I hope you have a great day and get those tabs and I’ll see you next time.
Check out this Free Awesome Neo Soul Guitar Chord Progression lesson from Guitar Control. Be sure to get the free tabs to go along with this killer lesson.
Neo Soul Chord Progression
The first thing I would like to do is to play it at a slower speed for you to understand it better. This progression consists of two parts; we have the Chords and Little League sub pages in between. What I would like you to do is focus on the actual progression playing and specifics.
The first chord that I will be playing is in the G minor, not playing the entire card, just playing some part of the core. Put the index finger on the fourth fret all along for frame and have the 6th fret on the 5th and 4th string, then from there go to an E major 7, having my index on the 7th fret ring finger, on the 9th fret of the fourth wheel finger, on the 8th fret of the 3rd, and pinky finger on the 9th fret of a 2nd, then C sharp minor 7, (pay attention to all the shapes), that I am going to show you because we are going to go deep into it. The index finger again on the 4th fret and then the ring finger on the 6th fret of the 4th and the middle finger on the 5th fret of the 2nd.
Now here we got the Jimi Hendrix chord, for that we have an E, this is an E flat 7 sharp 9. My middle finger on the 6th fret of the 5th string, then the ring index finger on the 5th fret of the 4th string, a ring finger on the 6th fret of the 3rd string, and pinky finger on the 7th fret of the nd string. From there, we repeat that run. Index finger on the 11th fret of the third, second, first, and middle finger, on the 12th fret of the third ring finger, and on the 12th fret on the 2nd, I put my pinky finger on the 14th fret, now that we got the shapes into this position, what I am going to do is actually start on the 4th string. With this one, I will be using the 6th fret of the 4th. The ring finger on the 6th fret of the 4th, and then the index finger on the 4th fret of the 3rd string, then bringing down my pinky finger to the 6th fret of the third index finger of the 4th fret, 2nd, and pinky on the 7th fret of the second, then from there we go straight up into this position.
Remember how I told you to remove the pinky sometimes and let it hit. I’m not going to play the first string, straight up to a second, and then Reuben. Then I bring my pinky into the 3rd string 9th fret. Removing it could potentially do something if you want to play the entire corps.
Going into the core, remove the middle finger, then bring it down, pull off, grab the pinky 6th fret of the 3rd, and remove the pinky. From there, we go into the Jimi Hendrix chord, which is very easy. We are going to play this chord. I think it is a cool progression that you can play. Yes, it is a little bit challenging. I do have E, C, E, tower lessons that you can check. I am releasing them soon. This is going to push your skills and make you a better guitar player.
Click the link in the description and make sure you tap or download it. I would love to know what you would like me to teach you in my next batch of lessons. Comment down below with your answers. Thank you so much for watching