Showing 81 Result(s)

How To Play Natalie Imbruglia’s Torn – Acoustic Guitar Lesson Made Easy Way W/ Sean Daniel

Hey, how’s it going this is Shawn Daniel with Guitar Control, we’re learning a classic 90s rock song “Torn” by Natalie Imbruglia. A fantastic song with three different parts, a really great exercise and kind of finding your way around a Key, make sure to check the image above to follow the chords and tabs.

[contentwall] pic [/contentwall]

Click on the Tabs button to follow chords and tabs.

[ninja-popup ID=715]

So we’re going to start on the 1 chord, F major bar 9th place bar chord. We’re actually going to play just the middle four strings if you hit that high E string as open as an F major 7 chord but we’ve got ring finger 3A pinky, 3D middle finger, 2G pointer finger, 1B. I’m going down, up, down, up, down, up, up, down, up, down. This is going to be our version of how the original is strummed with the rest of the band down, up, down, then down. I’m down, up, down, sometimes I add some to make a little livelier for a solo acoustic presentation but basically the verse is just going to be a key to a minor to B flat major. So we can number these because we learned those notes off as a 1, 3, 4, chord progression. The 1 chord F major down, up, down, up, down, up, up, down, up, down, again down, up, down, up, down, up, down, up, down, to A minor.

Pointer finger 1st fret of the B-string, ring finger 3rd fret 2nd fret of the G-string, middle finger 2nd fret of the D-string highest five strings down, up, down, up, down, up, down, up, down, up, down, up, down, up, down, up, down to B flat.

B flat is tough for a lot of people I see a lot of books teach it like this, where your pointer finger is the 1st fret in high string then you got the 3rd fret of the B-string, G-string, B-string, pinky, ring, and middle relatively. I’m not the biggest fan of this shape I think it’s kind of difficult for readers to do and you’re much better off taking the F major shape and isn’t moving it toward your pointer finger lines up with the 6th fret much easier because going back to F, anyways there’s the 1st fret because it’s where my pointer fingers lined up or where the root note will be in a bar chord F, B-flat as long as you don’t hit the low and high strings you can really just run this one shape from F to a B flat, so playing this way it’s F to A minor 1, 2, 3, 4, to a 4 chord, that’s how my thumb chilling here muting the low E string because that would sound better, my pointer finger making sure the high E string, I’m not hearing the lower of a high string.

F major, A minor, B flat, that’s going to be the entire verse. The next part is going to be the pre-chorus some people call it a bridge. I think if it’s a pre-chorus D minor, C, A minor, C, end of the chorus. So D minor, C , A minor C we can number those again remember what is D and F 1, 2, 3, 4, 5, 6, the 6 board to the 3/4 or the 6 part to the 5 chord to the 3/4 to the 5 chord when you can think of chord progressions as numbers makes everything super easy right F to A minor to B flat that’s  1, 3, 4, much easier to just kind of organize that stuff in my opinion D minor pointer finger 1st fret on the high E string pinky or ring finger on the 3rd fret of the B-string middle finger 2nd fret on the G-string.

Same strumming pattern to a C, pointer finger 1st fret of the B-string, you can play with your middle finger to D, ring finger 3a. I’m a big fan of playing it with your pinky 3a and your ring finger 3e. I just like that better sounds, a little fuller totally (optional) it’s up to you alright. So D minor 6 chord to the 5 chord to A minor which we already talked about was the 3 chord F, G, A and back to C, and then we go to the most common chord progressions in all of Western music history a 1, 5, 6, 4, chord progression.

Millions of songs are transposed to another key, even just like hearing it might make more sense if you did another key real just side note a one, five, six, four, in the key of C would sound like. My song familiar to some people but the point is a common chord progression that you should have under your belt and know how to navigate three different keys start on the one chord and the key of F which is the F to C, easy transition what’s the 6th chord in the key of F, D, D minor to B flat, back to F. So this is the chords of the song, that’s up to speed now this is one example of this B flat, could be better if you want to keep everything in the same ballpark.

That’s why it’s great to know different chord progressions for different things but in my opinion this B flat is a lot easier and will make the sound really good. Totally it’s up to you, I’m not going force you to do anything you don’t want, and we’re just trying to play some Natalie Imbruglia songs.

Here’s a recap, three parts the 1st part is F with the strumming power we’re going to go through the chords out the strumming, early half to A minor to B flat. Remember that’s 1, 3, 4, and when you know the numbers you can easily transpose these to other keys that might fit your singing voice or your singers singing voice better.

After that we have a 6 to a 5, to a 3, to a 2, to a 5, to a 2, to a 1, to a 5, to a 6, to a 4, and that’s it, that’s the whole thing. Make sure to subscribe on our You Tube Channel and we’ll see you in our next video lessons, thanks for watching.

– Click here to get Sean Daniel’s Secrets of Hendrix: DECODED – GO!!
18 D Chord Guitar Songs and Lessons

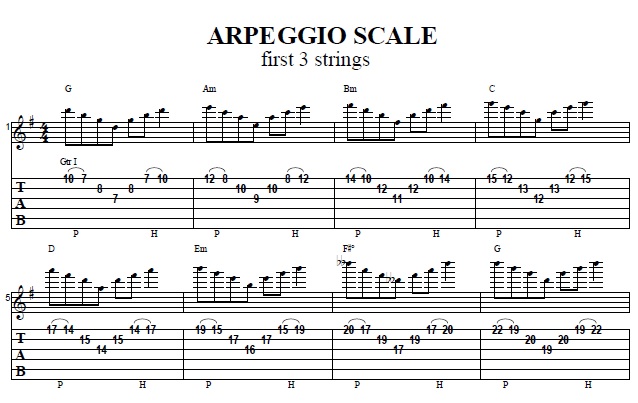
How To Play 3 String Diatonic Arpeggios in G Major – Lead Guitar Lesson For Beginners

Circles Post Malone

How To Play Circles By Post Malone | With Tabs and Video | Easy Acoustic Guitar Lesson

Check out this free Circles By Post Malone Easy Acoustic Guitar Lesson. With the variety of chords in this one, it makes it a great lesson for players of all skill levels and with an easy to follow chord chart you’re sure to get this Easy Acoustic Guitar Lesson under your belt in record time.

[contentwall] pic [/contentwall]

Introduction

Click on the Tabs button to follow the chords and tabs for Circles By Post Malone Easy Acoustic Guitar Lesson.

It’s four chords on a loop for this Easy Acoustic Guitar Lesson, but there are actually variations of those chords that we can do to make it sound more like the song and have a cool, chill acoustic guitar version and we’re going to talk about some easy ways to do it and ways to kind of incorporate that cool baseline into this Circles By Post Malone Easy Acoustic Guitar Lesson.

Circles Chords

First things first, the chords for this Easy Acoustic Guitar Lesson are C major to a C major 7, to F major, to F minor, we’ll go over those chords in more detail in a second, that’s it C, C major 7, F, F minor. Not too bad right 1, 2, 3, 4, 4, count. Each one gets its own bar and we’re going to start by playing a C major with variations but basically I got my ring finger on the 3rd fret of the low E-string, pinky on the CMA-string 3rd fret of A-string, middle finger is on the 2nd fret of the D-string, the G-string is open, pointer finger on the 1st fret of the B-string.

To get that kind of choked staccato type sound for Circles By Post Malone, what I’m doing is, I down strum, taking my fretting hand and releasing the pressure. If I keep the pressure down that will be fine, but it’s not really like the song and I would recommend starting the choked and get the chords of the Easy Acoustic Guitar Lesson.

You must have somewhere to go otherwise, it’s going to sound the same, and the whole time you want to make it a little bit of a dynamic performance out of this Easy Acoustic Guitar Lesson. It’s the coordination between your fretting hand, your strumming in down, down, down, that’s how I’m playing it. The count is how you want to internalize it but I think its most like the song in that pattern, you’ll notice after that 1st bar the next count is taking my pointer finger off to make it a C major 7 that’s the easiest way to make a C major 7.

Any time you had a B note to a C chord you get a C major 7 and we’re going to get the F major chord to the F minor chord. I’m playing this as a barre chord, 1st we switch it to the non-bar chord version in a second but again by the 1st fret 3rd fret on the A-string, ring finger 3rd fret on the D-string, pinky middle finger to G, same thing as four and then we’re going to make an F minor. You’ll notice that the only thing that changes is your middle finger on the 2nd fret and ends up becoming your pointer finger on the 1st fret.

We’re flattening what’s called the 3rd of the F major chord and then getting the last spot of the 4th bar on the progression. Notice that I’m using my middle finger to abandon and pulling out my pointer finger to give myself some extra power to really get that G-string note, G# in there or A flat to ring out because that’s the hardest part doing a E-string with a barre chord on the 1st fret is getting that kind of sound, but not necessary as we’re going to showcase in just a second so you can play the whole song in this C major 7 same strumming pattern F minor.

That really cool bass line I think is something that we can pretty simply incorporate into the Circles By Post Malone Easy Acoustic Guitar Lesson chord progression. So far we’ve got this notes of our 3a which is a C note the root note of the C chord C, C, open D, back to C, same as 3, 3, 5, 3, and if you’re playing the bass along with the song you just go 3, 3, 5, 3, 2, 2, 2, 2, 2.

Now what is that note that 2nd fret of the A-string A, A sharp B, it’s a B. Like I said before when you add a B to a C chord you get a B or C major 7 chord. The reason is because B is a 7th note in the key of C, C, D, E, F, G, A, B. Now we can play any variation, the first C major 7 we did was by opening up the B-string by taking out pointer finger off which is kind of like a very pretty acoustic strumming way to play that Easy Acoustic Guitar Lesson.

Another way we can play a B with the C major chord is taking the root note, making your middle finger that guy right there. Now I have my middle finger to A, my ring finger is onto D, G is still open, our C note is now coming from the 1st fret on the B-string, and then open E. It has a little bit of a different feel especially if you can palm mute it In the F bar of this Easy Acoustic Guitar Lesson.

A lot of these are just different variations and options that you can do in this Easy Acoustic Guitar Lesson to get it to sound more like a combination between what the guitars are doing and what the base are doing. Now let’s talk about the F portion of the progression. So far basically, the back after the progression we have F major to F minor once again sometimes the easiest that has been done specifically on an acoustic guitar with thicker strings where the tension is always the highest to closest to the nut. That 1st fret is really hard to barre a lot of times, so one way to get around is to play this F chord like that 1st C major chord that we did. Keeping your pointer finger right there, moving everything else down A-string, now the middle four strings are 3A, 3D, 2G, 1B, which is the as before a barre chord.

Remember we have to change 2 to 1 so what we can do is focus on the A, D, and G-strings to get 3, 3, and 1/2 major F minor doesn’t really sound as good I think as a full barre chord but it’ll work and a pinch. Another thing that you can do for this Circles By Post Malone Easy Acoustic Guitar Lesson is kind of like a mini bar chord whereas 3A, 3D, kind of like a half bar.

We’re getting the 1st round of this Easy Acoustic Guitar Lesson, the G, and the B-string, just like that highest three strings. That’s another way you can play an F major 7, if you want to do an easier F major chord like just 3D, 2G, 1b again doesn’t totally sound exactly like the song but it’s just a different way to introduce yourself fuller barre chords. We’ve got a four count on C, if you’re having trouble with the strumming let’s do all down strokes for this down, down, down, down, down, down, down, down, and I’m going to palm mute this to make it a little easier to hear or taking the side of my hand and hitting the bridge down, down, down, down, down, down, down, down. Notice that time I use the lower beat down, down, down, down, F minor, non power chord way down, down, down, down, down, down, down, down, down, down, down, down, down, down, down, down. The rhythm is really important for this Easy Acoustic Guitar Lesson.

I want you to accompany yourself to do it, like your basic down to reemployment 1, 2, 3, and 4, and 1, 2, 3, and 4, that’s totally fine. I’m just a huge proponent learning as many songs as you can try and different things out, but I think this is a really great opportunity to try to incorporate a little bit more of the elements that make this Easy Acoustic Guitar Lesson on Circles by Post Malone so cool and catchy.

Then get those bass notes in and there’s the bridge for Circles By Post Malone, the chords are the same for the bridge but really just let it ring out C, C major 7, half F minor, however if you want to play it and resolve it on C . The last thing I want to talk about this progression is how we number it really this is just a one chord to a four chord all that means is in the key of C. We have C, the notes, and the c, d, e, f, g, a, b, like to talk about B being the 7th and the 4th note in the key of c, c, d, e, f, is f that is where the F major chord comes from so it is a one core to 1/4 this made yourself to a 4 chord to a minor four chord that’s how we’re going to communicate this and then back to C.

Hopefully you enjoyed Circles By Post Malone Easy Acoustic Guitar Lesson and you understood everything keep on rocking. Make sure to subscribe on our You Tube Channel and we’ll see you in our next video lessons, thanks for watching Circles By Post Malone Easy Acoustic Guitar Lesson.

– Click here to get Sean Daniel’s Secrets of Hendrix: DECODED – GO!!

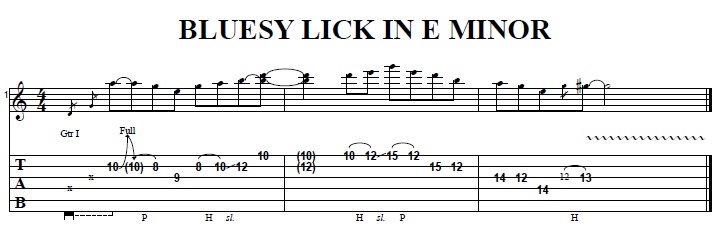
How to Do Easy Blues Guitar Lick in E Minor

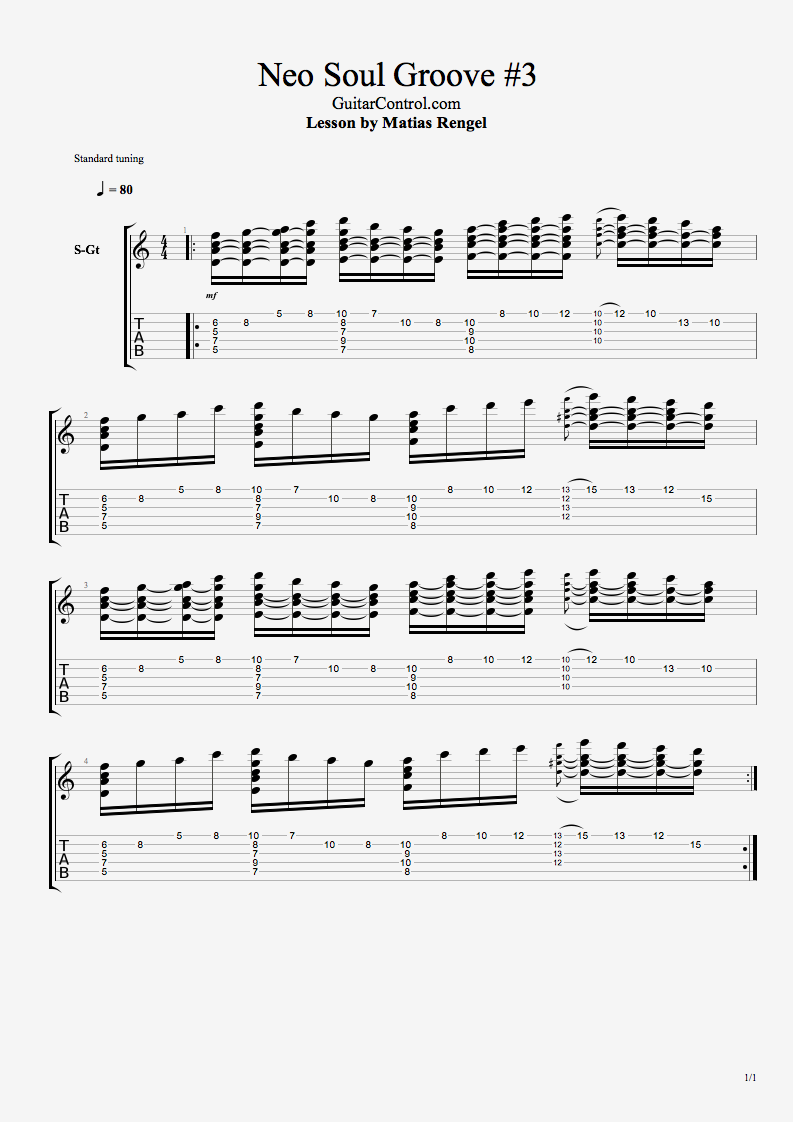
Beautiful Neo Soul Guitar Chord Progression – Rhythm Guitar Lesson For Intermediate Players

Learn How To Play Starlight By Muse

Check out this free lesson from Guitar Control instructor Sean Daniel on how to play Starlight by Muse. Be sure to click the link and get the free tabs to go along with this lesson.

[contentwall] How To Play Starlight By Muse [/contentwall][ninja-popup ID=715]

Introduction

What’s going on everybody? Sean Daniel with Guitar Control here and today were doing one of my all-time favorite songs from one my all-time favorite bands, Starlight by Muse. Now we’re gonna do an acoustic version of this and we’re gonna talk a little bit about barre chords, but I want you be able to do this an easy way where it’s only power chords because what makes it such a cool chord progression is it really kind of goes all over the place. So click the link below because we have the chord chart to follow along with; like I said we’re gonna be doing most of these as power chords.

Power Chords

So the first thing we need to know is what power chords are and we’re starting on B. This is going to be representative of a B major, but again our root note is the second fret on the A string, so second fret on the A string with your pointer finger and fourth fret of the D string with your ring finger. Now this is just a power chord that you can move anywhere, so this is a B power chord, C, C sharp, D, D sharp and so on and so forth. It isn’t major or minor, but it’s representative of one of them, in this case it’s going to be B major. Okay so we’re gonna start with a B major power chord and it’s gonna sound like this…

Okay so there’s a little bit of a strumming count that we have to get down, now let’s talk about just how this moves around, it’s gonna be the really three main parts. The first one is going to add the strumming afterwards to C sharp which is gonna be indicative of C sharp minor, but again we’re just playing it as a C sharp power chord to G sharp. We should also be a minor to open E major. So all these are gonna be power chords with the exception of E major just because it’s the easy open chord.

– Click here to get Sean Daniel’s Secrets of Hendrix: DECODED – GO!!

Adding Melody Lines To Power Chord Progressions – Rhythm Guitar Lesson On Easy Riffs

Remarkable Jazzy Neo Soul Killer Guitar Chord Progression

[contentwall] Neo Soul Progression [/contentwall][ninja-popup ID=715]

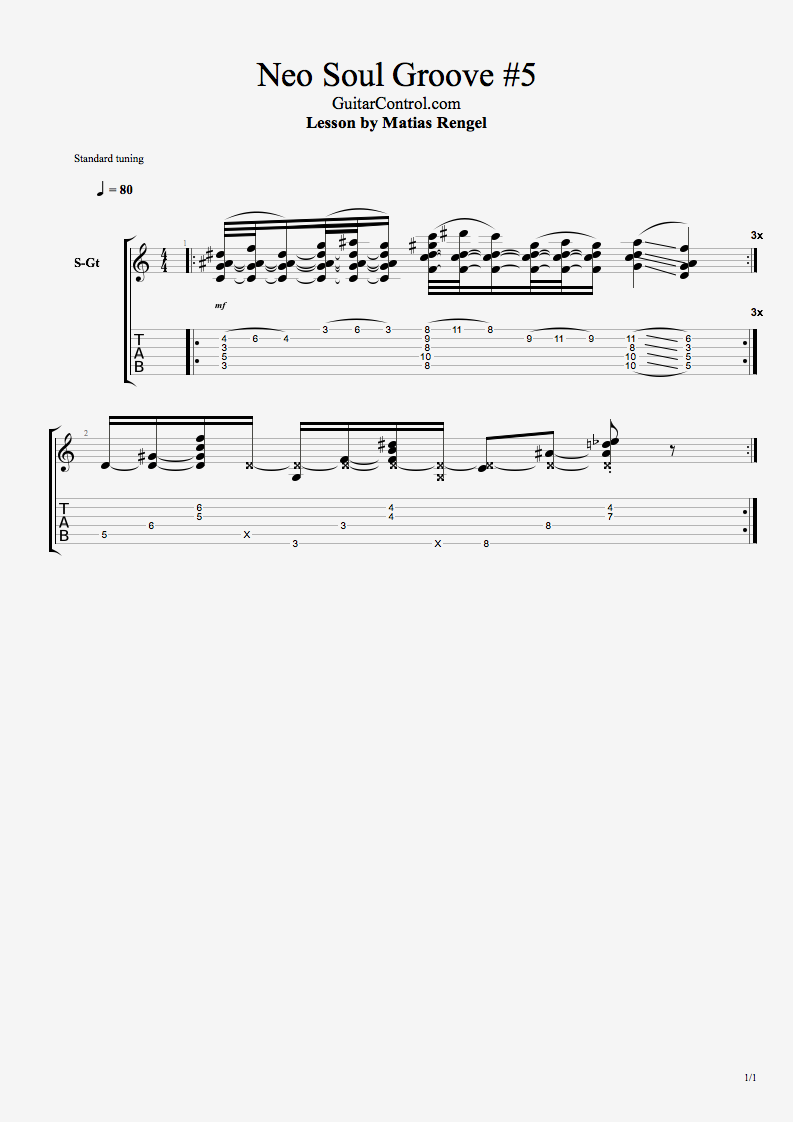
Killer Jazzy Neo Soul Chord Progression – Jazz Guitar Lesson w/ Matias Rengel with Guitar Control and today you’re going to be learning this really cool and challenging neo-soul jazzy progression. As usual there’s a link in the description, so make sure you click or tap on it to download the tab. Let’s get down to it. All right, so the first thing that I want to do, I want to play this at a slower speed because I was just playing it really kind of fast.

So I would like to, instead of showing you the actual riff that I’m doing, the actual progression, I would like to show the chords first and then we’re going to get into the specific of it because it’s much easier I think that way. So I’m playing a D minor seven. Then I’m playing the E Minor seven, F major seven. And then I’m just doing a version of it until I go into a E diminished.

But let me break it down for you. So for the first one, I got my index on the fifth fret of the fifth, fourth, third, second, and first string. Then I have my ring finger on the seventh fret of the fourth and middle finger on the sixth fret of the second. Then I move that same progression, that same chord, and move it into a seven fret, two frets up. And then from there, check this out, I move it one step up, but I bring my middle finger into the third string and I bring down the pinky into the 10th fret of the second string. Move it up and just…

Now for the inversion that I’m doing, we’ve seen it in other videos. I am placing my index finger on the 10th fret of the fourth, third, second and first string. And I’m bringing my, this is part of the actual licks that I’m playing a little bit, but I’m bringing my ring finger into the 12th fret of the first string. And that’s for that. For the E diminished one, I got my index finger on the 12th fret of the fourth, third, second and first. And I got the middle finger on the 13th fret of the third string and the ring finger on the 13 fret of the first string.

So you get the progression now. I would say practice the progression first. Just practice it like this. Like that. It’s going to help a lot because you need to know the chords first. So once you get that down, let me show you what I’m doing actually. I start here. I can strum it up to the second string. From the second string I go into the eighth fret. I always get the shape of the chord and I go… I bring down the pinky to the eighth fret of the second and then I play this first string. So for the first string I have it with the index finger on the fifth fret. And then I bring down the pinky to the eighth fret.

So we have that and I’m keeping the chord shape. The idea is to keep it sounded, unless you’re going for the muted sound, which also works. Perhaps, maybe it’s an even better idea to start with a muted sound so you don’t have to worry so much about keeping the chord sounding. What you want to do after this, you’re going to move the chord to this one with the pinky there and you’re going to go… You’re going to strum up to the first string and you’re going to remove the pinky and you’re going to have the seventh fret of the first that you’re playing it with index already. Then you put the pinky on the 10th fret of the second, remove it, see, and your middle finger’s already on the eighth fret of the second. So that’s why it’s important to keep the chord shapes and not move them. Because you’re moving around the chord shape. So from there you move it and you’re going to go up to the second string. And then you’re going to play the first one. You’re going to bring down the pinky into 10th fret.

I want to hear this. Okay? I’m going to hear the 10th fret of the second string, eighth fret of the first, 10th fret of the first then 12th fret of the first. So we’ve got…

And now from there we’re going to go into this chord. After you play the 12th fret of the first, you go into this chord and you do a hammer onto it, 12th fret like that. And then you played the 10th fret of the first, 13th fret of the second and 10th fret naturally, that is right there off the second string. Pretty cool right? Now, you got to repeat that. Up to this chord. Up to the 10th fret of the first string.

And once you get there, we’re going to do a hand move. You’re going to move the hand entirely with the index to the 12th fret of the fourth, third, second and first string. So basically the chord is going to be just a note. The chord is going to stop sounding for the moment. It’s going to be like… See there’s no chord there in that moment. Since you already have the index finger on the 12th fret, you’re going to bring down the middle finger to the 13th fret of the third and ring finger into the 13th fret of the first. And from there you’re going to do a hammer onto the 15th fret of the first string. Then you’re going to remove the ring finger. You’re going to be left with the 12th of the first string, and then bring the pinky on the 15th fret of the second and that’s it. It sounds like that.

So you got… Really, really cool. Now, some variations that you can add to this. You can do that right there in the second chord. So for that you will go… That will be seven, 10, hammer and pull off. 10 of the second, eight of the second, nine of the third, seven of the third and nine of the fourth. But you need to keep the chord. That’s a little bit harder.

Anyways, that’s all for today. I hope you’ve enjoyed this lesson. It’s a really cool progression and groove. It’s a little bit maybe on the complicated side, but you can totally do it. Especially if you click or tap on the link in the description and download the tab. Because this is, I’m going to say it, it’s not that easy, but if you have the tab, it’s going to be super easy. You’re going to be able to practice it every day. So that’s all for today.

Remember to subscribe to our YouTube channel for daily guitar lessons. One more thing. I would love to know what would you like me to teach you next? So leave a comment down below with your answer. Thank you so much for watching.

More of Neo Soul/Classical Guitar Lessons

Simple and Important Jazz Chord Lessons

Cool Guitar Riff Lessons To Play

6 Best Guitar Chord Progressions Lessons

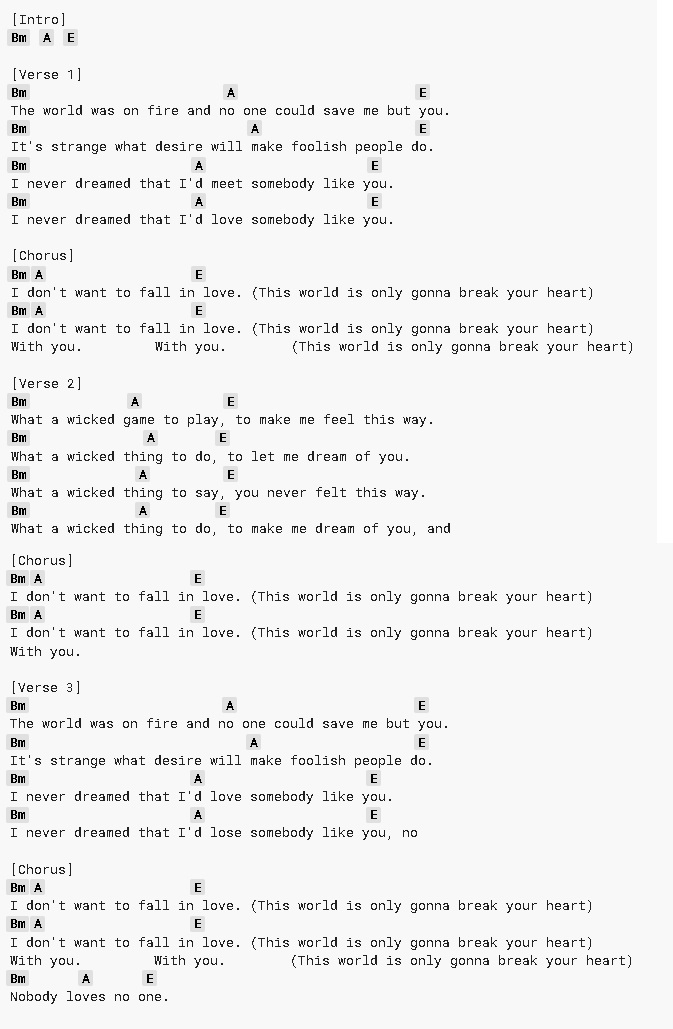
Wicked Game By Chris Isaak | Easy Acoustic Guitar Lesson | Tabs

Hey, how’s it going Sean Daniel here with Guitar Control, Today we’re playing “Wicked Games” by Chris Isaak. We’re going to do a way that we can kind of incorporate the melody into the acoustic guitar part, so make sure you click the link below, because we’re going to have the chords for it.

Really easy, actually. It’s only three chords, but we can start incorporating the melody, so if you just want to strum it, we can do that, and have it sound like this. You can pretty much sing the entire song just with these three chords. Then you could have that. Or, we can start adding the melody, like…

[contentwall] pic [/contentwall]

Click on the Tabs button to follow the chords and tabs.

[ninja-popup ID=715]

So, it’s super easy. Chords are simple. It’s fun to play. People have a reaction to this melody, that takes them to a totally different, hotter, black and white place. Starts with B minor, we don’t have to play this as a barre chord. You’re going to need to to play the melody, but if we just want to play it as B minor, A, E, you can start this, pointer finger two on the A-string. Now, if you don’t want to play the barre chord, that’s all you need with your pointer finger. Two A with your pointer finger, ring finger four D, pinky four G, middle finger three B. You can strum the middle four strings, and maybe not hearing anything from the high E-string, or barre it to get that 2nd fret of the high E-string to ring out. The 1st note of our melody, when we get there, but we just play the B minor like that.

You can scoot this really quickly and easily to an A major, by going down to the 2nd fret on the D, G, and B-strings, open A. You can raise the barre to get that high E-string to ring out if you’re crazy, or you’re not even worry about the high E-string, and then go to E major. This is our 3rd chord, I’m kind of going through the chords quickly. Then we’re going to talk about the strumming pattern. Then we’re going to add the melody, that open E major chord is middle finger 2nd fret on the A-string, ring finger 2nd fret of the D string, pointer finger 1st fret on the G-string.

Now, if we want to do it super basic and simple, all down strokes, 1, 2, 3, 4, 1, 2, 3, 4, A, 2, 3, 4, 1, 2, 3, 4, E, 2, 3, 4, 1, 2, 3, 4, another time around on that E, 1, 2, 3, 4, 1, 2, 3, 4. If we’re counting it like this, two bars of B minor and A and then four bars of E.

Now, you can totally play it like a little crazier, and the first thing you could add is that part with that E major. Maybe, if you’ve never tried playing melody notes on top of chords before, this is a really cool place to start, because all we’re doing is we’re taking an E major chord, that 1st fret on the G-string, the melody that we’re going to add is one, two, four, okay?

Now, we can pretty easily add that over an E major. The first thing that you could do is just put your pointer finger on the 2nd fret of the G-string, turning it from an E major chord to an E suspended 4 chord is the name of that chord. Every time you change a note in a chord, it probably changes names, but don’t worry so much about the name of it, even though it is an E sus 4, if you ever come across it on a chord chart or anything like that. Worry more about what that melody is doing. It’s leading us to the 4th fret. Now, the cool thing about this, once we’re here, you can bring it into B minor position, but just have it be 2A, 2D, and 4G. So now we kind of have this… This is actually technically an E power chord, playing it like this (singing). B minor, to A major, to E major. Kind of a slick move, and it sets you up for that B minor again, and then back home.

Now, if we want to add the entire melody, let’s talk about it. We can start with the B minor power chord. We’re going the high E-string to where your middle finger is on the B-string (singing), getting your pinky involved on the 5th fret of the B-string. You can do the same thing. You could open it with your hand like that, getting an open E-string. I think it’s better to add the pinky there, and go to middle finger five to three, so I’m getting the low part of the chord, and then I’m getting the melody there.

I’m raking the chord until I get to the B-string. I’m stopping there. That way, I’m hearing this note, that E note, in the chord, on top, okay? So, B, melody, B, melody, stopping on there again, and then going to the A major chord, because the next two notes of the melody are 2B, open B, C# to B (singing). That sounds really great on top of that A major chord, which we started earlier, all right?

So we’ve got B, E major, and then that slick move back to B, okay? This is a very interesting way that you can start incorporating melody into your chords, and again, you can start it… The cool thing about having a song on a loop for the entirety of the song is that it gives you time to practice different techniques while you’re going through the song. A lot of times, you might just get bored being like, “All right, B, A…” It’s like, “All right, I’m just playing this, whatever.” B… There’s no dynamic to it, right? So, if you’re bored, the listener, the audience, is going to be easily as bored, but maybe if you start with it muted, like… to an A, to that E. Now you can kind of take that chord progression somewhere else. Okay?

So there’s a lot of different things that we did there. We started out by just playing the power chords, which is just a two note chord. For the B minor part, it’s easy. It’s just two A and four D. Now, I said before, it’s in 4/4 timing, 1, 2, 3, 4, 1, 2, 3, 4, but one way to kind of mess with the rhythm is maybe to count it, instead of a 4 count or an 8 count, one, two, three, one, two, three, one, two. I’m just doing a muted power chord, where I’ve got my palm in the bridge 1, 2, 3, 1, 2, 3, 1, 2, A, 2, 3, 1, 2, 3, 1, 2, E, and then again on E. That really kind of breaks off from that verse, really brings a dynamic into it.

Now, slowly but surely, you can start to play more of the chord, in the same rhythm if you want. You could add the melody. We could start with A… Then by the end of it, you’re kind of getting the whole thing, of… Then it makes a bigger impact when you go back down. We don’t need to spend 20 minutes on this lesson. I think it’s really just kind of all right, we’ve got the chords. I see that within these chords, built inside the chord, is really most of the melody. The only place I have to reach to find a note for the melody that isn’t in that chord is when I’m adding my pinky or opening up the E-string to get the… Otherwise, all the other notes in the melody are inside that B minor chord. Same thing with the A, unless you open it up to make a suspended chord, and then to an E, E suspended 4, and then again, we’re grabbing that note, to kind of make just a different voicing of an E power chord.

I think this is something that you want to be thoughtful about, is where these melody notes are coming. They’re always going to be either in the chord or very near to the chord, no matter what kind of voicing, what kind of inversion that you’re playing. Really, if you find yourself in a song that is just a loop over and over again, and you’re mindlessly playing it, never be mindlessly playing. Always try to reach for maybe where a melodic note is, because a lot of times, you’ll plateau if you’re just kind of playing the same stuff over and over again, and you’re not really exploring the fret board, so I think that this is a great example of just doing a little bit of fret board exploration to open up basically all the stuff that you’re playing in a really easy-to-hear way, that is melody everybody knows, you’ve heard a million times, it’s great. Chris Isaak gives you street creds.

Thank you for watching this video. If you have any questions or comments, hit us up in the comment section. Anything else you want to see, let us know, because we’re always looking for your feedback, and then after that, check out the other videos on the Guitar Control channel, by myself and other great instructors. Make sure to subscribe on our You Tube Channel and we’ll see you in our next video lessons, thanks for watching.

– Click here to get Sean Daniel’s Secrets of Hendrix: DECODED – GO!!

How To Play “Wake Me Up” By Avicii – Easy Acoustic Guitar Lesson w/ Darrin Goodman

[contentwall] pic [/contentwall][ninja-popup ID=715]

Hey everybody, how’s it going? This is Darrin Goodman with guitarcontrol.com bringing you this video lesson. Today, I want to show you how to play a song called Wake Me Up and I hope I’m pronouncing the artist’s name correctly, Avicci. Never heard of him, but had a private student request this song and went through it and I thought it’d be a good one to show you guys, so be sure to click on the link in the description for the tabs. Let’s get close up and take a look at it.

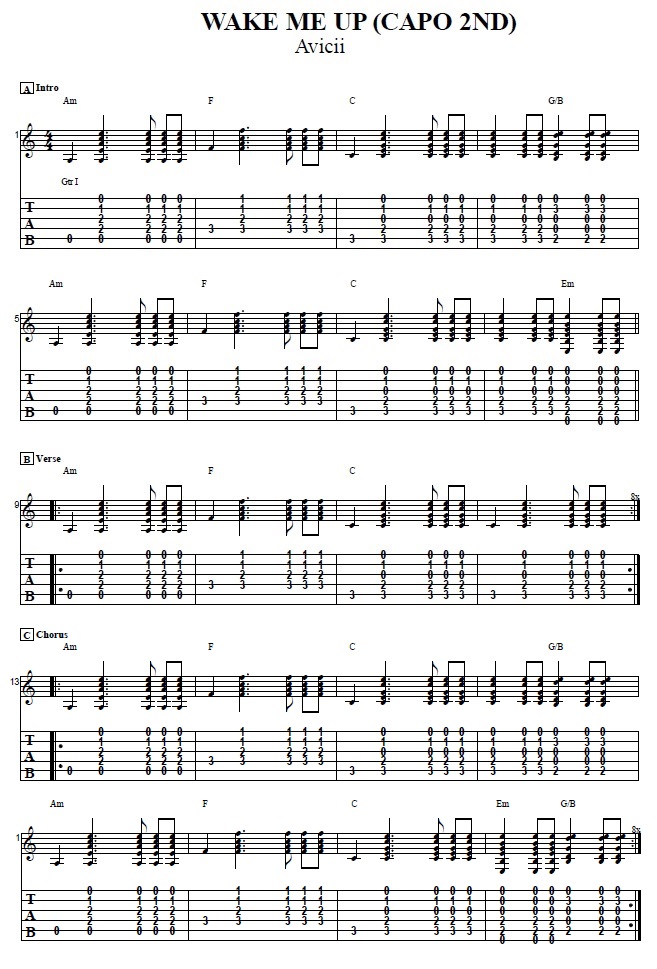
To be in the same key that the original song is in, put your capo on the second fret. So, chords we’ve got in here. We’ve got A minor. So, fifth string open, second fret of the … and this is in reference to the capo by the way. Second fret of the fourth string with your second finger, second fret of the third string with your third finger. First fret of the second string with your first finger, and first string open.

Then we have F. So, your first finger is going to bar across the first fret of the first and second string, and then we’re on the second fret of the third string with your second finger, and the third fret, the fourth string with your third finger.

And then we have C. So, third fret of the fifth string with your third finger, second fret of the fourth string with your second finger. Third string is open. First fret of the second string with your first finger, and the first string is open.

And then we’ve got G over B. How I’m doing this, I’m using my second finger on the fifth fret of the … excuse me, the second fret of the fifth string. And then strings four and three are open. And then I’m on the third fret of the second string with my fourth finger, and the first string is open.

Now, you may have learned the chord this way … But for the way the transition moves, it’s easier to do it this way.

And then E minor. So, sixth string open, second fret of the fifth string with your second finger, second fret of the fourth string with your third finger. Strings three and two and one are all open.

For the strum for this, we start off, we’re on A minor. And we’re just going to play just the fifth string open, and that’s beat one. So it’s like, one. And then on beat two, we strum the whole chord. Now, beat two is a dotted quarter note, so it’s like one, two, three, and four and. So, single note, down; down, up, down. This is the strum for the majority of the song.

Now, we switch to F. We do the same thing, but now the single note we’re playing is the fourth string. Then to a C, back to the fifth string for our single note. That’s the first three measures.

And then on the fourth measure, we stay on C and we do one, two and; and then we switch to the G over B. This is why I was saying that this transition here is that if we … If you go from C, if you just take your third finger off, move your second finger from the second fret of the fourth string to the second fret of the fifth string, and then drop your fourth finger down onto the fourth fret of the second string. And just leave your first finger there on the second string because right after this, we go right back into an A minor. So, that fourth measure, we’re on C. One, two and, and then switch to G over B, three, four and. So … And then it more or less starts over.

So, those first four measures.

And back to a minor. F. C.

And now this time on the … We stay on C again. One, two and; and then we switch to E minor for three, four and. That’s the entire intro. All right.

And then from there we go into the verse, and the verse is similar to the intro. We start off with that A minor, to F, and then C, and we just do two measures of C. The verse consists of these four measures, but it’s actually repeated eight times, so you’ve got …

And then, like I said, that repeats eight times.

I believe I just played it four times, so like I said, it repeats eight times. If you’re looking at your tabs, you can see that there, that it indicates to play it eight times. All right. And then from there we go to the chorus.

For the chorus, again very similar. We’re in A minor, F, C. This is like the first four measures of the intro for this first part of the chorus, so it has that … where we stay on C, and then go to the G over B, so you have … And then back to A minor, F, C.

And then for the fourth measure here, we go E minor, one, two and. And then to G over B for three, four and. So, that second half of that chorus … And then that repeats. The whole section for the chorus, the whole both parts that we just did, that is also repeated eight times. So, the chorus all the way through … Repeating. And then like I said, it repeats eight times.

All right. Well, I hope you enjoyed that and you got something out of it. If you like this lesson, give me a thumbs up, leave a comment down below. If there’s something you’d like to see either myself or one of the other instructors at guitarcontrol.com doing a future lesson. Anyway, that’s all I have for you today. Until next time.