How to Play Killer Pentatonic Tapping Licks With Robert Baker

[contentwall]  [/contentwall][ninja-popup ID=715]
– Click here to get Sean Daniel’s Secrets of Hendrix: DECODED – GO!!
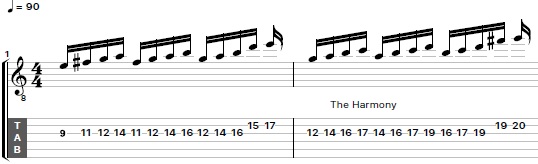
Hey, how’s it going this is Darrin Goodman with Guitar Control, I want to show you a little sequence from Yngwie Malmsteen song “I’ll see the light tonight”.
A little part that he like harmonizes with the keyboards right before the guitar solo and stuff but this is a really good exercise for alternate picking and for working out your fretting hand as well you know moving around through these positions and stuff and he plays this like really fast but you know I’m not even going to attempt to do that it doesn’t really matter you know I mean if you work it up and you play really fast that’s great but it doesn’t have to be played fast to be you beneficial and pretty cool sounding.
[contentwall] [/contentwall]
Click the Tabs button to follow chords and tabs.
Like I said this is all alternate picking so that means no two down strokes in a row no two up strokes in a row just down, up, down, up, down, up. For the first position most of this is on the first string by the way on the 10th fret of the 1st string with your first finger and then the other two notes from the 12th fret with your third finger and the 13th fret with your fourth finger now you could do this you know 1st, 2nd the 3rd or recommend if you’re a beginner you really get used to using your pinky it just really makes a big difference on a lot of stuff you know if I’m playing up really high above the 12th fret a lot of times I won’t use my pinky just because the frets are closer together and you know things can tend to get a little cramped but for you know anything below that it’s the opposite if you’re trying to go you know make these big stretches you know between your first and second and your third finger it’s that can be a little awkward too so I really recommend that you do it this way. We’ve got 10 and then we go to 13 and then 12 and then back to 13 so each one of these things if you think of it it’s three notes so 1, 2, 3, the pattern is 1, 3, 2, 3, so for this first section we’re going to shape and we’re going to play it twice.
Now we just move down into the next position so notes 1 and 2 become notes 2 & 3 so now we’re going to move our fourth finger from the 13th fret to the 12th and now our second finger on the 10th and our first finger on the 8th. Now this is how I like to do it some people like to do this they you know they like to make the stretch there that it’s just not comfortable for me to do that if you have longer fingers then this might be the way to go I’ve just kind of noticed that the players who are blessed with those you know awesome guitar player hands which I am NOT you know players like Paul Gilbert or Ebay or Steve Vai you know they all have you know really long fingers and I’ll notice that they tend to do those shapes that way so remember first shape now our second shape so now we’re going to be 8, 12 and we move down into the next position again so our first finger goes to seven fourth finger goes to ten and second finger is at 8 and then we move down again so now we’re 5, 7, and 8, so this whole first part.
Now for the next section which is like staff number two we go back up to the 1st shape and we only play it once though this time now we’re going to skip the 2nd shape and go to the 3rd one we go down we’re 7, 8, and 10 and then we go back up and get the one that we skipped a 12 and 12 and now again we’re going to skip and go down 5, 7, and 8 back up to 7, 10, and eight.
Now we’re going to come all the way down for 7 and 5 and then back to 5, 7, and 8 and we do that one twice so that whole sequence all right and then for the second half of that we go back to 4, 5, and 7 again and then all the way back up to the 1st shapes of 10, 1, and 13 and then down 1, 2, 8, 10, and 12, twice now we go to the very first one and now it’s now it’s where we change we’re going to move on to other strings so we do it once here 10, 12, and 13, on the 1st string and now we go to the 2nd string 9, 12, 10, to the 3rd string 7, 10, and 9, and now 4th string 6, 7, and 9 now to the 5th string 5, 7, and 8 but we are changing the sequence a little bit now we’re going to go instead of like 1, 3, 2, 3, and then back to the 4th string same frets but we’re also going to do that same thing so we’re going to go and then that last part just like that.
I hope you enjoyed that and you got something out of it if you liked the video give me a thumbs up leave a comment down below if there’s something you’d like to see either myself or one of the other instructors at guitarcontrol.com do in a future lesson so like I said aside from this just being you know kind of a cool sounding riff and stuff it’s a great workout for both of your hands one you’re working with alternate picking and it’s like an endurance thing just to keep going and then with your fretting hand it’s you’re basically getting exercise for all four fingers and you’re having to move through these positions and stuff so it just kind of helps you to like visualize places to go on the on the fret board all right so that’s all I’ve got for you today.
Make sure to subscribe on our You Tube Channel and we’ll see you in our next video lessons, thanks for watching.
[ninja-popup ID=715]

[contentwall]
Check out this Frank Sinatra’s “Fly Me to the Moon” Made Easy w/ Sean Daniel – Easy Acoustic Guitar Lesson.
– Click here to get Sean Daniel’s Secrets of Hendrix: DECODED – GO!!
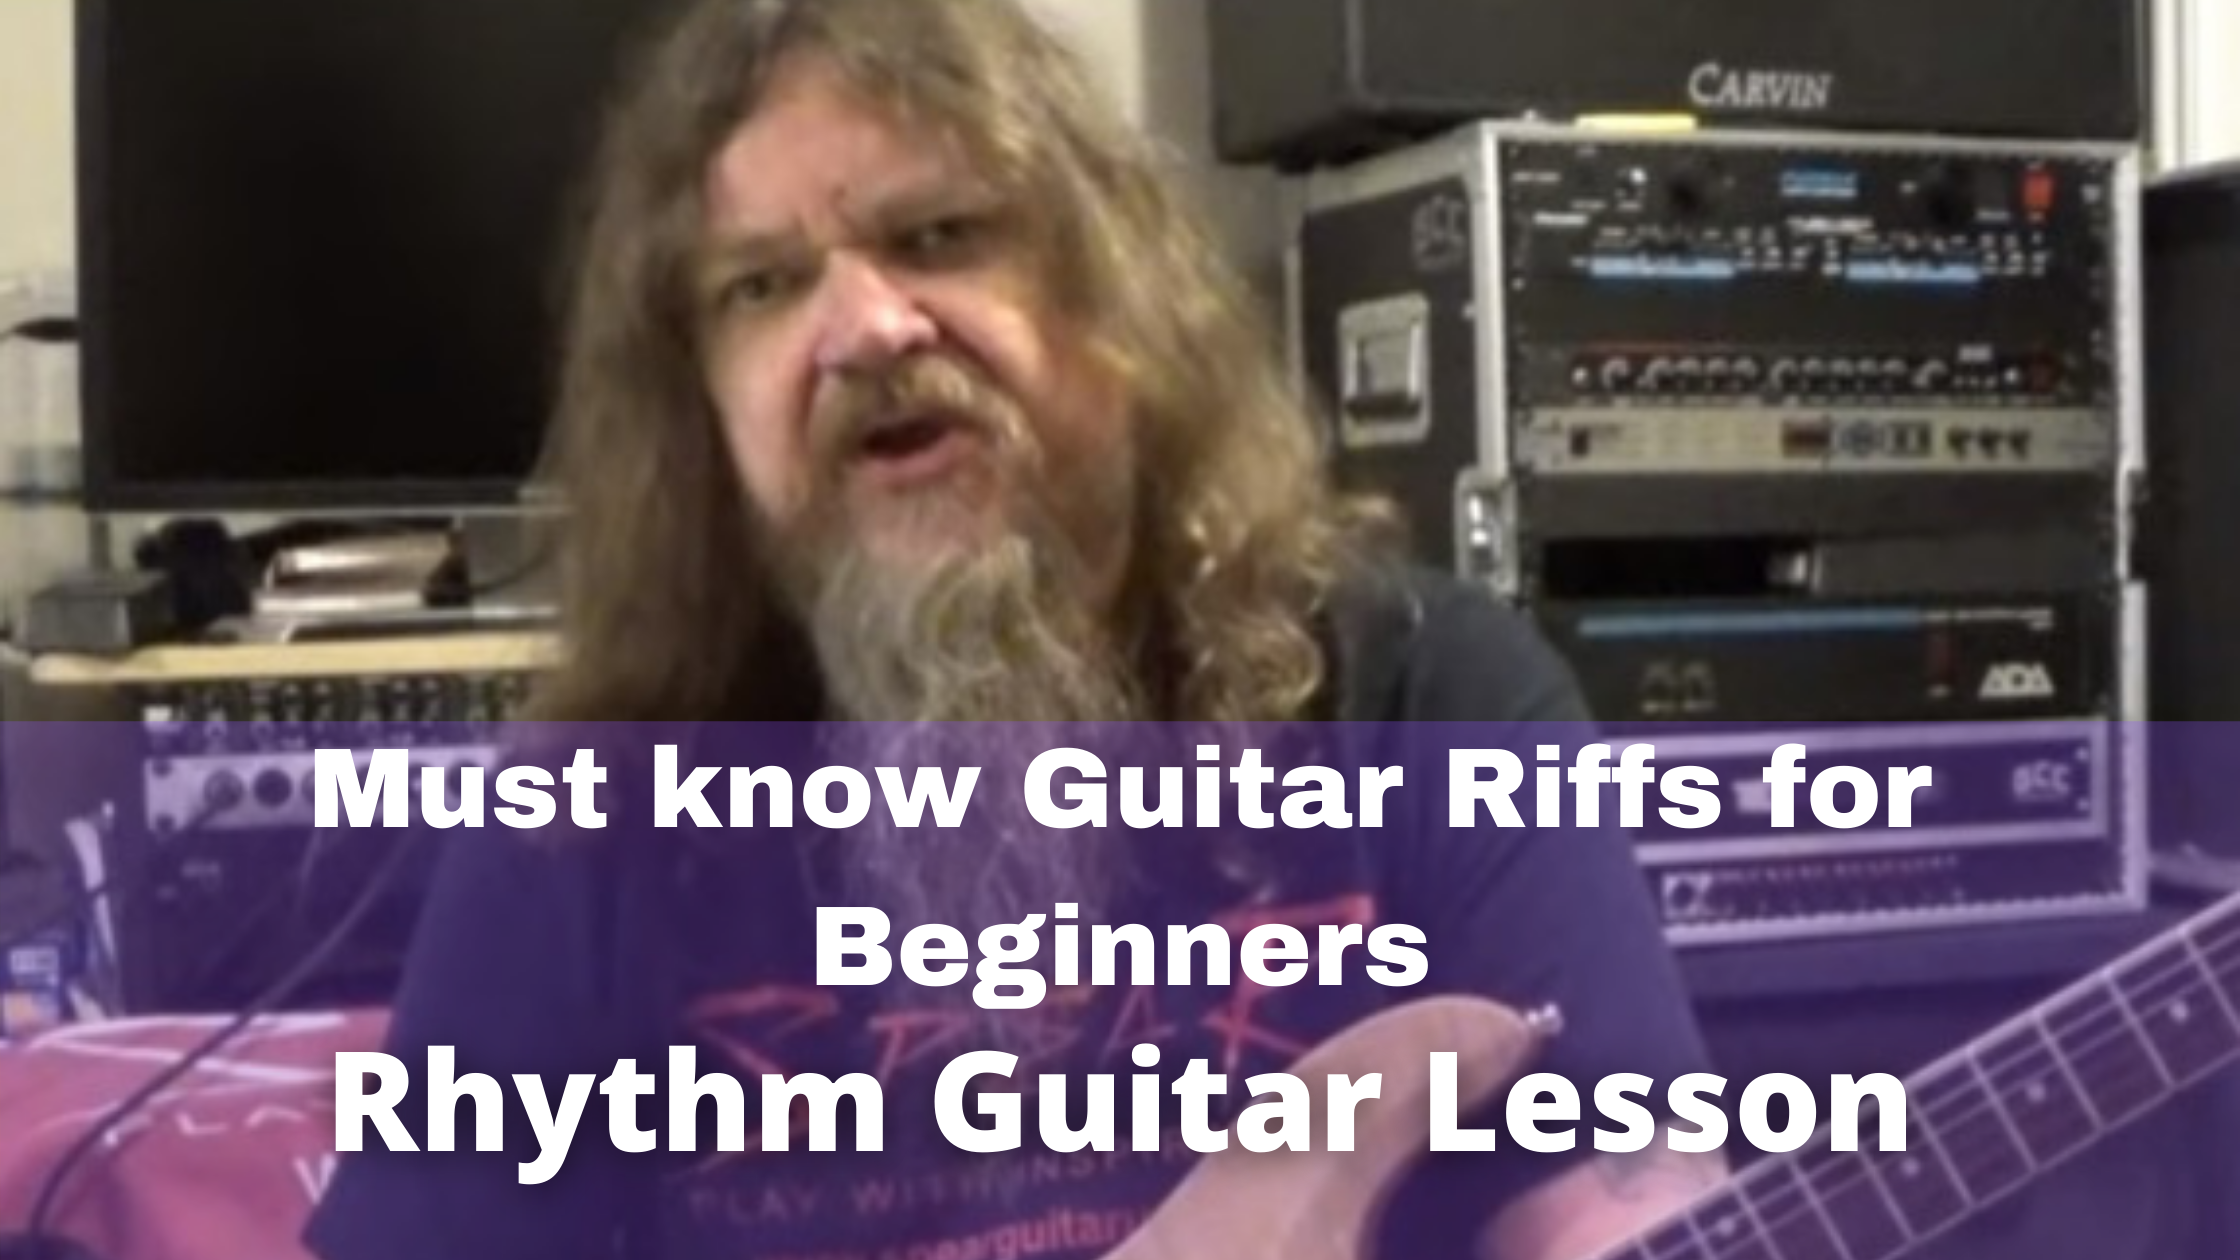
Easy Guitar Lesson on Easy Must Know Guitar Riffs For Beginners – Rhythm Guitar Lesson from Guitar Control instructor Darrin Goodman. These four Easy Must Know Guitar Riffs For Beginners will have you rockin‘ in record time to the classic riffs; Smoke On The Water, Whole Lotta Love, Crazy Train and Paranoid. So lets check out these Easy Must Know Guitar Riffs For Beginners.
[contentwall] 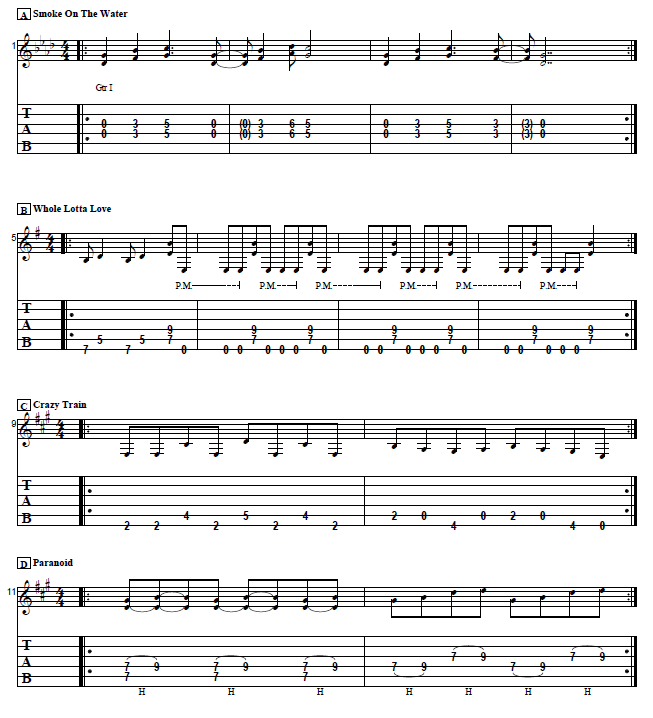 [/contentwall][ninja-popup ID=715]
Hey how’s it going? This is Darrin with GuitarControl.com bringing you this video lesson. Today I’ve got a lesson for all the beginners out there on some Easy Must Know Guitar Riffs For Beginners . These are ones that you’re gonna want to know how to play, they’re fun to play, everybody knows these and it’s just kind of a rite of passage for playing guitar to learn these riffs. So be sure to click on the link in the description for the tabs and let’s get close up and take a look at these Easy Must Know Guitar Riffs For Beginners.
All right so first Easy Must Know Guitar Riffs For Beginners we’re gonna look at Smoke On The Water. Now Smoke On The Water is everybody’s first cool riff that they learn and this is probably the most recognizable guitar riff of all time. But ironically it’s played incorrectly quite often so I’m going to show you how to play it. So this is just going to be played on the fourth and the third strings, so just these Center strings and you can you use a pick to do this, but it seems like they’re simultaneously playing the strings; so you could play it like that or just use two fingers, that’s what I do, I just hold my pick and then use my second and a third finger to play those two strings. So we start off by just playing both of these strings open and then it goes to the third fret on both strings… so we have open three and then five six… So that’s Smoke On The Water, the first Easy Must Know Guitar Riffs For Beginners.
The next Easy Must Know Guitar Riffs For Beginners we have Whole Lotta Love by Led Zeppelin, another iconic Easy Must Know Guitar Riffs For Beginners that’s fun and easy to play. So we start off Whole Lotta Love on the seventh fret of the sixth string with my third finger and we’re gonna go to the fifth fret of the fifth string with your first finger. So you do it twice just like that… and then from there you’re gonna take that first fingering and move it up a whole-step from the fifth fret to the seventh fret and then you’re gonna bring your third finger down onto the ninth fret of the fourth string; so this is an E5 power chord and you’re gonna pick those two strings and then you’re going to play the sixth string open three times. So we’re palm muting that so if you don’t know what palm muting is there’s plenty of videos on the channel about it, but all this kind of really quickly; so you just take this part of your hand and you rest it right on the bridge right where the string rests in the saddle and when you have it in the right place the note should slightly ring out, if you’re too far forward it’s just dead and if you’re too far back it’s not muted, so you just have to kind of find that sweet spot. Then after you do this three times you hit the power chord again, three muted power chords… just like that. Now another thing that I’m doing when I hit the power chord is I release the pressure with my fingers just enough so it becomes silent so that way it’s not ringing out; so each time before I strum I squeeze almost simultaneously… just like that. So that’s Whole Lotta Love, the second Easy Must Know Guitar Riffs For Beginners.
Alright the next Easy Must Know Guitar Riffs For Beginners we have another really iconic riff, this is the intro riff for Crazy Train, another one that everybody knows as soon as you play it, everybody knows exactly what it is and this is also good as a picking exercise because you can do this with all with alternate picking. So to start off this Easy Must Know Guitar Riffs For Beginners we’re on the second fret of the sixth string with your first finger and then have your third finger ready to be on the fourth fret of the fifth string. So we’re gonna play the sixth string twice and then to that fourth fret of the fifth string and then back to the second fret of the sixth string and it’s all eighth notes. So like I said this is a good picking exercise, you could do it with all down strokes, but I recommend that you do it with alternate picking. So we have that one G and now we’re gonna go to the fifth fret of this fifth string and you’re gonna want to use your fourth finger; now you could shift up and use your third finger, but I really recommend you use your pinky. Then back to the sixth string again, back to the fourth fret of the fifth string and back to the second fret of the sixth string again… so that’s the first measure. For the second measure of Crazy Train you’re going to take that first finger and you’re going to move it from the sixth string to the fifth string still at the second fret; so we’re second string open to the fourth fret of the sixth string and then to the fifth string open, second fret of the fifth string open and fourth fret of the sixth string to open. So the whole thing… and then it just repeats. So that’s Crazy Train, third Easy Must Know Guitar Riffs For Beginners.
And then the final Easy Must Know Guitar Riffs For Beginners we have the opening riff from Paranoid by Black Sabbath. You know Paranoid is one original metal riffs. So for Paranoid we’re gonna come all the way up to the seventh fret on the 5th string, but you’re going to barre your finger so you’re playing the fifth string and the fourth string at the seventh fret. Then you’re gonna strike those two strings together, but you’re going to do a hammer-on with your third finger to the ninth fret of the fourth string… just like that. So if doing a hammer-on is a new technique for you this might be a little bit more challenging; so you might want to just practice doing that. So when you do a hammer-on you literally hammer that finger down. You don’t want to just set it down, you want to hit it down hard enough that your fretting the note. So when you do this you want this fifth string still to be ringing out; so you do this three times… just like that, that’s the first measure of Paranoid. And then we follow that with this other riff that’s the fourth string seventh fret and then you hammer-on to the ninth fret and then you do the same thing on the third string and you do it twice. So technically you could just barre your first finger across the 5th, 4th and 3rd strings at the 7th fret… just like that. So that’s Paranoid, the fourth and last Easy Must Know Guitar Riffs For Beginners.
All right so I hope you enjoyed Easy Must Know Guitar Riffs For Beginners and you got something out of it. If you like this Easy Must Know Guitar Riffs For Beginners lesson give me a thumbs up and leave a comment down below if there’s something you’d like to see either myself or one of the other instructors at guitar control.com do in a future lesson. Well that’s all I have for you today, thanks for watching Easy Must Know Guitar Riffs For Beginners and have a great day.
 [/contentwall][ninja-popup ID=715]
Hey, how’s it going this is Sean Daniel with Guitar Control today we’re giving you an extra dose of happiness which everybody needs, learning a super simple song called “Don’t Worry be Happy” by Bobby McFerrin. An absolute crowd-pleaser it’s going to take you less than 10 minutes to learn this song.
[contentwall] [/contentwall]
Click on the Tabs button to follow the chords and tabs.
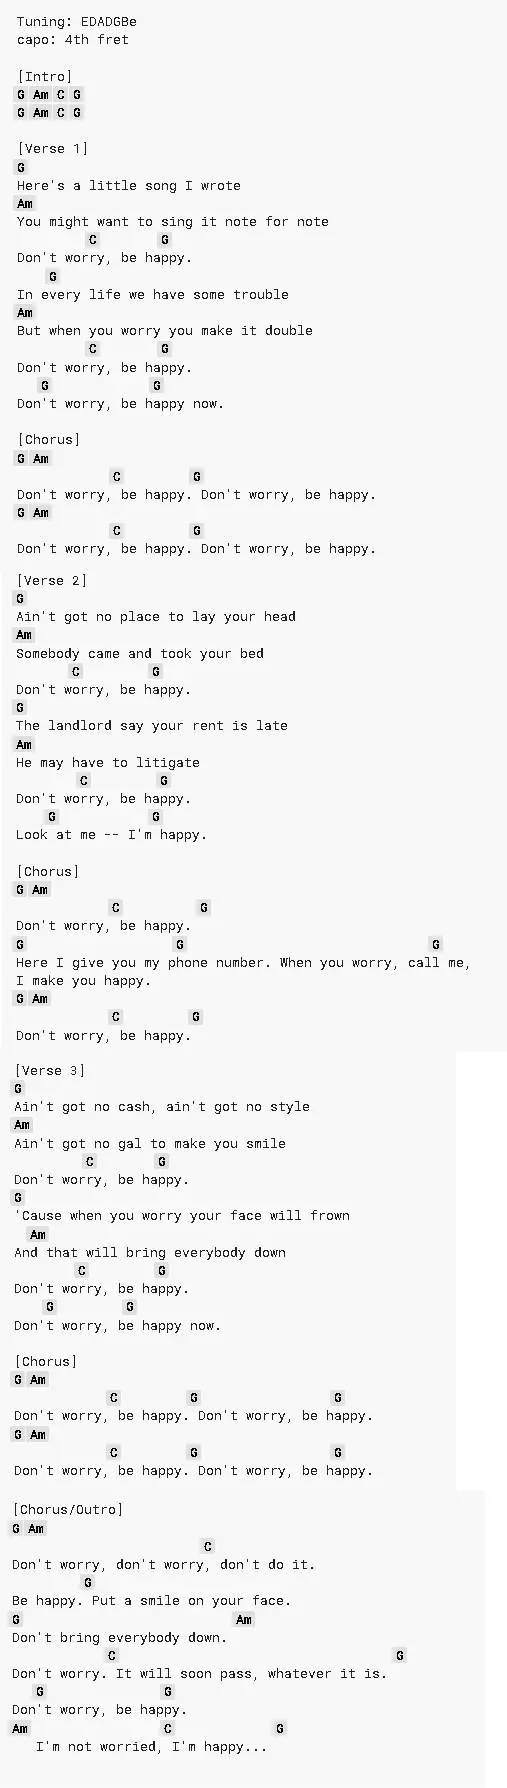
We’re going to play with a capo on the 4th fret, feel free to play it whatever key you want. But we’re just going to use three chords and the truth for 4 slots and G, A minor, C, and G, so the song is really easy to learn we’re going to talk a little bit about strumming it, to kind of give it that happy peppy step.
This works better if you sway back and forth, what I mean so you should know these chords right off the back three most popular chords in guitar history are you the G major chord metal finger on the 3rd fret relative to the capo low E-string, pointer finger 2nd fret on the A-string and then my ring finger and my pinky on the 3rd fret together. You need all three over or both of them or you could have just the high E- string but you know this is about being happy we’re getting all your fingers involve leaving no digit behind.
So let’s talk about how we’re going to strum this, first I think this is the happiest way you could possibly strum a chord especially when you’re really feeling it. What I mean in the root note 1st we’re going right from the lowest point of the chord, so we have the lower, high dynamic of life and happiness you can’t have the highs about the loads that’s the strumming pattern the root note and I’m aiming for just the top of the court when I say the top it’s the G, B and E-strings if I hit more of them great by hit Lots don’t worry about it I’m just separating the entire guitar chord into just the E-string the highest three strings so one, two, three, and four, end.
Now the three end of this four count this bar of G is going to be the lower three strings down and up just on the lower three strings and not all six right if you’re living like this that’s not happy that’s the sound of his sanity and you probably need to get your medication changed right so we have low high and lowest three strings down up and then on the for counter eating another down stroke of just the high strings again so low, high, low, low, high, and then if you want to get an upstroke at the end to that be a 1, 2, 3, and 4 count otherwise known in commoners terms as down, down, down, up, down, up, down, again so that’s going to be the vibe that we’re going to be use. We’re just going to do that with two other chords.
Next one is going to be A minor same strumming pattern but now the root note in an A minor chord where we have open a middle finger to D ring finger to G pulling your finger 1B and open on the high string the runo’s going to be the A-string, so we’re going to aim for the A-string we go if you hit the low E-string an accident it’s not a big deal okay don’t worry about it once again do I have to even say it for aiming that rude no because eventually you want to be able to just hit exactly which ever no string you’re looking for without having to look at it right so hey the hi ever the board same thing is before down up on the lower part of the chord down upon the higher part and C chord again a lot of people place you like this ring finger 3rd fret of the A-string middle finger 2nd fret of the D-string pointer for your 1st fret then our root note is on the A-string.
I like playing it like this where I have my ring finger one string lower my pinky right behind it rude note is still in the same spot but again we’re getting all the fingers involved if we’re just having a party throwing a happiness party back to Z so there’s only three chords but there’s four spots, four chords okay every chord gets its own barre G, A minor, C and G.
Now when you’re counting it you might only want to play that G once but again remember 8 counts on that G if you cycle it so again G, A minor C, G, back in G and again. Sometimes it’s helpful to have some kind of mechanism in place to start it again what I mean by that is like I’ll do an example so we have G, A minor to C major, D major. You may have noticed at the end of that last bar of G I just said all down strokes this C right 2, 3, 4, 0, 2, 3, 4, back to G and because I made that dynamic of his G, 2, 3, 4, the next time around when I hit the root note on the G it seems it doesn’t seem like I’m doing the same thing instead of just like one more gone not lost alright that’s not the sound of happiness that’s the sound of the slow inevitable march to death you don’t want to have that you want to have a little bit of action we’re only here for a short time people that’s why I did a great decision by choosing the guitar control video with Sean Daniel to watch for non-palm muting about palm-muting just like in life is your muffling your happiness because you don’t want to be all over board telling people how happy you are there’s nothing more annoying than that way I’m doing that taking the side of my hand judo chop the bridge and that’s nothing to get good at is just angering you see like if you look at my wrist right when I’m doing this I’m locked in to the bridge here I’m not okay a lot more control you can do anything you want by having your you know your wrist lock in you do anything all you need to do is get this action down right here okay so yeah and you can do it muted for maybe like the verse everything is so applying low high down up down up low high down I’m down am a minor and see how much more reserve that is it’s like business casual happiness back to G and then one of your get home take off your shoes make it nice bath open it up okay so the last thing I want to talk about is how we numbered this chord progression again this is on a capo this is in the key of you know wherever we’re ending here which is a G this isn’t actually a G no this is the third far relative to the capo but this note right here is actually a B so we’re doing this in the key of B if we were to move the capo one front lower you’re doing even b-flat another one a so on so forth right until we’d eventually get to doing it in the key of G like this that’s why Capo’s are great because they can to help us transpose songs depending on where you want to sing you don’t advocate both don’t worry we can transpose this because all of this is really common chord progression it’s what’s called a 1 a 1 for the 2 to the 2 chord 4 chord 1 1 2 4 1 okay I got this was from the notes in the key of G right since this is G a minor C we can label this and communicate with other musicians because communication is a great way to keep the happiness falling right in the key of G we have seven notes one two three four five six seven eight the first note is a G that’s why it’s the one chord any one of these notes can become a chord one chord to the two chord a necklace we my of two chord is almost always minor any key one two three four C is the fourth note G ABC the four chord of C major back to G so that’s a one two four one the sound of a pure happiness all right now you don’t have a capo you could do it with different chords all right let’s guy what’s a one two four one let’s say maybe that’s uh I want to do a little bit higher let’s do in the key of a I have to do is find out what a is right you know a there’s one two and a was too note after a B minor what’s four and A one two three four D back so that’s how you can easily transpose even if you don’t have a capable to find whatever one is easiest for you to sing it okay so again make sure you click that link below because we have the chords of it all the lyrics and you know what make up your own lyrics because no one will know the difference as long as it’s not too dark so thanks for sticking with us thanks checking out the guitar control channel.
Make sure you subscribe on our You Tube Channel and we’ll see you in our next video lessons, thanks for watching.
[ninja-popup ID=715]
– Click here to get Sean Daniel’s Secrets of Hendrix: DECODED – GO!!
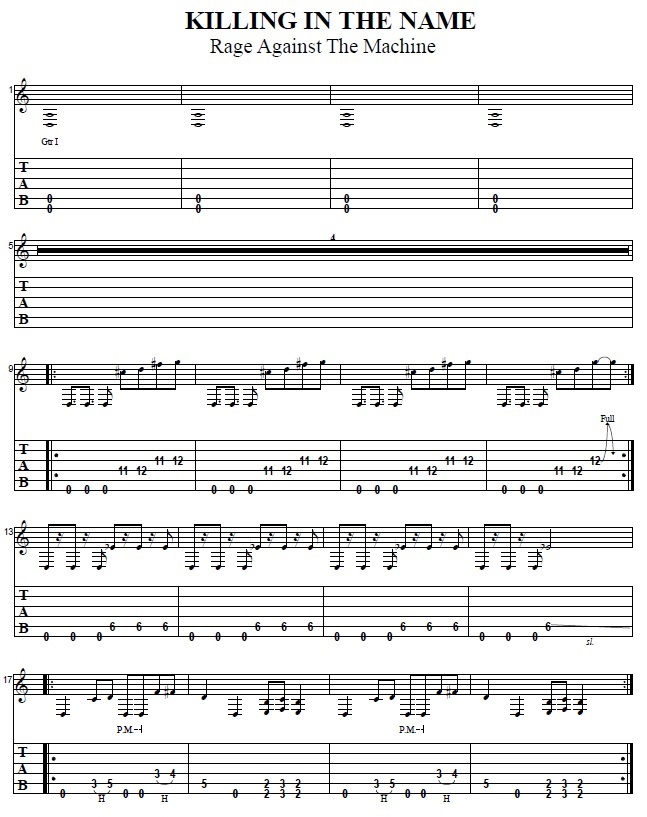
Check out this free Killer Riff From “Killing in The Name” By R.A.T.M. guitar lesson from Guitar Control instructor Darrin Goodman. Be sure to click on the link for the tabs so you can easily follow along with Killer Riff From “Killing in The Name” by Rage Against The Machine.
[contentwall] [/contentwall][ninja-popup ID=715]
Hey everybody how’s it goin? This is Darrin Goodman with GuitarControl.com bringing you this video lesson. Today I want to show you a Killer Riff From “Killing in The Name” by Rage Against The Machine. This guitar player is really interesting and weird things. Anyway this is just a fun drop D riff and I hope you enjoy it. Be sure to click on the link in the description for the tabs and let’s get up close and take a look at Killer Riff From “Killing in The Name”.
All right, so we’re not going to be going through this entire song, we’re basically gonna be working on the intro and then the one main riff. The Riff is in it is drop D so you’re gonna have to tune your sixth string from an E down to a D.
Alright so it starts off with just this D5, so just gonna be playing the six in the fifth strings open as whole notes so and then the guitar at this point actually rests for four measures and it’s just the bass and some percussion stuff. So after we do that rest then we go into this next riff that is just unusual, there’s a lot of notes that are kind of dissonant and stuff but I just really kind of like the way that it sounds.
So start off with just the six string open play that three times and then we go to the fourth string and I’m just using my first and second finger and we go eleven twelve and then to the third string eleven twelve; also that’s one measure and it does three measures of that… okay so after you do it three times then on the fourth measure it’s just slightly different and we go to the third string to 12 and we do a full step bend and release. So that whole four measures, which is repeated, so you do the whole sequence twice. All right, then that leads us to the next section, the next staff starting at measure 13 and this riff right here is actually what the bass is doing during that part where you rest for the four measures; so you can actually just play this part right there if you wanted to so you’re not just sitting there twiddling your thumbs for four measures.
Now with this again, we got this kind of dissonant thing going on here. So we’ve got the sixth string open and it’s an eighth note, but we rest on the & so it’s like one &, two &, three &, and then on the & of three we go to the 6th fret of the fifth string and we pick that note and then we have a rest, so that’s one measure and each measures is the same except for the fourth one. Then on the fourth one we just hit that 6th fret and we slide out of it and then from there it goes into the main riff, probably the most recognizable riff from the song, the one that if you play this people will probably recognize it, like I said it’s fun to play and this is like said just the intro, but they do play this riff during the verse as well.
So after you slide out of that 6th fret, then we’ve got 6th string open and then we go to the third fret of the fifth string and we’re gonna pick that into a hammer-on to the fifth fret and then the sixth string open twice again, but we’re gonna palm mute it, so then we go to the fourth string third fret with first finger and we’re gonna pick that and then do a hammer-on to the fourth fret with our second finger.
So the first measure and then from there we follow that with the fifth fret of the fifth string with your third finger and then the sixth string open again. Then I go to the second fret and we’re gonna bar our first fingers across the six and the fifth strings and we’re gonna go to the second fret. So you can pick that or you can slide it back and forth. What I like about riffs like this is it’s got a little bit of a swing to it, so it’s really fun to kind of mess around with that timing and the technique of what you’re doing and just make it sound kind of however you want.
So that’s the first two measures, measure 17 and 18 is the riff and then measures 19 and 20 is just the same thing and then it repeats, so you just end up doing this entire sequence like four times and that’s it for the whole intro and then from there it goes into the verse and like I said the verse is the same thing but, he just kind of palm mutes.
Alright so I hope you enjoyed Killer Riff From “Killing in The Name” and you got something out of it. If you liked the video give me a thumbs up and leave a comment down below if there’s something you’d like to see covered by myself or one of the other instructors at GuitarControl.com do in a future lesson. That’s all I’ve got for you today. Have a great day!